
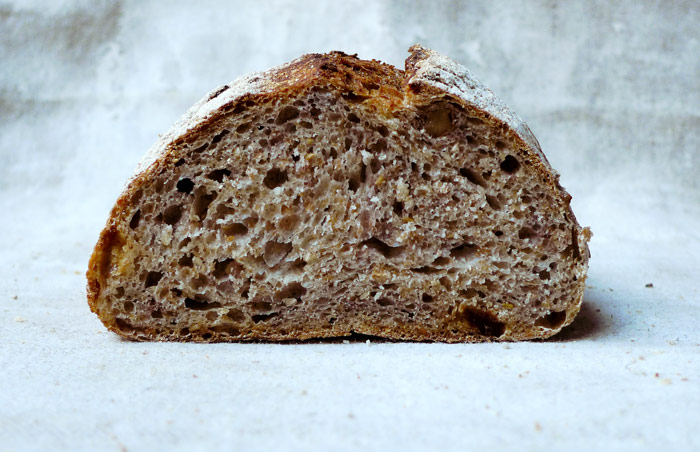
Hoy no traigo receta, sólo fotos. Un pan de centeno y trigo con pasas y nueces (al que yo añadí lino y sésamo), sólo masa madre y ya. Del libro Pan Casero de Ibán Yarza. Delicia de pan, delicia hacerle fotos.

Hoy no traigo receta, sólo fotos. Un pan de centeno y trigo con pasas y nueces (al que yo añadí lino y sésamo), sólo masa madre y ya. Del libro Pan Casero de Ibán Yarza. Delicia de pan, delicia hacerle fotos.
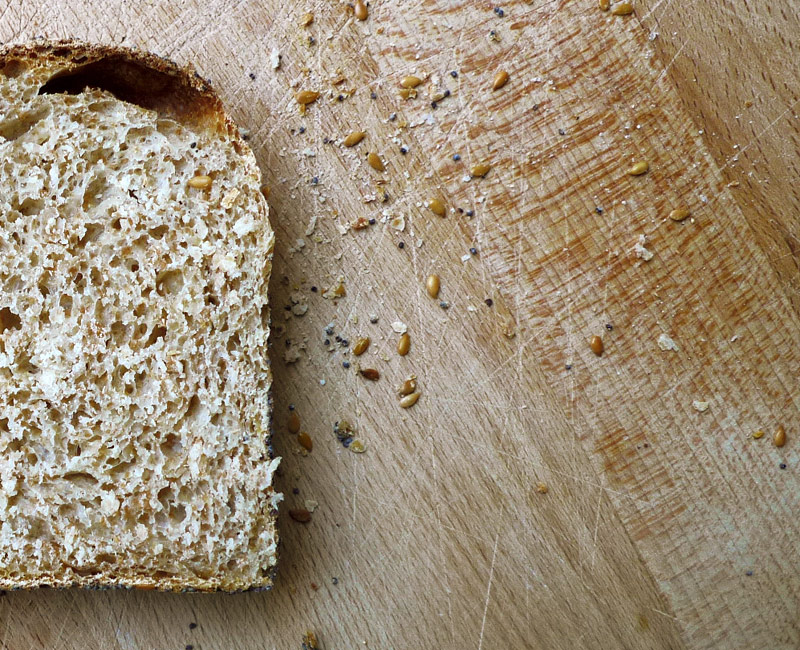
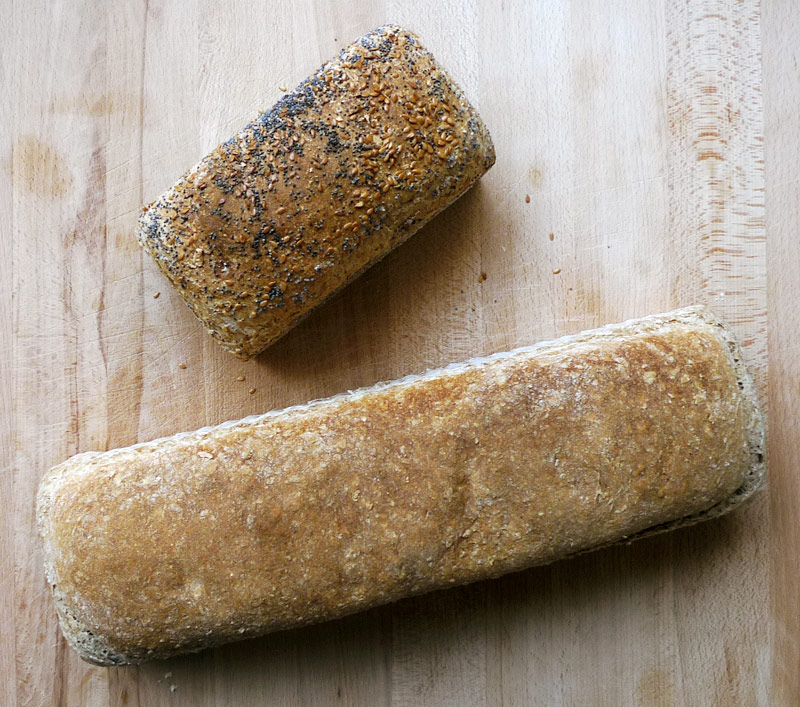
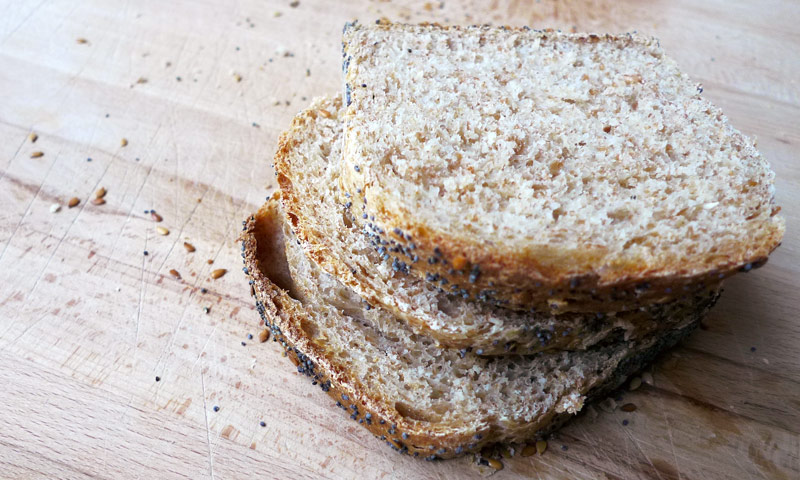

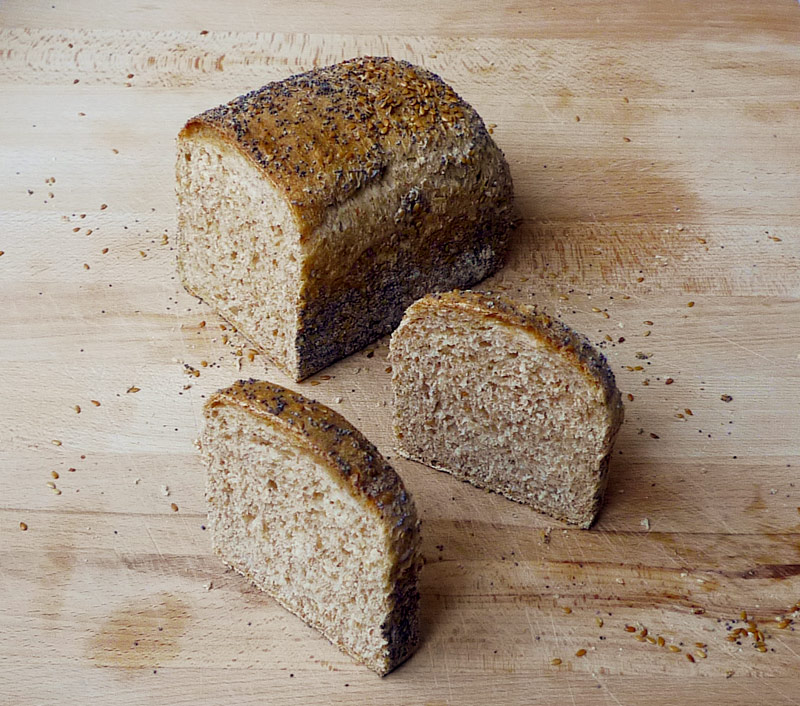
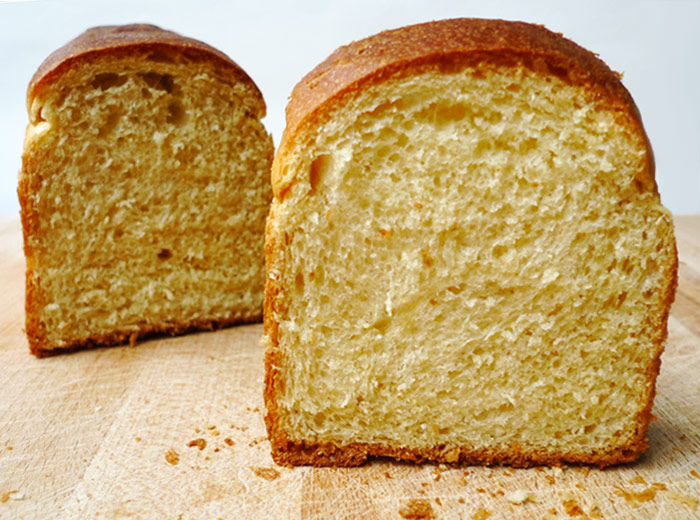
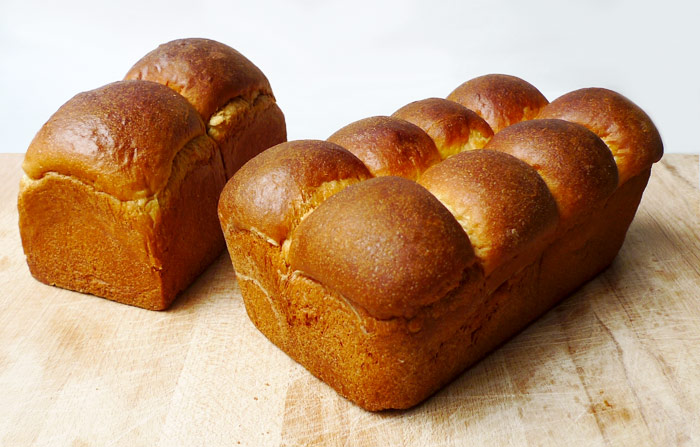
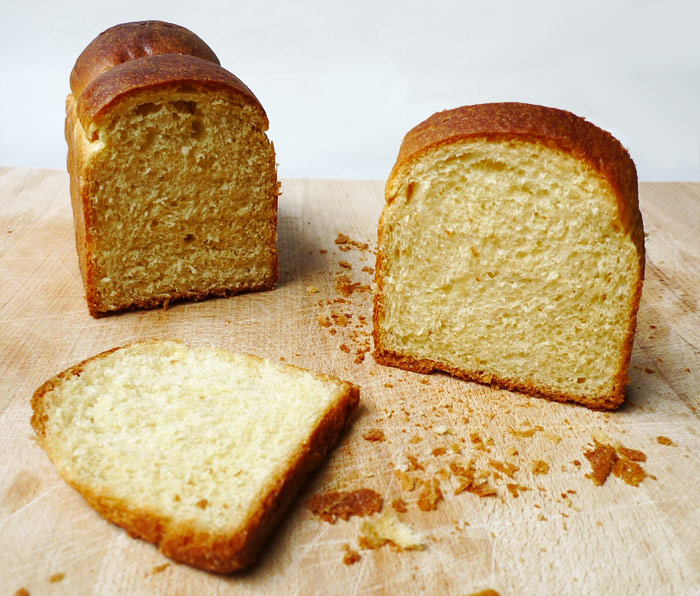
Hoy dejo unas fotos de los panes de molde de la semana. Del libro Handmade Loaf de Dan Lepard con algunas variaciones(más harina integral y algunas semillas en el pequeño) han dado unas buenas tostadas con dulce de leche esta semana!
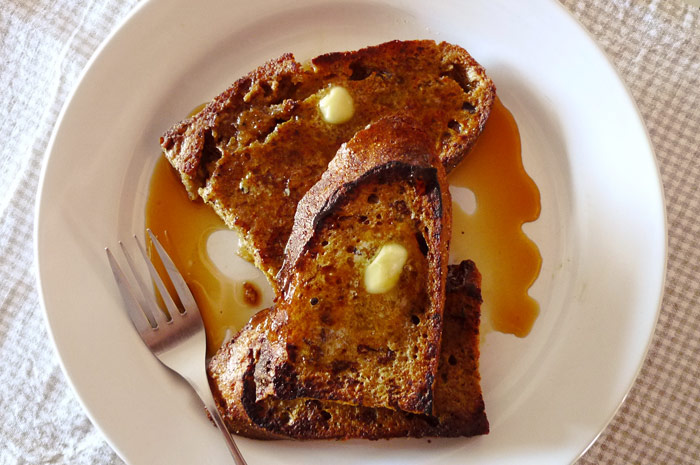

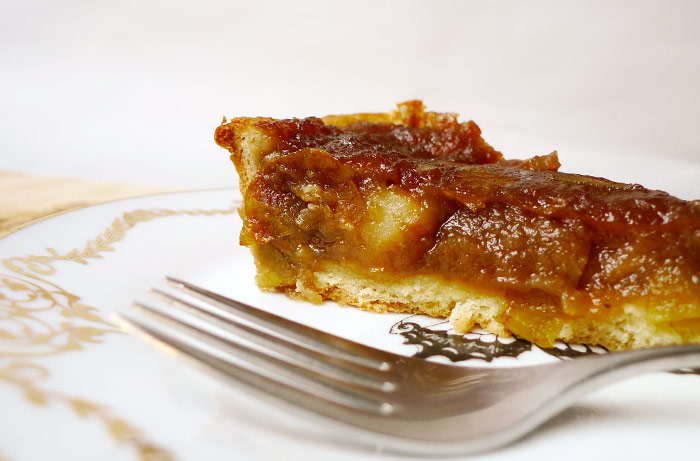
[tp lang=”es” only=”y”]La tostada francesa, pain perdu, prima de la torrija, ésa. Las recetas, que dan vueltas desde el siglo XV, han sido siempre una forma de reciclar el pan viejo, y yo, en este caso, utilicé el roca miche del curso de Hamelman. La miche u hogaza que hicimos de 1.5k, integral, maravillosa y de masa madre, se fue en parte al congelador (tenía exceso de pan en casa, si eso es posible) así que después de un par de días de descongelarla había que hacer algo con ella. Qué mejor para un pan francés que unas tostadas francesas ¿no?. Usar un pan como este, con ese carácter y ese sabor tan intenso, en una tostada francesa da un resultado diferente, no van a quedar igual que con un pan más suave y de trigo blanco ya que este pan es más duro, con más corteza y con una miga que se deshace menos. Pero el resultado ha sido glorioso, probadlo.[/tp]
[tp not_in=”es”]French toast, pain perdu, or torrijas. Recipes that have been spinning since the fifteenth century, they´ve always been a way to recycle old bread, in this case I used a miche from the Hamelman course. The miche or loaf we made was 1.5k, whole wheat, wonderful and all sourdough. It was partly in the freezer (I had too much bread at home, if that’s possible) so after a couple days of taking it out I had to do something with it. What could be a better end for a French bread than a French toast, right? Using this bread, with so much character and flavor in a French toast gives a bit of a different result. It´s not going to turn out the same than with a softer white wheat bread as this bread is harder, with more crust and a tough crumb. But I have to say the result was glorious, try it.[/tp]
[tp lang=”es” only=”y”]Ingredientes
En una bandeja de horno colocar el pan en rodajas. En un bowl batir el huevo y añadir la leche, la canela, y la nuez moscada. Mezclar bien. Echar esta mezcla en la bandeja sobre el pan. Tiene que haber suficiente líquido para que el pan quede bien mojado. Dejarlo reposar por un lado y pasados unos 10 minutos girarlo y que repose por el otro lado. Se tiene que empapar bien.
Calentar mantequilla en una sartén y freír las rodajas una a una para dorar bien ambos lados. Las sacamos y las reservamos. Las ponemos de nuevo en la bandeja de horno y las metemos al horno unos 10 minutos a 170ºC. Sacar y servir con un poco de mantequilla y sirope de arce (miel de maple). Listo, auguro un desayuno memorable.[/tp]
[tp not_in=”es”]Ingredients
[/tp]
[tp not_in=”es”]In a baking pan place the sliced bread. In a bowl beat the egg and add milk, cinnamon, and nutmeg. Mix. Pour this mixture over the bread tray. There should be enough liquid so that the bread is well soaked. Let stand on one side and after about 10 minutes turn it and let it sit on the other side. It has to get soggy.
Heat butter in a pan and fry the slices one by one to brown well on both sides. Take them out, put them back on the baking pan and put them in the oven for about 10 minutes at 170 º C. Remove and serve with a little butter and maple syrup. Voilà! I predict a memorable breakfast.[/tp]

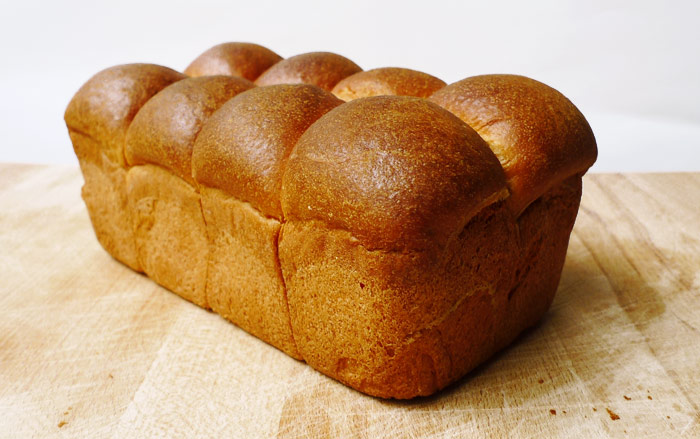

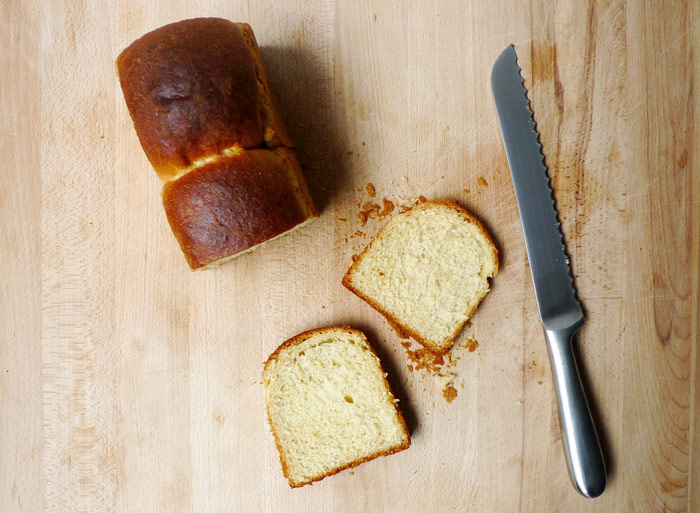
[tp lang=”es” only=”y”]Por fin! Ya que es san Valentin y esas cosas, a mi como que el Brioche me pega con el amor ¿no? Un pan de yemas, dulce, con mantequilla a más no poder (estos franceses) y absolutamente delicioso. No dura nada, las tostadas de brioche son elevar el desayuno a una categoría superior, esto es así. Estos son de las famosas masas rescatadas. Después de pasar la receta de Hamelman por la calculadora panarra ya que la receta es para 6.600kg y como que se nos hace un poco demasiado por muy bueno que esté, os dejo la receta adaptada para 500grs. de harina.[/tp]
[tp not_in=”es”]It´s St.Valentine´s day and for me Brioche is synonym of love, huh? A yolky bread, sweet, with more butter than you could handle to eat (these Frenchies) and absolutely delicious. It won´t last long, brioche toasts raise breakfasts to a higher category. These are the famous rescued doughs from my course. After passing the Hamelman recipe by a baker´s calculator (since the recipe is for 6.600kg and that may be a bit too much) I give you the recipe adapted to 500grs. of flour.[/tp]
[tp lang=”es” only=”y”]Ingredientes
*Total porcentaje 230.5%
Mezclar todos los ingredientes menos el azúcar y la mantequilla, Amasar hasta tener una masa más o menos lisa e ir añadiendo de a poquitos el azúcar y la mantequilla. Hay que amasar hasta que la masa esté lisa, manejable, bonita y no se nos pegue a la encimera (esto puede tardar un poco). Hay que mantener la mantequilla fría y un tip de Hamelman es tener todos los ingredientes fríos (de la nevera). No queremos que la mantequilla se caliente por que nos quedaría un brioche grasoso.
En su receta pone que la dejemos toda la noche en la nevera, en un bowl cubierta con un film. A la mañana siguiente la formamos. El formado del brioche realmente puede variar mucho. En este caso yo me fui a hacer bolitas, 6 bien apretadas y colocar una junto a otra en el molde previamente enmantequillado y enharinado. Dejar levar una o dos horas aprox. Lo pintamos con 1 huevo batido (yo me olvidé en este caso) y lo metemos al horno.El horno a 200ºC, entre 40 y 45 minutos, ir verificando, si se tuesta mucho por encima, que se tostará… ponerle un papel Albal para que termine de hacerse y no se queme.
Lo dicho, desayunar esto es algo de otro planeta! así que cual Maria Antonieta ¡Que coman brioche![/tp]
[tp not_in=”es”]Ingredients
[/tp]
[tp not_in=”es”]*Total percentage 230.5%
Mix every ingredient except the butter and the sugar, knead until you have a smooth nice dough and start adding the sugar and butter little by little. You have to work the dough until it´s nice, smooth and it won´t stick to your countertop (this may take a while). Try to keep the butter cold, Hamelman advises to try to keep all ingredients as cold as you can. You don´t want to get warm butter since you would get a greasy dough.
In his recipe here the dough goes to the fridge in a bowl covered with film and rests all night. Next morning take it out and shape it. You can shape brioche in a lot of ways here I did 6 tight balls and place them side by side in a previously buttered and floured mold. Let it rise for one or two hours. Take it out, paint it with some egg (beaten) and get it in the oven at about 200ºC between 40-45min. Check your oven. If it starts to toast too much on the top (and it will) place a foil paper on it and let it finish.
With that said having brioche for breakfast is an outer world experience, so as Marie Antoinette said, let them have brioche! [/tp]


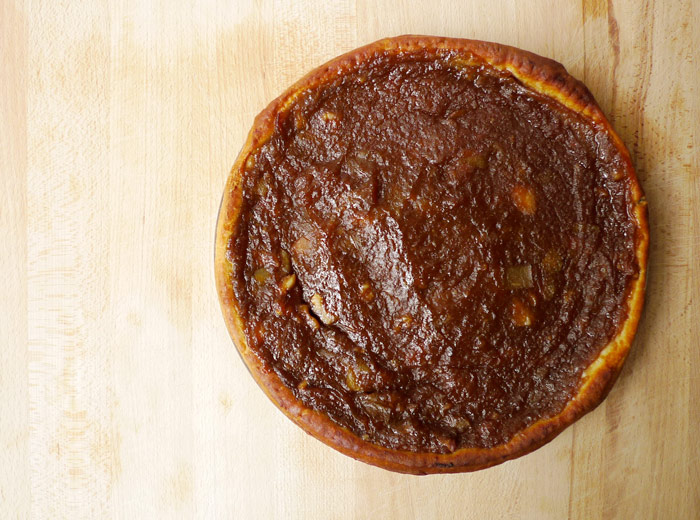
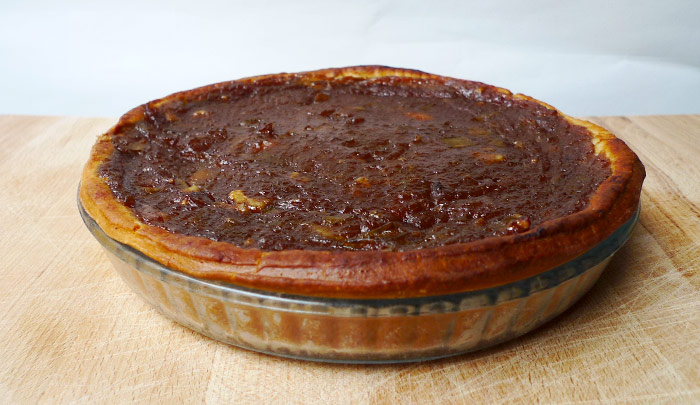
[tp lang=”es” only=”y”] Ya os había contado de la masa de Brioche del curso de Hamelman, ¿verdad? Pues eso, que rescaté un par de ellas que no hicimos por falta de tiempo para hornearlas e hice un par de Brioches deliciosos de los que hablaré más adelante. Hoy me centraré en la tarta. En el curso, Hamelman nos preparó una tarta de queso con masa de Brioche increíble. Así que como con dos Brioches había suficiente y quedaba masa, opté por hacer una tarta con ella, sólo que de manzana. Me ha encantado esto de usar la masa del Brioche para otras cosas y esta tarta (si tenemos la masa, claro) no puede ser más fácil. Técnicamente la podríamos hacer con cualquier tipo de masa de pie o pastel. Os cuento que fácil.[/tp]
[tp not_in=”es”]I already told you about the Brioche dough from the Hamelman course, did n´t I? So I rescued a couple of them that we did n´t do for lack of time to bake them and made a couple of delicious brioches which I will discuss later. Today I will focus on this tart. During the course, Hamelman cooked us a cheese tart with Brioche dough, it was amazing. So as two brioches were enough for me and I had come dough left, I decided to make a tart with it, only I used apples. I enjoyed using the Brioche dough for other things and this tart can not be easier. Technically we could do it with any kind of mass or cake stand.[/tp]
[tp lang=”es” only=”y”]Ingredientes
[/tp]
[tp not_in=”es”]Ingredients
[/tp]
[tp lang=”es” only=”y”] Realmente lo que vamos a hacer es una compota con trozos. Así que picamos las manzanas (las podéis pelar, a mi a veces me gusta dejar la piel y que sea más rústica) En éste caso, la dejé. Las picamos en cubos. A una cacerola, con el agua, el azúcar, la canela y la sal. A fuego bajito hasta que se deshaga todo bien. Pasamos la minipimer y licuamos un poco dejando algunos trozos y dejamos enfriar. Cogemos nuestra masa, la estiramos bien con un rodillo haciendo un circulo que sea más grande que el molde (unos 5cm por lo menos). Enmantequillamos con un pincel y enharinamos el molde (un poquito, que quede una capa muy finita) y colocamos la masa cuidando que llegue hasta el borde. La masa tiende a encogerse un poco, así que una vez colocada dejarla reposar un ratito y cuando se haya encogido, cortamos el sobrante de alrededor. Colocamos nuestra compota de manzana, ya fría, en el molde y al horno hasta que la masa esté dorada, unos 35 minutos a 180ºC. Hay que fijarse que esté bien cocida y que no se queme por encima. Si se empieza a tostar demasiado y aun no está hecha ponerle encima un papel albal (aluminio). Listo, dejarla enfriar e ir corriendo a comprar helado de vainilla![/tp]
[tp not_in=”es”]What we´ll do is a compote with chunks. So chop the apples (you can peel them, sometimes I like to leave the skin and make it more rustic) In this case I left them. So chop in cubes. In a saucepan, simmer with water, sugar, cinnamon and salt. At short heat until everything is well done. Give it a little blender and liquefy leaving some pieces chunky and let it cool. Take your dough, stretch it well with a roller making a circle that is larger than the mold (at least about 5cm). Butter it with a brush and add a bit of flour (a little in a very thin layer) place the dough until it reaches the edge. The dough tends to shrink a bit, so once placed allow it to stand for a while. When it has shrunk, cut the excess around. Put the applesauce in the mold and bake until the crust is golden, about 35 minutes at 180 º C. You have to look it’s well done and that it´s not burned above. If it starts to roast too much and it is not well cooked, put some foil over it and let it finish. Once ready let it cool and rush to buy some vanilla ice cream![/tp]

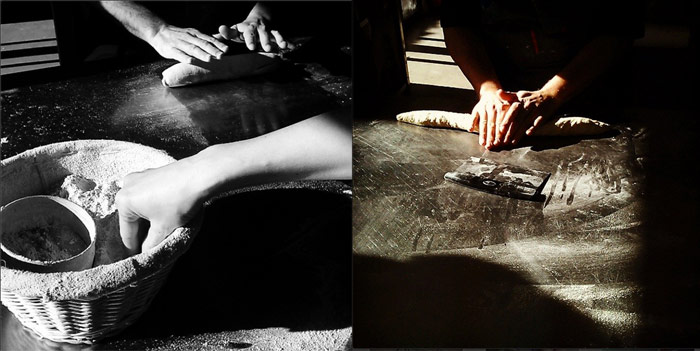
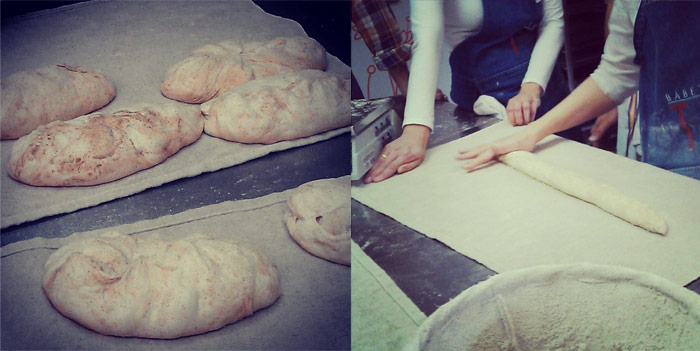 Este fin de semana no he cocinado. La razón es que me pasé todo en finde en La Escuela de Babette en un curso de baguettes. Fascinada con el mundo baguettino y gracias a Bea que es una profe genial pude sacar unas baguettes preciosas.
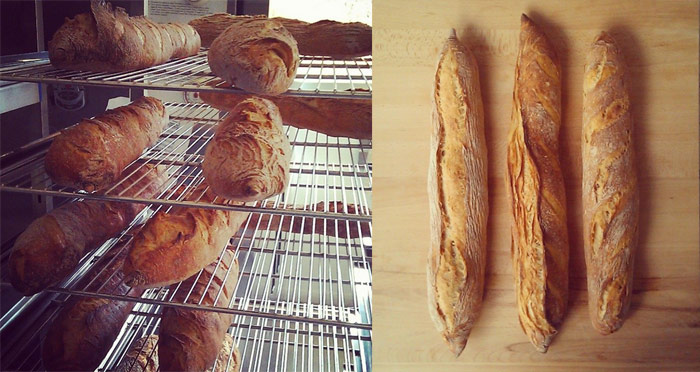
Hicimos baguettes de método directo, con poolish y de masa madre. Amasamos, formamos, greñamos, cortamos, esperamos y enharinamos todo.
Mi primera experiencia intentando hacer baguettes en casa había sido catastrófica, así que les tenía un poco de miedo, pero después de este curso allí que voy lanzada a intentarlo de nuevo. Un finde genial, 8 baguettes para casa y muchas ganas de probar a hacerlas sola… a ver que tal me salen!

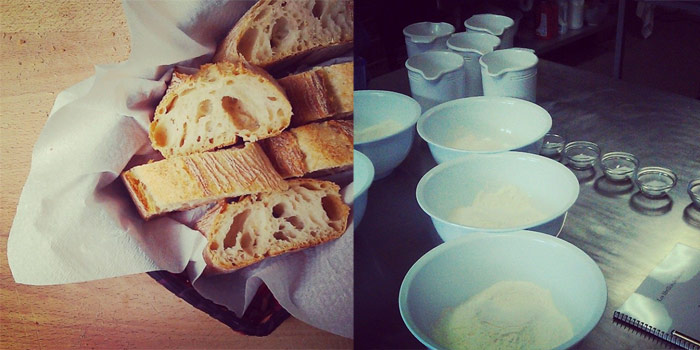
[tp lang=”es” only=”y”] Ya toca una de pan. He de reconocerlo, estoy obsesionada con el pan de Tartine… y como no. Nunca lo he visto en vivo, pero esas migas y esas cortezas me tienen enamorada. Así que como soy un poco cabezota he decidido que quiero hacer ese pan hasta que salga perfecto o lo mejor posible (dentro de mis posibilidades). Así que llevo luchando con él unas cuantas veces y creo que nos empezamos a hacer amigos. Este finde ha salido uno que me tiene más que contenta! No suelo poner recetas de panes porque es un tema más complicado y este blog es de cosas sencillas y fáciles pero, esta vez os copio la receta del libro y os cuento un poco como lo hice yo.[/tp]
[tp lang=”es” only=”y”]Esta es la receta del country loaf de trigo blanco. Es un pan sólo de masa madre por lo que que necesitaréis estar familiarizados con la masa madre y tenerla activa. La mía está alimentada con centeno integral.[/tp]
[tp not_in=”es”]It´s bread time. I have to admit, I’m obsessed with Tartine´s Bread. I haven´t tried it or seen it (besides the book I mean) but those crumbs and crusts keep me in love. So, since I am a bit stubborn I’ve decided I want to make this bread until it is perfect or at least the best I can. So I’ve been struggling with it a few times and I think we have started to become friends. This weekend I made one which has left me more than happy! I usually don´t put bread recipes here because it is a complicated issue and this blog is for simple and easy things, but… this time I copied the recipe from the book and I’ll tell you a little of how I did it.[/tp]
[tp not_in=”es”]This is the recipe for the white country loaf. It’s a sourdough bread just so you will need to be familiar with sourdough and have it active. Mine is fed with whole rye.[/tp]
[tp lang=”es” only=”y”]Ingredientes
Bueno más que una receta, os cuento lo que hice. Primero en un bowl muy grande mezclar la masa madre (primero que pase la prueba de la flotabilidad) con 700 grs. de agua a 26ºc La batí un poco para deshacerla y luego añadir las harinas que son en total 1k. Mezclamos bien y dejamos reposar unos 45 minutos. Pasado este tiempo añadir la sal y los 50grs. de agua restantes, mezclar muy bien y amasar un poco en el bowl. La tapamos con un trapo húmedo y la dejamos 30 minutos. He seguido el sistema del libro de ir plegando varias veces dentro del mismo bowl. Así que a los 30 minutos la plegamos sobre si misma, lo que suelo hacer es plegarla por uno de sus lados e irla rotando y plegando hasta hacer cuatro pliegues.
Así las primeras 2 horas:
pliegue- 30 min. descanso
Después de las 4 veces de pliegue-descanso de 30 minutos (en total 2 horas) pasamos a dejarla reposar una hora y luego otro pliegue y descanso de otra hora. En total el tiempo de plegados más o menos es de 4 horas. Aquí le puse un plástico por encima al bowl y la metí a la nevera a fermentar toda la noche,ya que la quería hornear al día siguiente.
Al día siguiente la saqué, la dejé un rato para que se atemperará y la dividí en dos. Las dos masas las plegue sobre si mismas y las dejé reposar unos 30 min. Formarlas en bola y cada una a su banetón a descansar, como a las dos horas las horneé. En la cocotte, como dice en el libro. Esta masa es muy húmeda y la he intentado hornear sin cocotte alguna vez y ha sido un desastre total así que me quedo con la cocotte para este pan, 25 minutos con tapa y unos 25 sin tapa hasta que tenga el color que queremos! Esta vez ha salido bastante bien (aunque no perfecto, esas greñas como que no) con lo cual de momento seguiremos practicando![/tp]
[tp not_in=”es”]Ingredients
Well more than a recipe, I´ll tell you what I did. First in a large bowl mix the sourdough (first pass the floating test) with 700 grs. of water at 80°F beat slightly to undo it and then add the flours which are a total of 1k. Mix well and let it stand about 45 minutes. After this time, add salt and 50g. of remaining water. Mix well and knead a little in the bowl. Then cover with a damp cloth and let stand for 30 minutes. I followed the book system of folding several times within the same bowl. So after 30 minutes, fold it over itself, what I do is fold by one side and then rotate it and fold again until you make four folds.
Thus the first 2 hours:
fold- 30 min. rest
After 4 series of “fold and 30 rest minutes” which sum 2 hours, let it sit an hour and then give it another fold and rest for another hour. In total the folding time is roughly 4 hours. Here I put a plastic cover on the bowl and stuck it into the fridge to ferment overnight since I wanted to bake the next day.
The next day I took it out, I left it for a while outside so it would temper and then divided it into two. I folded the two doughs on themselves and let them stand for 30 min. Then I formed them in a boule and put them in their baskets to rest for sort of two hours. Then I baked them in the Dutch oven as it says in the book. This dough is very wet and I´ve tried baking it without the dutch oven and it has been a total disaster. So for this bread I prefer to use it, 25 minutes with a lid and 25 without lid until you have the color you want! This time it turned out pretty well (although not perfect, the scorings are not so good) So I´ll just have to continue practicing![/tp]
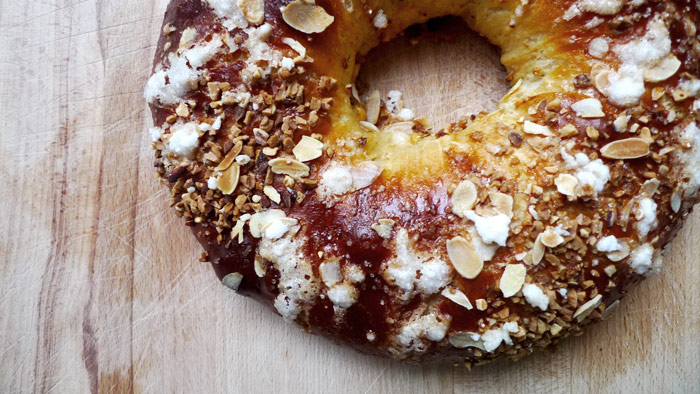

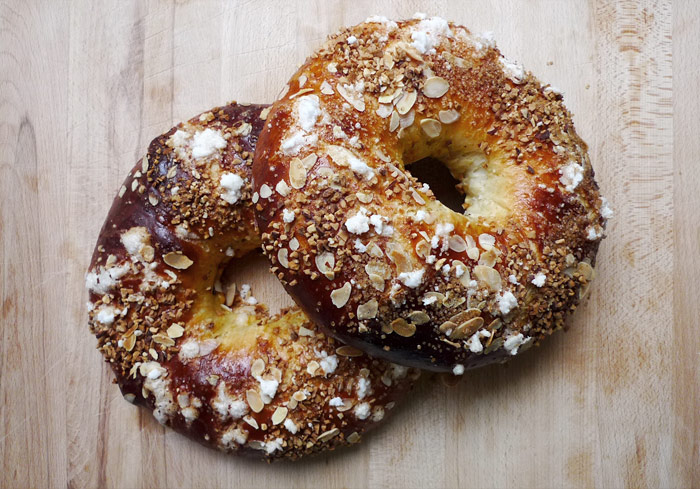
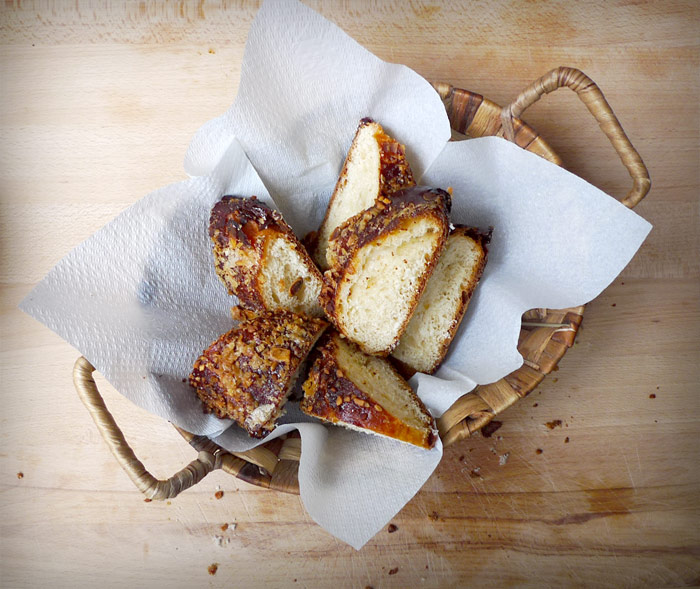
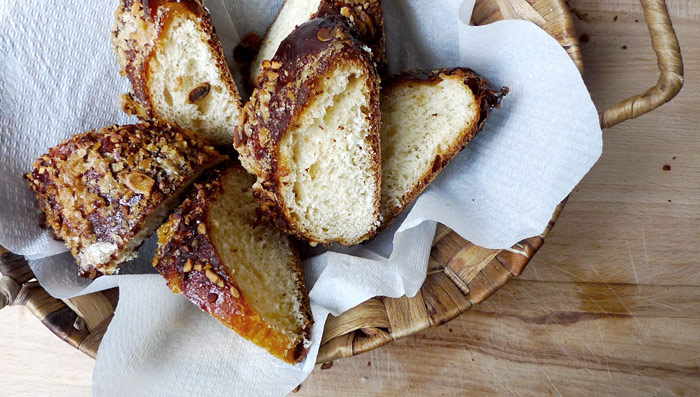
[tp lang=”es” only=”y”] Antes de que se me pasen las fechas en las que aun tendría sentido este post vamos con el roscón de reyes. El año pasado hice mi primer roscón y como salió bastante bien este año repetí. La receta es la misma, la de Madrid tiene miga sólo que yo le añado 7 grs. de levadura y alguna variación más he hecho este año. Me ha parecido menos trabajoso que el año pasado y después de la tortura fracasada de intentar hacer un Panettone de masa madre incluso se me ha hecho fácil! Aunque tiene su aquel. He de reconocer que este bollo navideño tardó mucho en conquistarme. De hecho no fue hasta que probé un roscón casero que mi pobre opinión sobre el roscón cambió. A partir de ese momento nos hicimos amigo, aunque con condiciones… no me gustan las frutas confitadas (para queja de mi chico) y no se las pongo, no me gusta que sepa demasiado a azahar y no me gustan rellenos. Aunque entiendo que para mucha gente sea un roscón demasiado “minimalista” como me dicen, para mi así está perfecto aunque bueno, algún día le pondremos frutas por darle gusto al novio.[/tp]
[tp lang=”es” only=”y”]La receta original de masa madre sin levadura esta aquí.
Os copio la que yo hice.
Ingredientes
[/tp]
[tp not_in=”es”]Before we pass the dates in which it makes sense to upload this post let´s go with the Roscón de reyes. For those out of Spain this is a traditional bread made in Christmas time, specifically for “Reyes” which is celebrated in Spain on the 6th of January. Last year I made my first roscón and it went pretty well so I repeated this year. The recipe is the same I used last year from the blog Madrid tiene miga (in spanish).
I added 7 grs. yeast and some variations to the one i’ve done this year. It felt less work than it did last year and after the failed attempt at a sourdough Panettone it even felt easy! Although it has it´s complications. I must admit that this Christmas bread has taken some time to conquer my heart. In fact, it was not until I tried a homemade roscón that my low opinion of it changed. From that moment on we´ve become friends, but with some conditions… I do not like candied fruit (it´s traditional to put some) so I don´t put it, I also do not like too much orange blossom water and I do not like fillers ( it´s also custom to put whipped cream in it) . Although I understand that for many people here my roscón is too “Minimalist” so they say, for me it’s just perfect like this.
Ingredients
[/tp]
[tp lang=”es” only=”y”]La masa madre
Estuve refrescando mi masa con harina de trigo blanco, usualmente la tengo de centeno integral así que la tuve un par de días a punta de trigo y en el último refresco la alimenté con agua y leche como pone en la receta.
Con la masa madre lista empezamos con el primer turno. En una cacerola mezclar el agua con la leche y hacer una infusión con la piel de naranja, la del limón y la canela. Yo la naranja y el limón los rallé bastante. Dejar que la leche hierva y bajar el fuego. Dejar que se enfríe y cuando esté tibio añadir al azahar y el ron.
Sacamos la canela y parte de la ralladura de limón y naranja. Separamos 90 grs. de la infusión y los mezclamos con la levadura, la masa madre y la harina. Mezclamos muy bien deshaciendo bien la levadura. La masa es bastante pegajosa… amasamos bien hasta que esté suave, la dejamos reposar un rato y le vamos añadiendo la mantequilla de a pocos. Seguimos amasando (un buen rato) hasta que tengamos una masa lisa, suave y que no se nos pegue demasiado a la encimera.
Aquí unté un bowl grande con un poco de mantequilla y la puse a fermentar media hora fuera y luego toda la noche en la nevera. Al día siguiente por la mañana había casi duplicado su volumen.
Dejarla fuera un rato para que se atempere. Luego dividirla en dos formar dos bolas y dejarla reposar otro rato. Formar las roscas rompiendo el centro con los dedos enharinados y estirando la masa hasta darle la forma de anillo. Ponerlas sobre un papel de hornear y poner un vaso untado con un poco de mantequilla en el centro para que no se cierre el agujero.
Lo pintamos con los huevos batidos y lo dejamos fermentando hasta que vuelva a doblar el volumen. Como hace frío los dejé fermentando dentro de mi horno con una jarra de agua caliente para mantenerlos a una temperatura de unos 24-26 grados. Cuando hayan crecido los pintamos otra vez con huevo y le ponemos las almendras y el azúcar mojada (mezclar azúcar blanca con un poquito de agua para hacer esas bolitas que tiene por encima) y listo, al horno 200-220ºC unos 25min.
Tiene su complicación pero se puede hacer y sale bastante bien! Id revisando el horno para que no se queme por arriba y si veis que se tuesta demasiado ponerle un papel aluminio por encima el ultimo rato de horno.[/tp]
[tp not_in=”es”]With our sourdough started and ready to go let´s begin. In a saucepan mix milk with water and make a tea with the orange peel, the lemon and cinnamon. I grated thinly the orange and the lemon. Allow the milk boil and reduce heat. Allow to cool and when warm add the orange blossom water and the rum.
take out the cinnamon and some of the lemon and orange zest. Separate 90 grs. from your infusion and mix with the yeast, the sourdough and the flour. Mix very well for undoing the yeast. The dough is quite sticky… knead well until smooth, let rest for a while and start adding the butter little by little. Continue kneading (quite a while) until you have a smooth dough, smooth and that we is not sticking too much to the counter top.[/tp]
[tp not_in=”es”]Get a large bowl and smear with a little butter. Put the dough inside to begin fermentation after half an hour outside set overnight in the fridge. The next morning it should have doubled its volume.
Leave it outside for a while to warm up. Then divide it into two and form two balls, let it rest for another 10min. Form the rings breaking the center with floured fingers and stretching the dough into the shape of a ring. Put them on a baking paper and place a glass smeared with a little butter in the center so that the hole does not close.
Paint it with the beaten eggs and let it ferment until it doubles the volume again. As it is cold I had it fermenting inside my oven with a jug of hot water to keep them at a temperature of about 24-26 degrees. When they have grown again, paint them with egg for the second time and put the almonds and sugar on top (mix white sugar with a little water to make those sugar balls) Ready, get it to the oven at 200-220ºC about 25min.
It has its complications, but it does pretty well! Check the oven to prevent the top from burning and if you see that it´s getting too toasted put a foil over for the last minutes of cooking.[/tp]
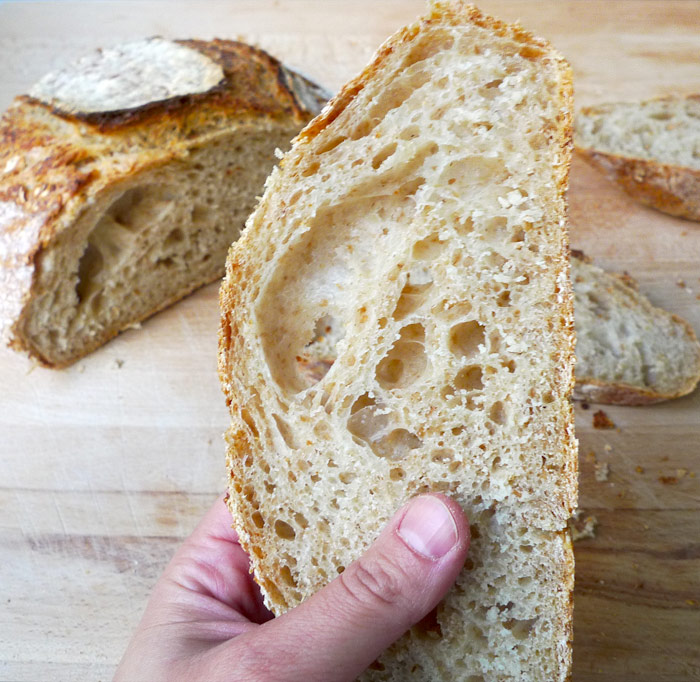
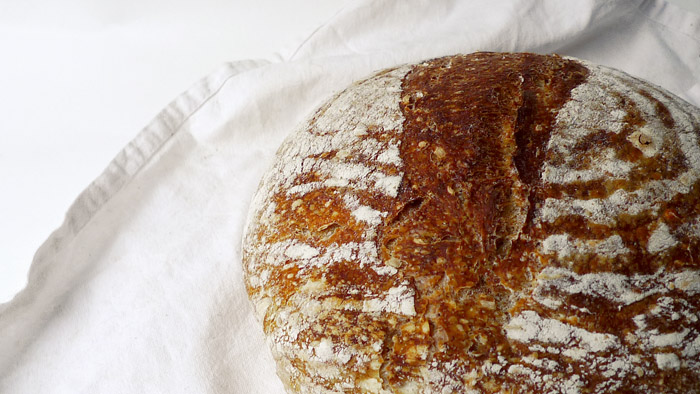
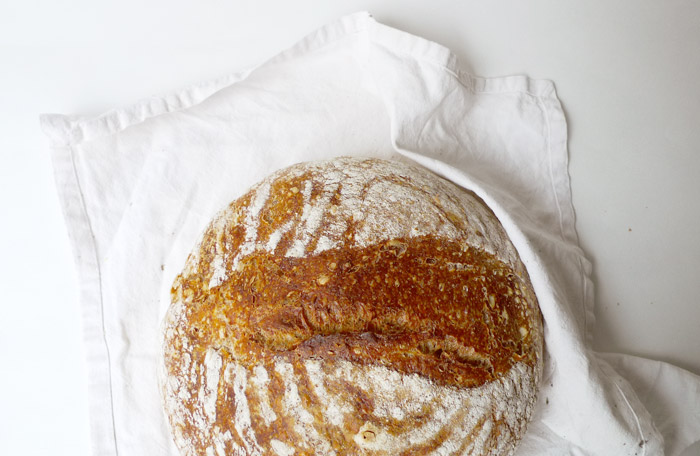
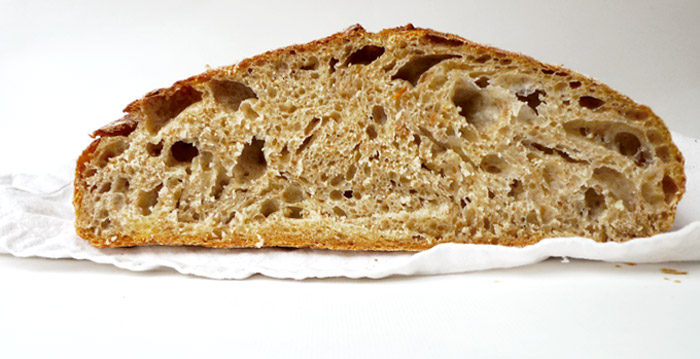
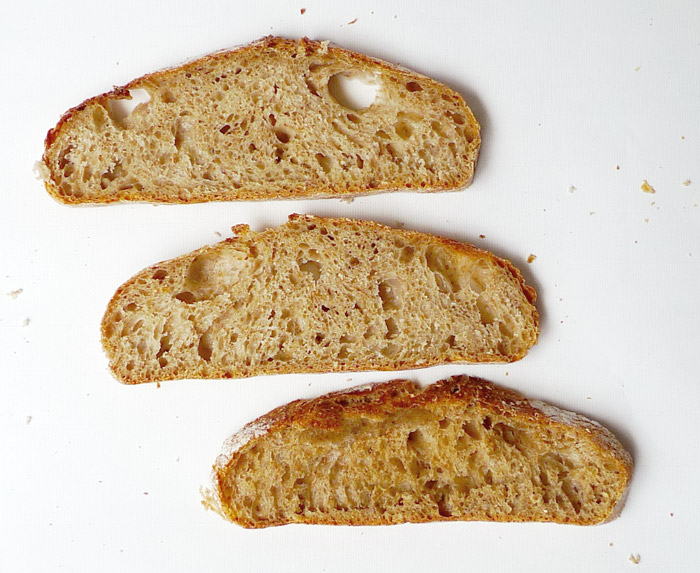
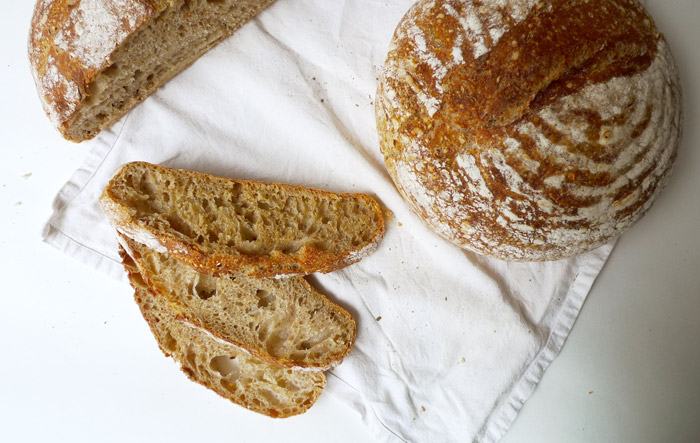
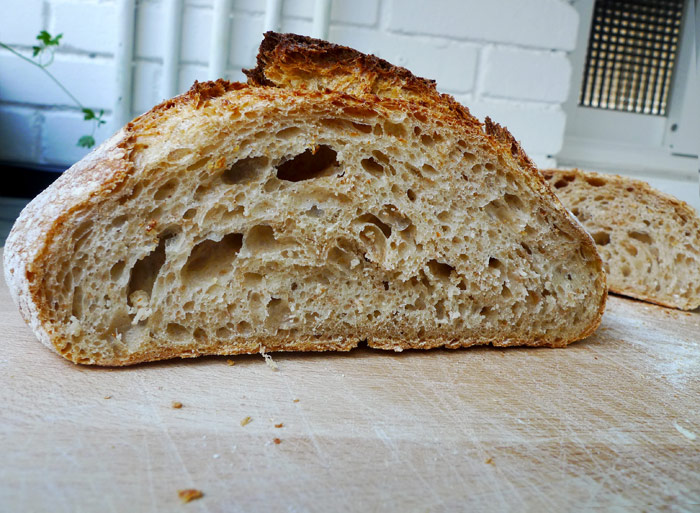
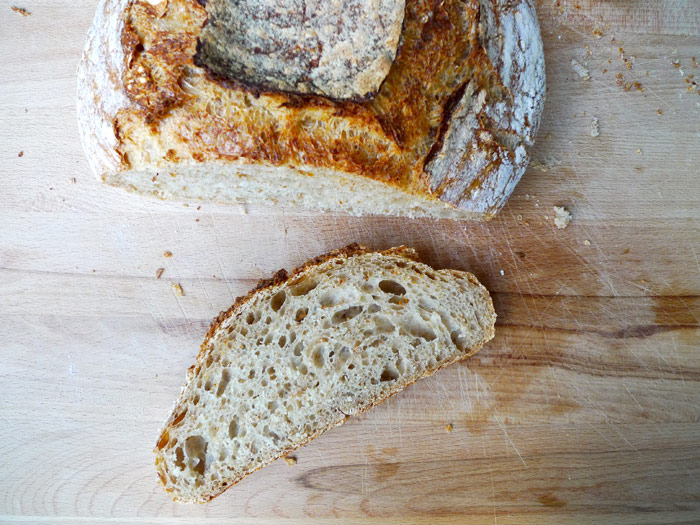
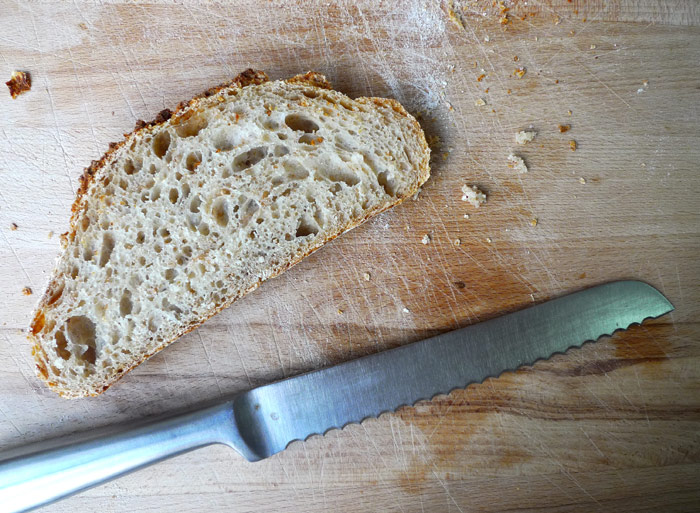
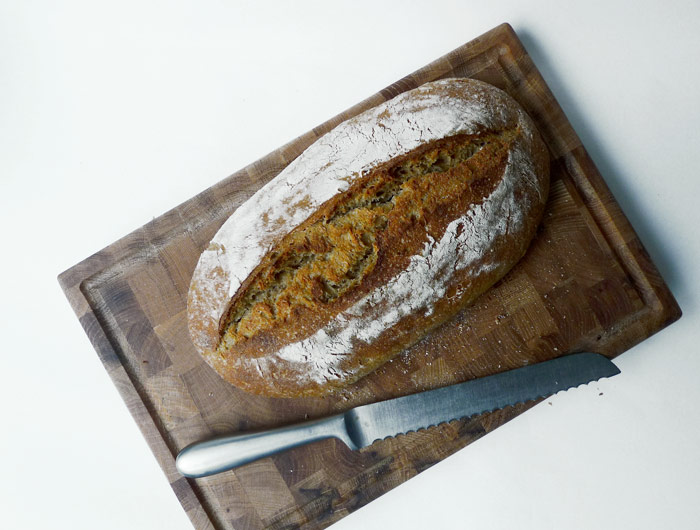
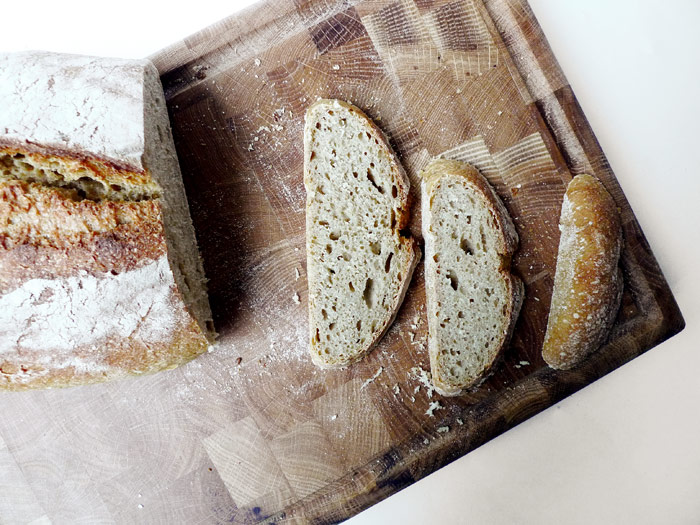
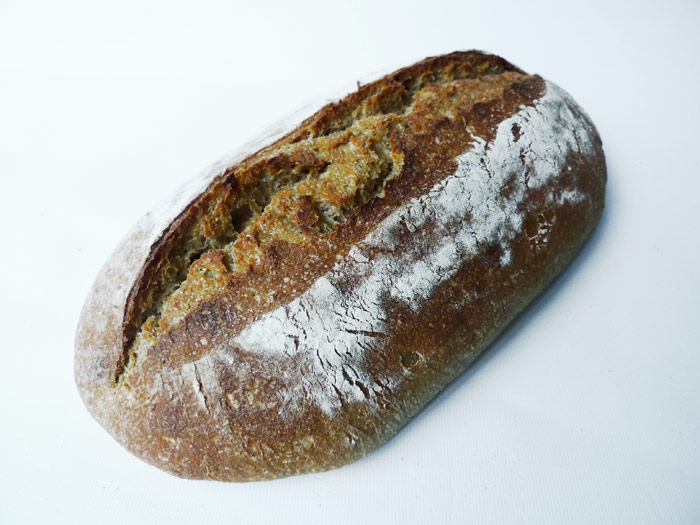
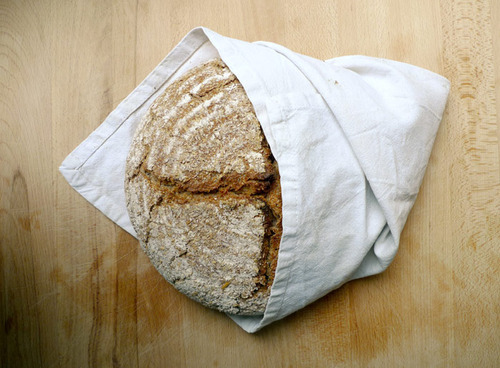
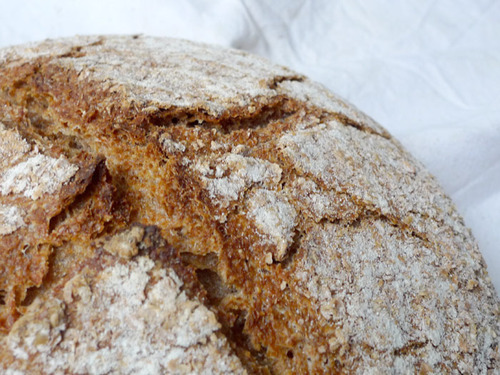
 El fin de semana decidí ser aplicada y seguir al pie de la letra la receta del pan de tartine. He de confesar que la mayoría de las veces tengo toda la buena intención de seguir las instrucciones y al poco me doy cuenta que he cerrado el libro y estoy haciendo cualquier otra cosa que se me haya ocurrido, esto es así. Pero bueno, esta vez decidí ser consecuente y el resultado me ha dejado muy contenta, me gustan mucho mis experimentos pero he de reconocer que está muy bien seguir las instrucciones de vez en cuando. Un pan de trigo blanco, horneado en la cocotte, sólo con masa madre de centeno y que me tiene más que contenta. Aquí os dejo las fotos.

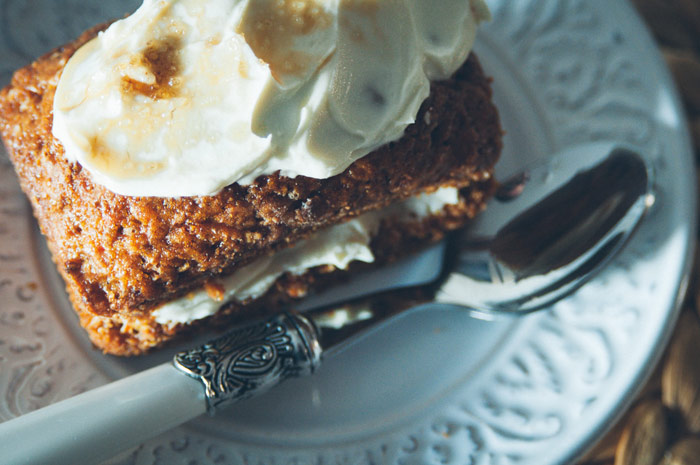
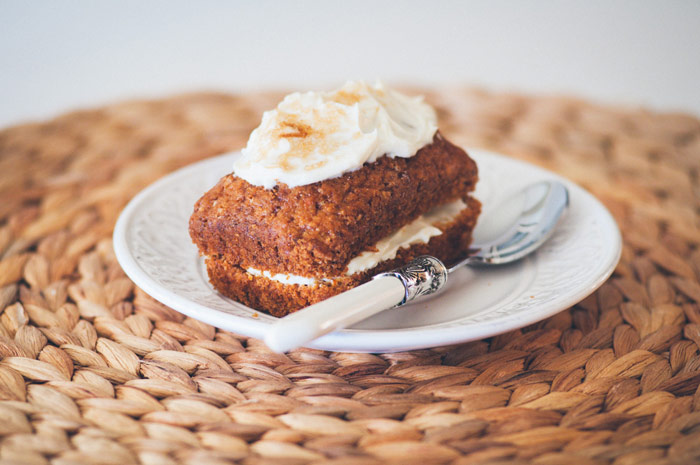

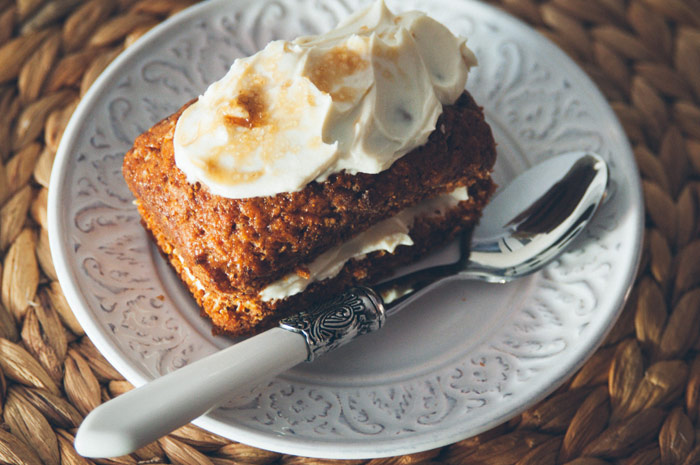
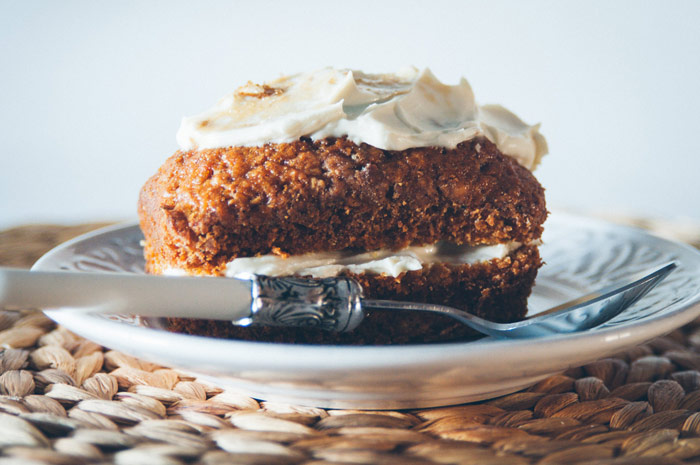
[tp lang=”es” only=”y”]El otro día me preguntaron si se podía hacer mi receta de bizcocho con zanahoria, la verdad es que no lo había probado así que no lo tenía claro pero a partir de allí decidí investigar y la respuesta es que sí. Este no es un carrot cake como tal pero se le parece mucho, podríamos llamarlo carrot cake de palo y es que el carrot cake me encanta pero uff… mantequilla a tope, azúcar a más no poder y esta chica tiene el colesterol bastante alto de por si. Así que esta es una versión para comer sin remordimientos.
Ingredientes
Frosting
Opté por hacerlos en versión mini por que no los quería todos con frosting con lo cual no hice una cantidad de frosting demasiado grande, lo justo para ponerlo a unos cuantos y el resto conservarlos fuera de la nevera y comerlos de desayuno en plan muffin. Pero eso dependerá de cada uno, a mi de desayuno no me apetecen con tanta historia. Así que vamos con la receta.
En un bowl grande mezclamos la harina con el polvo de hornear y el bicarbonato.Separar las claras de las yemas y colocar las yemas en otro bowl junto con el azúcar, el yogur, la vainilla, el clavo, la canela, la nuez moscada y la sal. En otro bowl con la batidora llevamos las claras a punto de nieve y las reservamos. Ahora mezclamos lo del bowl de las yemas y el azúcar con las zanahorias, las pasas y las nueces, añadimos el aceite y mezclamos bien. Añadimos las claras batidas poco a poco. Mezclamos todo bien.
Calentamos nuestro horno a 170ºC. Enharinamos y enmantequillamos el molde o los moldes según lo vayamos a hacer, lo podríamos hacer perfectamente en un molde largo tipo bizcocho o en pequeñitos como he hecho aquí. Añadimos la masa y al horno. Si es un molde grande aprox. unos 50 min si son pequeños tardarán como mucho 20 hay que ir revisando.
El frosting que hice es simplemente batir el queso con la mantequilla añadirle un chorrito de vainilla y azúcar glass al gusto… los montamos y listo, un perfecto placebo de carrot cake que no deja de estar muy bueno!
Estas fotos tan bonitas son gracias a una mini sesión hecha con NSEfotografía![/tp]
[tp not_in=”es”]The other day someone asked if they could make my basic cake recipe with carrots, the truth is that I had not tried it, so I was not sure, therefore I decided to investigate it myself and the answer is yes! This is not a real carrot cake but it´s a pretty good substitution we could call it a fake carrot cake, and don´t get me wrong I love carrot cake but uff… A whole load of butter and tons of sugar and this girl has a quite high cholesterol as it is. So this is a healthier version to eat without remorse.
Ingredients
Frosting
I decided to make them in mini versions because I did n´t want to have them all with frosting which is why I did n´t make a very large amount of it, just enough to put on a few and keep the rest of them out of the fridge and have them as breakfast in a sort of muffin way. But that depends on our preferences, for me as breakfast buns they work ok without frosting. So here we go with the recipe.
In a large bowl mix the flour with the baking powder and the baking soda.Separate the whites from the yolks and place yolks in another bowl along with the sugar, yoghurt, vanilla, cloves, cinnamon, nutmeg and salt. In another bowl (with our mixer) we mix whites until stiff and save them for later. Now we mix the bowl with the yolks and sugar with the carrots, raisins and walnuts we add the oil and mix it up well. Add the egg whites gradually and mix well until smooth.
We heat our oven to 338 ºf. Butter and flour your chosen molds. We could do it in a loaf cake mold or in tiny molds as I did here. Add the dough and get them in the oven. If the mold is large, it will take approx. about 50 min, if you use the small ones they will take tops 20 min but check them from time to time.
For the frosting I just beat the cheese and butter and added a dash of vanilla and powdered sugar to taste. Assemble them and they are ready, a quite good placebo carrot cake!
These beautiful pictures are the result of a mini session made with NSEfotografía![/tp]
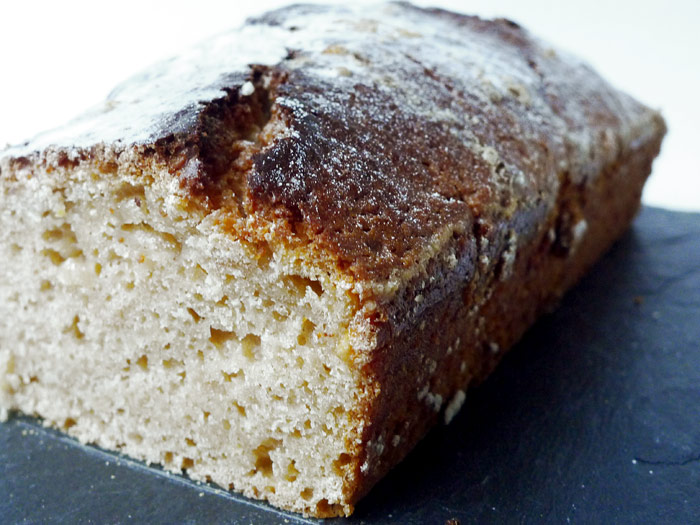
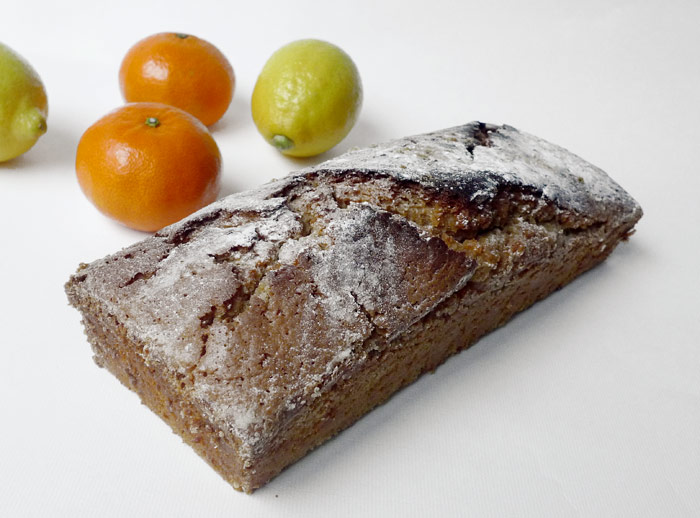

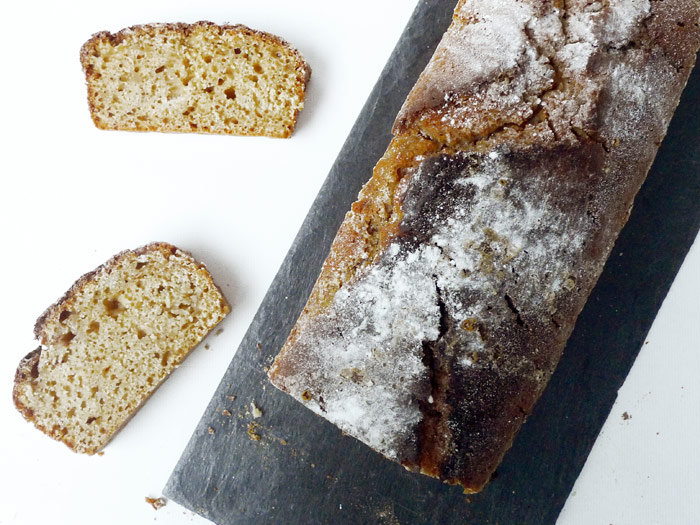
[tp lang=”es” only=”y”] Como nos gustan los bizcochos… En casa somos muy de bizcocho. Yo los amo y mi chico más, así que suelo tener petición de bizcocho casi todos los fines de semana. No pongo receta por que es la misma que en este post Una historia de amor… Con una pequeña variación, esta vez no lleva semillas de amapola y lleva ralladura de limón y mandarina, un poquito de azúcar en polvo por encima y voilà! Es que con una buena receta base se pueden hacer tantas variaciones e inventos![/tp]
[tp not_in=”es”]We love cakes… At home we are a couple of cake lovers. I love them and my boy more than me so I usually have cake request every weekend. I am not putting a recipe because it is the same as in this post A love story… With a small change, this time it does not have poppy seeds and instead it has lemon and tangerine zest, a little powdered sugar on top and voilà! With a good basic recipe you can make soooo many variations and inventions![/tp]
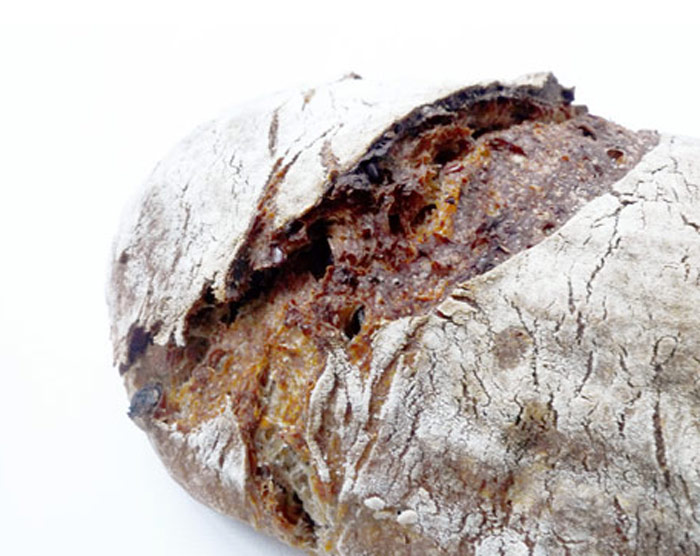
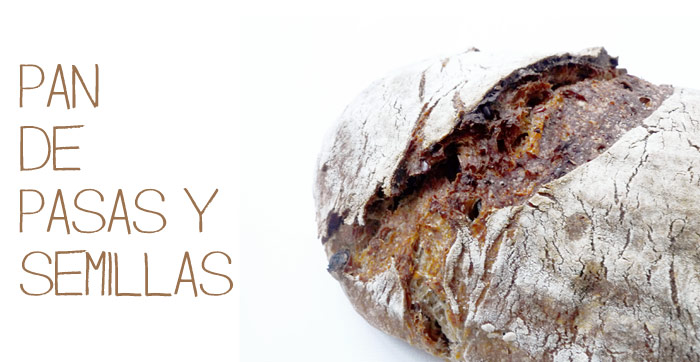
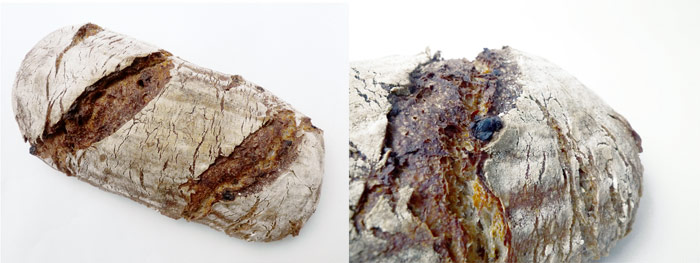
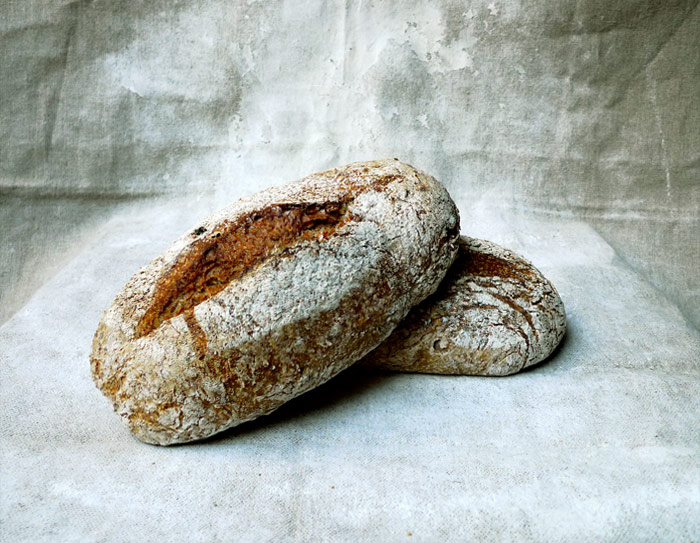
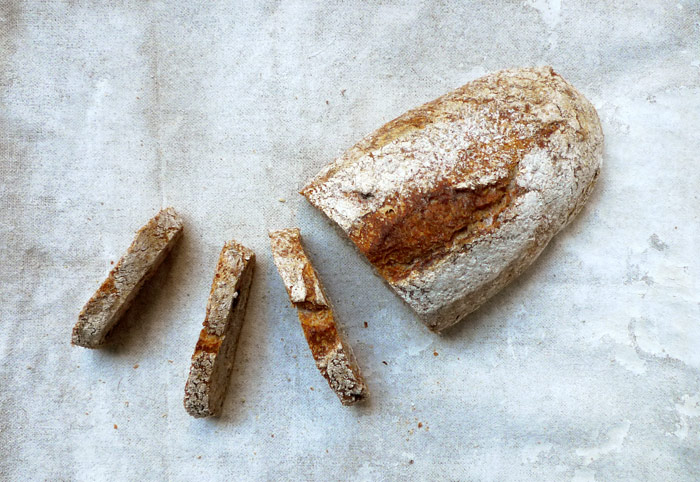
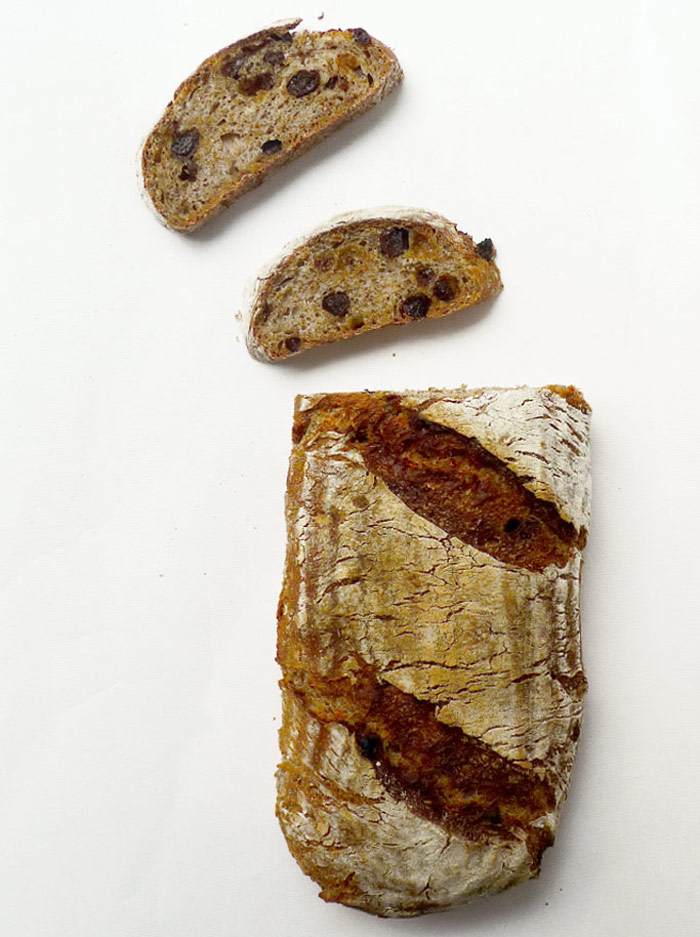
[tp lang=”es” only=”y”] Un pan de pasas. Uno de los panes más bonitos que he hecho hasta ahora y un pan completamente anárquico. Esto es de esas cosas que pasan a veces, en las que digo… al diablo con la receta y va y sale bien. Masa madre de centeno, trigo blanco y trigo integral, mezclado en base a como me pareció que estaba bien, sin receta, sin pesar y sin nada, a ojo. Pasas, semillas de lino y de amapola. Rico, bonito y con unos colores… eso sí, tengo que aprender a apuntar, pero aun así… muy contenta. Me gustan mis experimentos, viva la anarquía![/tp]
[tp not_in=”es”] A raisins bread. One of the prettiest loaves I’ve done so far and a completely anarchic bread. This is one of those things that happen sometimes, When I say… to hell with the recipe and turns out well. Rye sourdough, white wheat and whole wheat, mixed by intuition, without weighting, without regrets and without any recipe. Raisins, linseed and poppy. Rich, Nice colors… yes, I have to learn to write down this things, but still… very happy. I like my experiments, long live anarchy! [/tp]
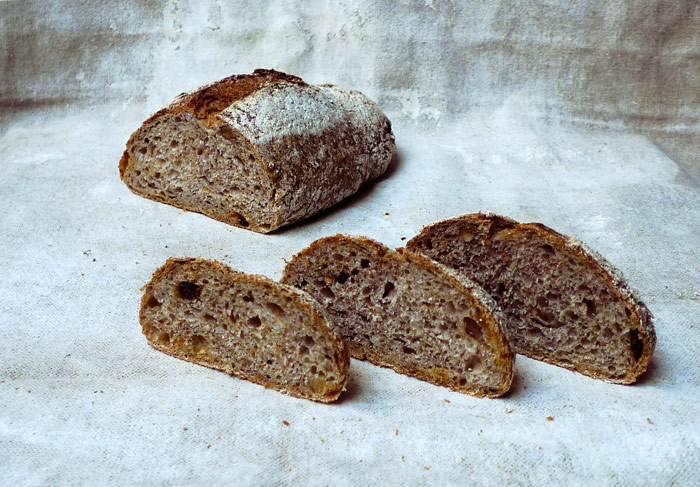
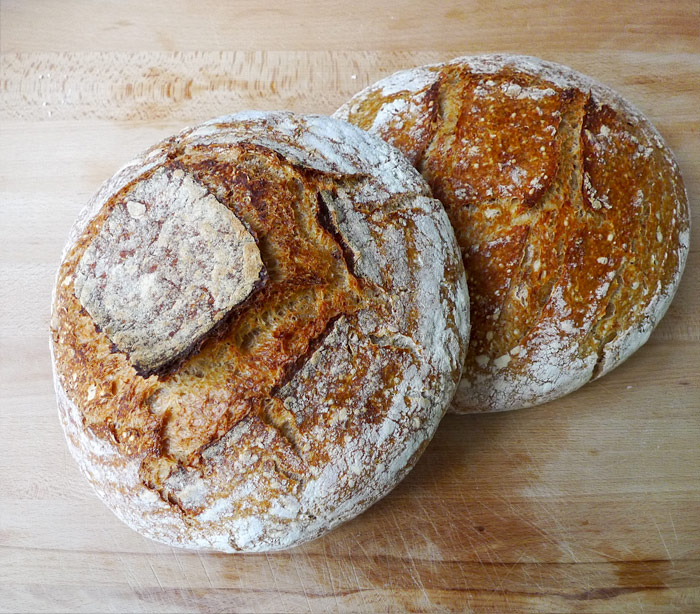
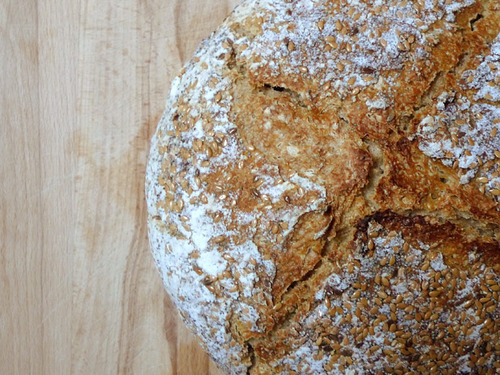
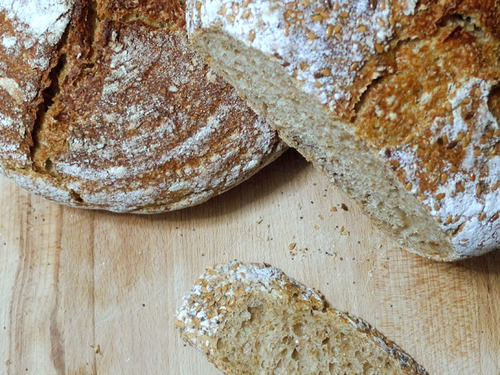
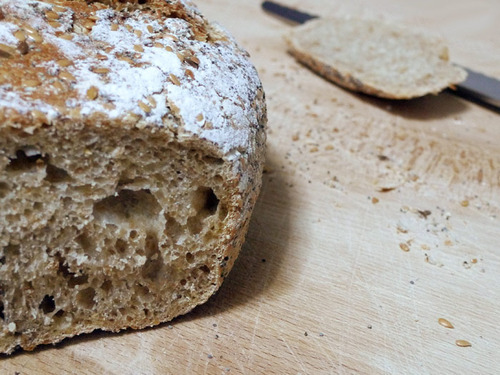
[tp lang=”es” only=”y”] Aparte un par de integrales, receta del libro de Tartine, con un ligero cambio de harinas. Bastante contenta con esas greñas.Ha sido un buen finde panaderil. [/tp]
[tp not_in=”es”] Besides a pair of whole wheat breads, from the Tartine recipe book, with a slight change of flour. Pretty happy with these scores.It has been a good bread weekend.[/tp]

Como nos gustan los integrales…


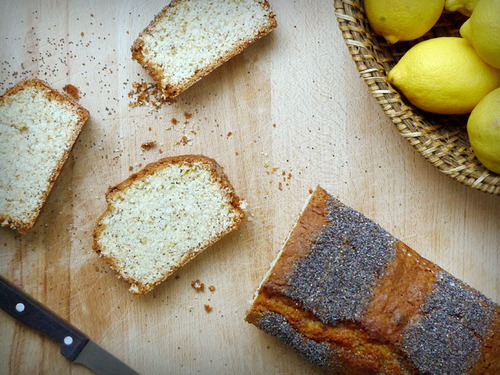
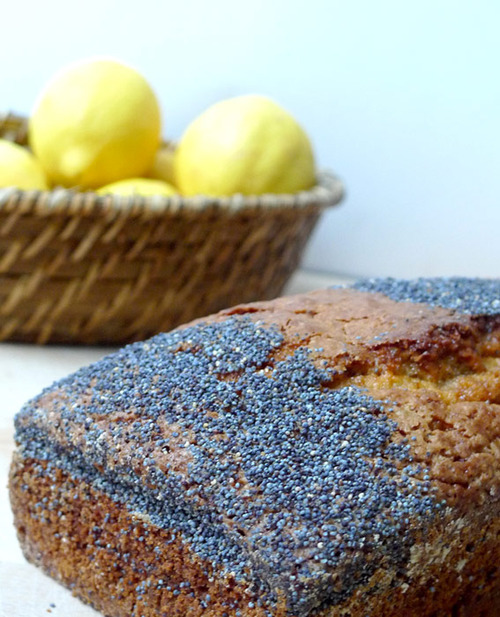
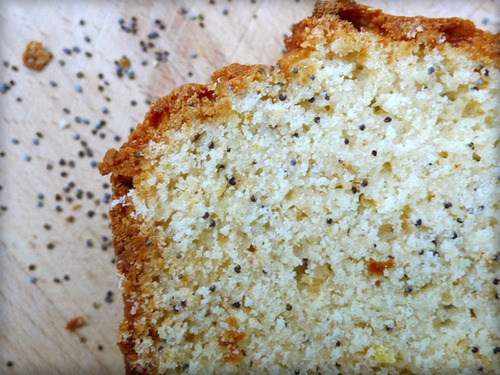
Un bizcocho de finde, para desayunar, para merendar, para el frío o pensandolo bien… para cualquier cosa ya que vale para todo. En esta ocasión contamos con nuestros dos protagonistas, que hacen una pareja perfecta. El limón y las semillas de amapola que se quieren y funcionan tan bien juntos.
Rápido, fácil e infalible.
Vamos a ello…
![]()
Ingredientes