Categories
Easy essentials Fácil Imprescindibles

Por mis huevos, oeuf mollets

P1070638P1070641
[tp lang=”es” only=”y”]El huevo, los huevos, soy una fanática perdida y enamorada de los huevos. Me da igual lo que digan al respecto que si comer huevos es malo, que si una vez por semana como mucho… no estoy de acuerdo. Soy de las que creo que vale la pena gastarse el dinero en unos buenos huevos, de gallinas sanas y de preferencia que corran libres por los verdes prados. Los huevos de gallinas presas y enfermas son malos, los otros no. Así que como me encantan, también me encanta prepararlos y creo que son de las cosas más complicadas de aprender a hacer bien. Por simples que parezcan unos huevos bien hechos tienen mucha complicación. Y la diferencia se nota. Una simple tortilla, una vez que estudiamos como se hace realmente una omelette, cambia por completo! La vida no es la misma una vez que una se come una omelette bien hecha, lo prometo. Sigo peleando con el huevo poché y el frito perfecto tiene su aquel.[/tp]

[tp lang=”es” only=”y”]Los Franceses, esos seres que se dedicaron a crear muchas de las técnicas de cocina que usamos en el mundo mundial y a estudiarlas y registrarlas por supuesto, tienen mucho que decir acerca de los huevos y muchísimas técnicas especificas de como prepararlos (en el libro de técnicas culinarias de Escoffier hay más de 90 sí… 90 recetas de huevos y eso sin llegar a los omelettes!) Y técnica es la palabra por que son reglas inamovibles de como preparar un tipo de huevo u otro. Estrictos, sí pero los resultados lo valen.

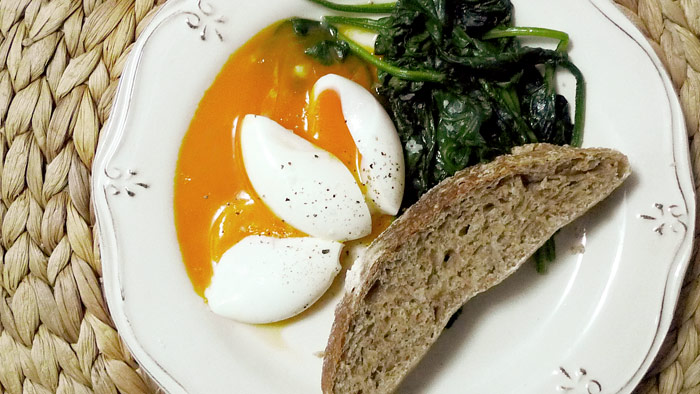
Me he propuesto aprenderlas todas (esa es la idea a menos) de momento vamos con una de las sencillitas. Oeuf mollet, esto que significaría huevo mullido es un tipo de huevo cocido. Se diferencia de el huevo cocido por el tiempo de cocción y el estado líquido de la yema. Se cuecen con cáscara por lo que tampoco son huevos poché.

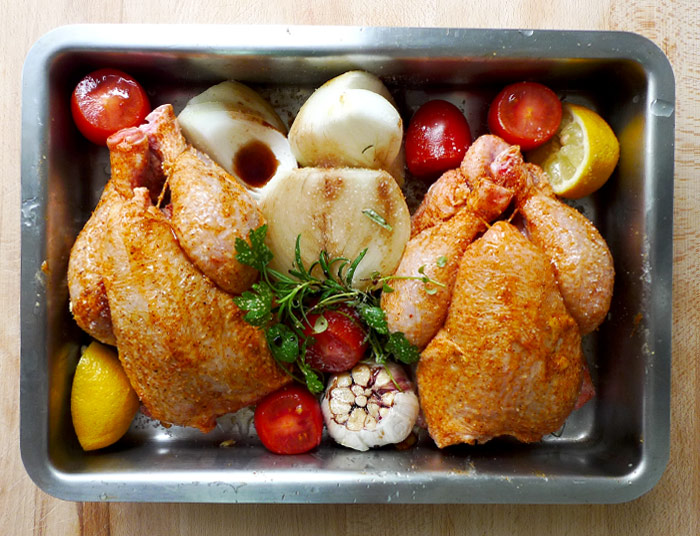
Simple. Un par de buenos huevos, mientras más frescos mejor, pero esto es difícil de saber con exactitud. Un cazo con agua, que rompa a hervir y sólo cuando este hirviendo meter los huevos enteros. 5 minutos por reloj! sacar, pasar por agua fría y pelar con mucho cuidado ya que son muy delicados y si se nos rompen fuera del plato la yema se saldrá entera y será un pequeño desastre.

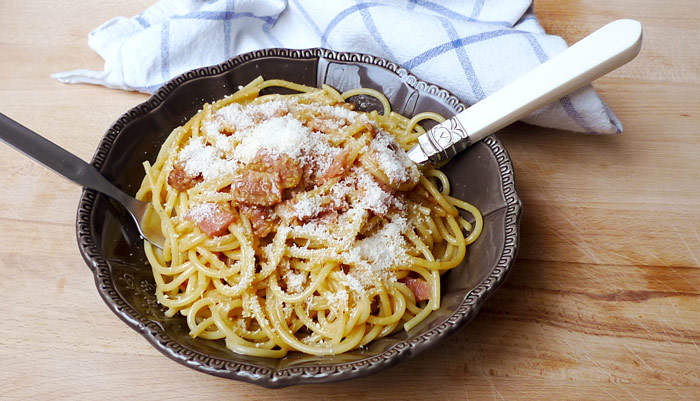
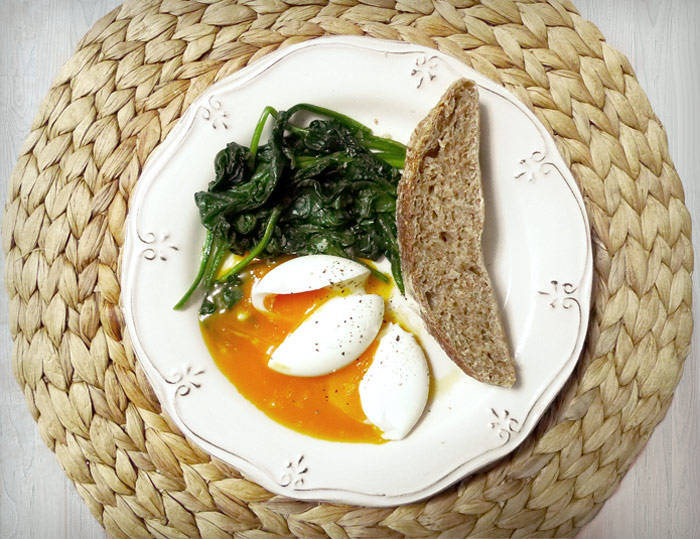
Un pan y unas espinacas y para mi al menos, poco hay más rico que esto![/tp]

[tp not_in=”es”]The egg, eggs, I’m a fan of eggs. I don´t care what they say about them, that eating eggs is bad for you, that you should only have them once a week… I don´t agree. I am think it´s worth spending your money on good eggs from healthy chickens that run free preferably by green meadows. Eggs from hens that are stuck and sick are bad for you, I believe eggs from healthy hens aren´t. So as I love them, I also love to prepare them. I think are the hardest things to learn to do well. As simple as they seem, well made eggs have some complications. And the difference is noticeable. A simple omelette, once you learn how an omelette is actually made, it changes it completely! Life is not the same once you have an omelet well done, I promise. I keep fighting the perfect poached egg and the fried is still tricky.

The French, those beings who were devoted to create many of the cooking techniques we use in the global world and of course to study and record them, have a lot to say about eggs and many specific techniques to prepare them (in the book of culinary techniques of Escoffier there are more than 90 yes… 90 egg recipes and that´s without reaching the omelettes!) And it´s quite technical, there are immovable rules on how to prepare a type of egg or other. Strict, yes but the results are worth it.[/tp]

[tp not_in=”es”]I intend to learn them all (that’s the idea at least) for now we go with one of the easy ones. An oeuf mollet (this would mean fluffy egg) is a type of cooked egg. It differs from the cooked egg in the cooking time and the texture of it´s liquid yolk. You boil them in the shell so they are not poached eggs.

It´s simple if you follow the rules. A couple of good eggs, freshest is best (I know this is difficult to know exactly). Take a pot with water to a boil and only when it´s actually boiling put the whole eggs in. 5 minutes per clock! time it. Take them out through some cold water and peel them carefully as they are very delicate and if you break them off the plate the yolk will pour all over and you will have a small disaster.

A good bread and some spinach and at least for me, there is little richer than this![/tp]

Categories
Easy essentials Fácil Imprescindibles Italia Italy

Carbonara real deal: sin nata


P1070664P1070668Vamos con una receta clásica aunque usualmente mal entendida. La carbonara nace en Roma, es un plato de pasta, spaghetti usualmente pero podría hacerse con fettuccine o rigattoni. Se basa en una manera rápida de preparar la pasta al huevo y panceta y contrariamente a lo que se suele hacer, no, no lleva nata.

Lo de la nata en todos los platos italianos es un misterio que no pretendo resolver… pero efectivamente éste y muchos otros no la llevan. Vamos a ello, es muy fácil de hacer y muy rápida, en este caso yo he optado por bacon en lugar de panceta. Es perfecta para un día con poco tiempo, yo casi me he decidido por instaurarla como plato oficial de los viernes.


P1070667Ingredientes

  • 250grs. de spaghetti
  • 4 lonchas de bacon (o panceta)
  • 1 diente de ajo
  • 2 huevos
  • queso parmesano
  • sal
  • pimienta
  • aceite de oliva

Poner una olla grande con agua a fuego alto, en cuanto rompa a hervir añadir la pasta y preparar 1 minuto menos de lo que pone en la caja. En este caso la mía ponía 11min. Pues 10. Sacar a un colador, echar un chorro de agua fría y dejar a un lado. Ni sal, ni aceite ni nada.

En una sartén calentamos un chorrito de aceite de oliva (poquito) y sofreímos el ajo. Picamos el bacon o panceta en trozos pequeños. Retiramos el ajo de la olla y freímos el bacon hasta que se dore un poco. Lo reservamos.

En un bowl echamos los dos huevos, añadimos la sal, pimienta y queso parmesano y los batimos bien.

Ahora, en la cacerola grande con un poco de calor (fuego medio) volvemos a meter la pasta, dejamos que se caliente un poco ya que se nos habrá enfriado un pelin. Apagamos el fuego y añadimos la mezcla de los huevos y el bacon y revolvemos todo bien. El calor de la pasta cocerá el huevo. Pasamos a un plato y ponemos queso parmesano al gusto por encima. Listo, en 15 minutos lo tenemos hecho!


P1070675

Categories
Bread and Bakery Complicado aunque vale la pena Dulces essentials Imprescindibles Masas y Pan Sweets

Roscón de reyes

P1070566P1070569
[tp lang=”es” only=”y”] Antes de que se me pasen las fechas en las que aun tendría sentido este post vamos con el roscón de reyes. El año pasado hice mi primer roscón y como salió bastante bien este año repetí. La receta es la misma, la de Madrid tiene miga sólo que yo le añado 7 grs. de levadura y alguna variación más he hecho este año. Me ha parecido menos trabajoso que el año pasado y después de la tortura fracasada de intentar hacer un Panettone de masa madre incluso se me ha hecho fácil! Aunque tiene su aquel. He de reconocer que este bollo navideño tardó mucho en conquistarme. De hecho no fue hasta que probé un roscón casero que mi pobre opinión sobre el roscón cambió. A partir de ese momento nos hicimos amigo, aunque con condiciones… no me gustan las frutas confitadas (para queja de mi chico) y no se las pongo, no me gusta que sepa demasiado a azahar y no me gustan rellenos. Aunque entiendo que para mucha gente sea un roscón demasiado “minimalista” como me dicen, para mi así está perfecto aunque bueno, algún día le pondremos frutas por darle gusto al novio.[/tp]

[tp lang=”es” only=”y”]La receta original de masa madre sin levadura esta aquí.

Os copio la que yo hice.

Ingredientes

  • 300 grs. de harina de fuerza
  • 7 grs. de levadura fresca
  • 140 grs. de masa madre de trigo blanco
  • 120 grs. de leche
  • 120 grs. de agua
  • 100 grs. de azúcar
  • 40 grs. de mantequilla
  • 2 huevos
  • 30-40 grs. de ron
  • 4 cucharaditas de agua de azahar
  • cáscara de limón
  • cáscara de naranja
  • canela en rama
  • almendras laminadas
  • almendras tostadas en trocitos

[/tp]

[tp not_in=”es”]Before we pass the dates in which it makes sense to upload this post let´s go with the Roscón de reyes. For those out of Spain this is a traditional bread made in Christmas time, specifically for “Reyes” which is celebrated in Spain on the 6th of January. Last year I made my first roscón and it went pretty well so I repeated this year. The recipe is the same I used last year from the blog Madrid tiene miga (in spanish).

I  added 7 grs. yeast and some  variations to the one  i’ve done this year. It felt less work than it did  last year and after the failed attempt at a sourdough Panettone it even felt easy! Although it has it´s complications. I must admit that this Christmas bread has taken some time to conquer my heart. In fact, it was not until I tried a homemade roscón that my low opinion of it changed. From that moment on we´ve become friends, but with some conditions… I do not like candied fruit (it´s traditional to put some) so I don´t put it, I also do not like too much orange blossom water and I do not like fillers ( it´s also custom to put whipped cream in it) . Although I understand that for many people here my roscón is too “Minimalist”  so they say,  for me it’s just perfect like this.

Ingredients

  • 300 grs. strong bread flour
  • 7 grs. yeast
  • 140 grs. sourdough white wheat
  • 120 grs. milk
  • 120 grs. water
  • 100 grs. sugar
  • 40 grs. butter
  • 2 eggs
  • 30-40 grs. de rum
  • 4 teaspoons orange blossom water
  • lemon peel
  • orange peel
  • cinnamon
  • sliced ​​almonds
  • chopped toasted almonds

[/tp]

P1070585

[tp lang=”es” only=”y”]La masa madre
Estuve refrescando mi masa con harina de trigo blanco, usualmente la tengo de centeno integral así que la tuve un par de días a punta de trigo y en el último refresco la alimenté con agua y leche como pone en la receta.

Con la masa madre lista empezamos con el primer turno. En una cacerola mezclar el agua con la leche y hacer una infusión con la piel de naranja, la del limón y la canela. Yo la naranja y el limón los rallé bastante. Dejar que la leche hierva y bajar el fuego. Dejar que se enfríe y cuando esté tibio añadir al azahar y el ron.

Sacamos la canela y parte de la ralladura de limón y naranja. Separamos 90 grs. de la infusión y los mezclamos con la levadura, la masa madre y la harina. Mezclamos muy bien deshaciendo bien la levadura. La masa es bastante pegajosa… amasamos bien hasta que esté suave, la dejamos reposar un rato y le vamos añadiendo la mantequilla de a pocos. Seguimos amasando (un buen rato) hasta que tengamos una masa lisa, suave y que no se nos pegue demasiado a la encimera.

Aquí unté un bowl grande con un poco de mantequilla y la puse a fermentar media hora fuera y luego toda la noche en la nevera. Al día siguiente por la mañana había casi duplicado su volumen.

Dejarla fuera un rato para que se atempere. Luego dividirla en dos formar dos bolas y dejarla reposar otro rato. Formar las roscas rompiendo el centro con los dedos enharinados y estirando la masa hasta darle la forma de anillo. Ponerlas sobre un papel de hornear y poner un vaso untado con un poco de mantequilla en el centro para que no se cierre el agujero.

Lo pintamos con los huevos batidos y lo dejamos fermentando hasta que vuelva a doblar el volumen. Como hace frío los dejé fermentando dentro de mi horno con una jarra de agua caliente para mantenerlos a una temperatura de unos 24-26 grados. Cuando hayan crecido los pintamos otra vez con huevo y le ponemos las almendras y el azúcar mojada (mezclar azúcar blanca con un poquito de agua para hacer esas bolitas que tiene por encima) y listo, al horno 200-220ºC unos 25min.

Tiene su complicación pero se puede hacer y sale bastante bien! Id revisando el horno para que no se queme por arriba y si veis que se tuesta demasiado ponerle un papel aluminio por encima el ultimo rato de horno.[/tp]

[tp not_in=”es”]With our sourdough started and ready to go let´s begin. In a saucepan mix milk with water and make a tea with the orange peel, the lemon and cinnamon. I grated thinly the orange and the lemon. Allow the milk boil and reduce heat. Allow to cool and when warm add the orange blossom water and the rum.
take out the cinnamon and some of the lemon and orange zest. Separate 90 grs. from your infusion and mix with the yeast, the sourdough and the flour. Mix very well for undoing the yeast. The dough is quite sticky… knead well until smooth, let rest for a while and start adding the butter little by little. Continue kneading (quite a while) until you have a smooth dough, smooth and that we is not sticking too much to the counter top.[/tp]

[tp not_in=”es”]Get a large bowl and smear with a little butter. Put the dough inside to begin fermentation after half an hour outside set overnight in the fridge. The next morning it should have doubled its volume.

Leave it outside for a while to warm up. Then divide it into two and form two balls, let it rest for another 10min. Form the rings breaking the center with floured fingers and stretching the dough into the shape of a ring. Put them on a baking paper and place a glass smeared with a little butter in the center so that the hole does not close.

Paint it with the beaten eggs and let it ferment until it doubles the volume again. As it is cold I had it fermenting inside my oven with a jug of hot water to keep them at a temperature of about 24-26 degrees. When they have grown again, paint them with egg for the second time and put the almonds and sugar on top (mix white sugar with a little water to make those sugar balls) Ready, get it to the oven at 200-220ºC about 25min.

It has its complications, but it does pretty well! Check the oven to prevent the top from burning and if you see that it´s getting too toasted put a foil over for the last minutes of cooking.[/tp]

P1070591

Categories
Dulces Easy essentials Fácil Imprescindibles Peruvian Recipes Sweets

Pie de limón, el postre que conquista.

P1060658P1070594
[tp lang=”es” only=”y”]Ésta fue la primera entrada de me kitchen. El primer post y el postre que me hizo pensar en que tenía que compartir esta receta con  los demás. El pie de limón es un postre clásico de la cultura anglosajona dónde se le conoce como Lemon meringue pie y lleva dando vueltas desde mediados del siglo XIX. Los Peruanos, no me pregunten cómo ni cuando nos lo hemos robado olímpicamente  y ahora es un postre clásico de la repostería peruana casera. Claro que en Perú no lo hacemos con limones (los amarillos) sino con limas (nuestros limones) con lo que realmente hacemos Key lime pie… pero terminologías aparte, no conozco a nadie a quién este postre no le deje enamorado. Es fácil, es rápido y es absolutamente delicioso. Eso sí tiene doscientasmil calorías… pero no es para comer a diario  y con lo bueno que está, se las perdonamos.  He decidido reeditar la receta básicamente por que se merecía un post más bonito.[/tp]

[tp lang=”es” only=”y”]Los ingleses tienen otra forma de hacerlo, la clásica, que lleva otro proceso de masa y de relleno. Esta no es la receta original  es la receta peruana en concreto la de mi casa y  aviso, esto es adictivo!

Hay algunas variaciones con la primera receta, vamos a ello.[/tp]

[tp not_in=”es”]This was the first entry in me kitchen. The first post and the dessert that made me think that I had to share this recipe with others. The lemon meringue pie is a classic dessert of Anglo-Saxon culture and carries around since the mid-nineteenth century. Peruvians (don´t ask me how or when) have stolen it and now it´s a classic homemade dessert in peruvian homes. Of course, in Peru we don´t do it with lemons (the yellow ones) but with limes (our lemons) so what we actually do would be Key lime pie… but apart from all those details, I don´t know anyone who does n´t love this pie. It´s easy, it´s fast and it´s absolutely delicious. It does have (I guess) too many calories… but we don´t eat this every day and besides it´s so good, that they are forgiven. I’ve decided to republish the recipe basically because it deserved a nicer post than the first one.[/tp]

[tp not_in=”es”]The English have another way to it, the classical, it involves another process in the dough and the filling since it´s custard. So this is not the original recipe, this is the Peruvian recipe and particularly my family´s recipe and take notice, this is addictive!

There are a few variations from the first recipe I published, so let’s do this.[/tp]

P1070595

[tp lang=”es” only=”y”] Ingredientes

  • Zumo de 4 limones 
  • 4 yemas
  • 6 claras
  • 1 lata leche condensada
  • 3/4 taza de azúcar blanca
  • 2 tazas de galletas maria trituradas
  • 1/2 taza de mantequilla

Masa
Triturar las galletas ( yo las meto en una bolsa  ziploc y les doy un poco con el martillo, así de rudimentario, pero podéis meterlas en una picadora por ejemplo o con la mano) colocar la galleta  triturada en un bowl y mezclar con la mantequilla hasta  formar una masa, he puesto 2 tazas de galleta por media de mantequilla pero las proporciones dependerán  del molde de pie que tengáis. Tiene que haber suficiente masa para cubrir el molde entero y la pared del mismo, pueden hacer un poco y si falta hacer más. Cubrir el molde y las paredes con una capa no muy gruesa pero que tape todo. Aplastando bien con los dedos para que se pegue.

Meter en el horno unos 10 minutos a 170ºC para que se seque. Lo sacamos y dejamos enfriar.

Relleno
Separar las claras de las yemas de 6 huevos. Echar en otro bowl 4 de las yemas, el zumo de 4 limones y la lata de leche condensada. Mezclar bien. tiene que quedar una crema uniforme. El huevo se cocerá con el zumo de limón.Es importante mezclarlo bien.

Merengue
Cogemos las claras de los 6 huevos y batimos a punto de nieve añadiendo  de a pocos el azúcar. Tienen que quedar bien batidas, para comprobar  sacar la batidora y deberían quedarse en la espátula de la misma sin caerse. Nunca he sido fan de las torres de merengue… prefiero el justo y necesario. Pero si queréis hacer esos merengues de catedral, usad más claras, unas 8 deberían bastar.

Montaje
Colocar el relleno en la masa estirarlo bien para que cubra todo y por encima poner el merengue. Esto se puede hacer de muchas maneras, podemos ponernos creativos y con una manga pastelera hacerle formas o (como aquí) con una espátula de silicona haciendo una montañita, también podemos darle textura con un tenedor y dejarlo con formas y texturas distintas. Eso ya depende de vosotros, yo suelo terminar en la versión más simplificada de montaña rústica.

Cuando esté todo montado, le espolvoreamos un poquito de azúcar por encima (mínima) y lo metemos al horno unos minutos para dorar el merengue. Con eso hemos acabado, lo único malo de este postre es que no os durará ni un día![/tp]

[tp not_in=”es”]
Ingredients

  • Juice of 4 lemons
  • 4 egg yolks
  • 6 egg whites
  • 1 can condensed milk
  • 3/4 cup white sugar
  • 2 cups of crushed vanilla cookies
  • 1/2 cup butter

Dough
Crush the biscuits (I stuff them in a ziploc bag and give them a little with the hammer, so rudimentary I know but you can put them in a blender or do it by hand). Place the crushed biscuits in a bowl and mix with butter to form a dough, I have put 2 cups of cookies for half a cup of butter but the proportions will depend on the pie shell that you may have. There must be enough dough to cover the entire cast and the wall. Thereof, you can do this measures and make some more if necessary. Cover the pan and the walls with the dough. Crushing with your fingers to make it stick.
Place it in the oven for 10 minutes at 338 º F to get it dry. Take it out and let cool.
Filling
Separate the whites from the yolks of 6 eggs. Pour into another bowl 4 yolks and the juice of 4 lemons, add the can of condensed milk. Mix well until you have a uniform cream. The egg will get cooked with the juice. It´s important to mix well though.
Meringue
Take the whites of the 6 eggs and beat until stiff adding the sugar little by little. They must be well beaten, to check remove the blender and the meringue should stay in the same spatula without falling. I’ve never been a fan of meringue towers… I prefer it in a smaller amount. But if you want to make these sort of cathedral meringue, Make sure you use at least 8 whites.
Mounting
Place the filling on the dough and stretch it to cover well. Above all put the merengue. This can be done in many ways. You can get creative and with a pastry bag make forms or (as here) with a silicone spatula making a mound, you can also give it texture with a fork and leave it with different shapes and textures. That depends on you, I usually end up in the most simplified version of a rustic mountain.
When everything is mounted, sprinkle a little sugar on top (Minimum) and put it in the oven a few minutes to brown the meringue. So we are finished, the only bad thing about this dessert is that it won´t last a day![/tp]
P1070600P1070593

Categories
A bit more complicated Carnívoros essentials Imprescindibles Intermedio, un poco más de trabajo Italia Italy Meat

Ossobuco

P1070548P1070554

[tp lang=”es” only=”y”] Después de las (interminables) fiestas vuelve la calma, se acaban los días de descanso y hay que seguir con el ritmo habitual, así que estamos de vuelta. Lo bueno es que en estos pocos días libres he tenido tiempo de hacer varías cosas, por que hay que comer entre fiesta y fiesta. Así que una de las cosas que hubo en me kitchen fue este ossobuco. Ossobuco que significa literalmente hueso con hueco es un corte de carne típico de la cocina Italiana, Milanesa para ser exactos. No es un corte demasiado común en España pero se encuentra fácilmente y si no, tu carnicero te lo consigue. La pieza de carne en España se llama Jarrete y debe ser cortado grueso y con el hueso incluido. Dicho esto vamos con la receta. Esto es un plato muy casero, lentito y muy de invierno, aquí va.

Ingredientes

  • 4 cortes de ossobuco
  • 1 cebolla
  • 4 dientes de ajo
  • 4 zanahorias
  • 1 pimiento rojo
  • 8 champiñones grandes
  • 1 taza de vino tinto
  • 1 taza de caldo de ternera
  • sal
  • pimienta
  • aceite de oliva
  • vinagre balsámico

[/tp]

[tp not_in=”es”]After (these endless) holidays calm returns, I´ve run out of days off and have to keep pace with my routine, so we’re back. The good thing is I had time these days to do a lot of stuff! we need to eat between party and party. So one of the things that I did in my kitchen was this ossobuco. Ossobuco literally means bone with a hole. It is a cut of meat typical of Italian cuisine, Milanese to be exact. The piece of meat used is shank and must be cut including the bone, it should be thick about 3cm. That said let´s go with the recipe. This is a very homey dish, slow to cook and very winterly, here it goes.

Ingredients

  • 4 cuts ossobuco
  • 1 onion
  • 4 cloves of garlic
  • 4 carrots
  • 1 red pepper
  • 8 large mushrooms
  • 1 cup red wine
  • 1 cup of veal broth
  • salt
  • pepper
  • olive oil
  • balsamic vinegar[/tp]

P1070547

[tp lang=”es” only=”y”]Primero vamos a marinar la carne. Cogemos el ossobuco y lo pintamos con un poquito de vinagre balsámico y aceite de oliva virgen, les echamos sal y pimienta por ambos lados y los reservamos.

Picamos los ajos muy finitos, picamos la cebolla en rodajas finas y el pimiento en cubitos. Pelamos y picamos las zanahorias en rodajas. Los champiñones los limpiamos pero los dejamos enteros.

En una cacerola grande (yo lo hice en la cocotte) calentamos un chorrito de aceite a fuego alto. Cuando humeé sellamos las rodajas de carne por todos sus lados para que se doren bien. Las sacamos a un plato y las reservamos. Sólo sellar por fuera que ya se cocerán luego. Bajamos el fuego a medio y añadimos otro chorrito de aceite en la cacerola, sofreímos el ajo, el pimiento y la cebolla, cuando estén dorados añadimos el caldo y las zanahorias.

Volvemos a colocar la carne en la cacerola y añadimos el vaso de vino, la sal y la pimienta. Añadimos los champiñones encima de todo, tapamos y dejamos cocer a fuego lento. Tardará según la carne que tengamos más o menos 1 hora. Cada tanto ir revisando que no se queme el fondo y que no se evapore el liquido. Si vemos que se seca añadimos 1/2 taza más de caldo y 1/2 taza más de vino. Lo tenemos así hasta que veamos que la carne está bien cocida y blandita (debe separarse del hueso fácilmente) y las zanahorias están hechas.

Cuando esté listo retiramos la carne. Cogemos aprox. la mitad del caldo y las verduras y lo licuamos para hacer una salsa espesa.Se suele comer con risotto, yo hice arroz blanco. Colocamos la carne junto al arroz, algunas verduritas enteras con su jugo y la salsa por encima… está de muerte, el guiso con el hueso y el sabor que le da es todo un acontecimiento![/tp]

[tp not_in=”es”]First lets marinate the meat. We take the ossobuco and paint it with a little balsamic vinegar and virgin olive oil, we toss salt and pepper on both sides and reserve it.

Chop the garlic very small, chop the onion into thin slices and the bell pepper diced. Peel and chop the carrots into slices. Clean the mushrooms but leave them whole.

In a large saucepan (I did it in the cast iron) heat a little olive oil at high temperature. When it steams seal the slices of meat on all it´s sides until golden brown. Then get them to a plate and reserve. Lower the heat to medium heat and add another drizzle of oil into the pan, fry garlic, pepper and onion. When they are golden, add the broth and carrots.

Put the meat into the pan and add the wine glass, the salt and the pepper. Add the mushrooms above all, cover and let it simmer at low heat. It takes more or less 1 hour. From time to time review the fund does not burn and the liquid does not evaporate. If you see that it dries add 1/2 more cup of broth and 1/2 more cup of wine. We have it like this until we see that the meat is well cooked and squishy (easily separated from the bone) and carrots are made.
When ready retire the meat. Take approx. half of the broth and vegetables and liquefy to make a sauce. It is usually eaten with risotto, I made white rice. Put the meat next to rice, some of the vegetables with their juice and the sauce on top… It´s really good, the stew with the bone and flavor that it gives is a whole event![/tp]

P1070556
P1070557

Categories
Easy essentials Fácil Imprescindibles Vegetarian Vegetarianos

Primera receta del año! Crema de coliflor y patata

P1070502coliflor2

[tp lang=”es” only=”y”]Ante todo, feliz año nuevo! Vamos con la primera receta del año.Es una facilita y sobre todo de descanso. Descanso de comer y específicamente de comer tanta carne. No sé vosotros pero yo estoy ya un poco hartita de las comidas navideñas y con la cantidad de carne en todas sus formas que llevo ingiriendo en estos días,una necesita un día de vacaciones al menos. Así que hoy vegetarianos totales. Una crema de coliflor y patatas. Muy fácil, muy rápida y muy sanota.[/tp]

[tp not_in=”es”]Happy new year! Here is the first recipe of the year.Quite easy and perfect to take a break from all these holiday meat eating days. I don´t know about you but I’m a little tired of Christmas meals and the amount of meat in all of them is quite large. I need a meat vacation day so today we go completely vegetarian. A cream of cauliflower and potatoes. Very easy, very quick and very healthy.[/tp]

P1070506

[tp lang=”es” only=”y”]Ingredientes

  • 4 patatas
  • 1 coliflor
  • 1 vaso de vino blanco
  • 1 vaso de leche
  • sal
  • pimienta
  • romero fresco
  • aceite de oliva
  • 4 dientes de ajo
  • 1 cebolla blanca
  • leche fresca

Primero vamos a poner a cocer por un lado la coliflor y por otro las patatas. Las patatas al agua con piel y todo y hasta que estén hechas. La coliflor, la cortamos sacando las flores y separandolas lo más posible y al agua también a cocer hasta que esté blandita. Cuando ambas cosas estén cocidas las sacamos del agua, las escurrimos bien y las reservamos.[/tp]

[tp lang=”es” only=”y”]En una cacerola grande sofreímos los ajos pelados pero enteros y la cebolla picada en trozos (grandes) luego añadimos la coliflor, las patatas peladas partidas en trozos, el vaso de vino y la leche, dejamos a fuego medio bajo un rato. Cuando la cebolla ya esté cocida y blanda (con la batidora de mano) licuamos hasta tener una crema. Si queda demasiado espesa añadir un poco de agua. Añadimos la sal y la pimienta y un chorrito de aceite de oliva virgen por encima. Ponemos un poco de romero fresco y lista![/tp]

[tp not_in=”es”]Ingredients

  • 4 potatoes
  • 1 cauliflower
  • 1 glass of white wine
  • 1 glass of milk
  • salt
  • pepper
  • fresh rosemary
  • olive oil
  • 4 cloves of garlic
  • 1 white onion
  • fresh milk

Let’s begin to cook the potatoes and the cauliflower. Potatoes go into a lot of water (skin and all), until they made. For the cauliflower remove the flowers and separate them as much as possible. Then toss them to boil in water until soft. When both are cooked drain well and reserve.[/tp]

[tp not_in=”es”]In a large saucepan with a bit of olive oil fry the whole peeled garlic and the onion coarsely chopped then add the cauliflower, the peeled potatoes cut into pieces, the glass of wine and the milk, leave over medium low heat for a while. When the onion is cooked and tender (with your hand mixer) liquefy until you have a cream. If it´s too thick add a little water! Add salt and pepper and a drizzle of olive oil over it. Put some fresh rosemary leaves and you´re ready![/tp]

P1070508

Categories
Carnívoros Easy essentials Fácil Meat

Picantones asados

P1070435P1070442

[tp lang=”es” only=”y”] El sábado hice picantones. Nunca los había probado así que decidí aventurarme con estos mini pollos, en estas fechas hay de pronto una variedad enorme de pájaros por los mercados y estaba entre un picantón y un coquelet sin entender bien la diferencia entre ambos. En realidad el picantón es un pollo que se sacrifica con un mes de edad y 500g de peso mientras que el coquelet o tomatero se sacrifica con un peso de 500-1000 g pero son todos pollos básicamente. Así que en conclusión es un mini pollo, muy tierno y unipersonal. Aquí va la receta.

Ingredientes

  • 2 pollos picantón
  • sal
  • pimienta
  • pimentón
  • mantequilla
  • vino blanco
  • limón
  • 1 cebolla
  • romero, perejil y tomillo fresco
  • sirope de agave
  • tomates cherry de pera
  • una cabeza de ajos
  • un puñado de uvas
  • un puñado de granadas

P1070431
Enmantequillamos los pollos, los embadurnamos bien de mantequilla, sal, pimienta y pimentón por todo sus lados y bien masajeados. Cortamos las puntas de la cabeza de ajos, pelamos la cebolla y la partimos en dos. Le cortamos la cabeza a los tomates cherry y partimos el limón. Colocamos en la bandeja de horno, los pollos, la cebolla, el ajo y los tomatitos. Colocamos las hierbas . Exprimimos un poco del zumo de limón sobre los pollos y colocamos las rodajas en la bandeja. Añadimos un chorro de vino blanco y un chorrito de sirope de agave, añadimos las uvas y la granada y al horno una hora aprox. a 170ºC. Ir verificando que el pollo esté bien hecho y doradito por fuera. Aprovechamos de meter en el horno unas patatas envueltas en papel albal para tenerlas asadas y listo! [/tp]

[tp not_in=”es”]On Saturday I made poussin. I had never tried it so I decided to venture with these mini chickens. At this time of the year there is suddenly a huge variety of birds available at markets and I was between a poussin and coquelet without quite understanding the difference between them. Actually the poussin is a chicken that is sacrificed at one month of age and 500grs of weight while the coquelet is done weighting 500-1000grs, but both are basically chickens. So in conclusion it is a mini chicken, very tender and individual.Here goes the recipe.

Ingredients

  • 2 chickens picanton
  • salt
  • pepper
  • cayenne
  • butter
  • white wine
  • lemon
  • 1 onion
  • rosemary, parsley and fresh thyme
  • agave syrup
  • cherry tomatoes pear shaped
  • A head of garlic
  • a handful of grapes
  • a handful of grenades

Butter the chickens all round, with the salt, pepper and cayenne and give them a massage. Cut the ends of the garlic head, peel and slice in half the onion. Cut the head of the cherry tomatoes and slice the lemon. We put on the oven tray, the chickens, the onion, the garlic and the tomatoes. Throw in the herbs . Squeeze a little lemon juice over the chicken and place the slices on the tray. Add a little white wine and a splash of agave syrup, add a handful of grapes and grenades and bake for approximately one hour. at 338 º F. Verify that the chicken is well done and browned on the outside. Put some potatoes in the oven wrapped in foil to roast and you are ready![/tp]

P1070436