Categories
Bread and Bakery Complicado aunque vale la pena Dulces essentials Imprescindibles Masas y Pan Sweets

Roscón de reyes

P1070566P1070569
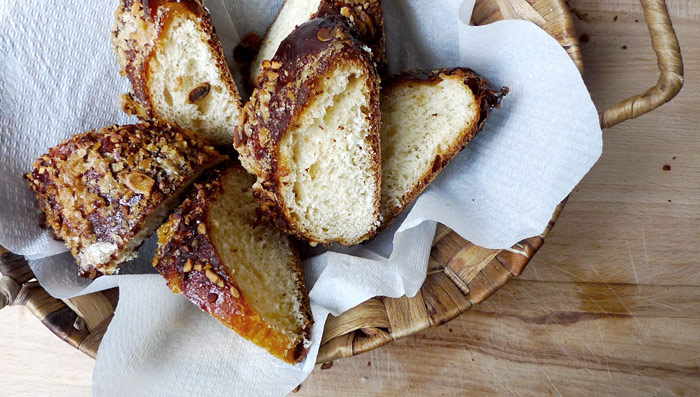
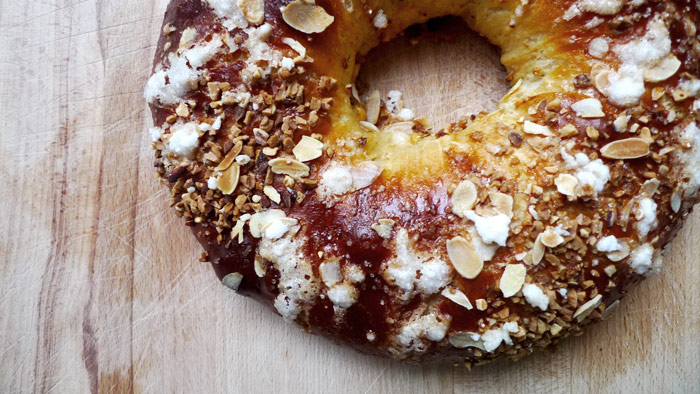
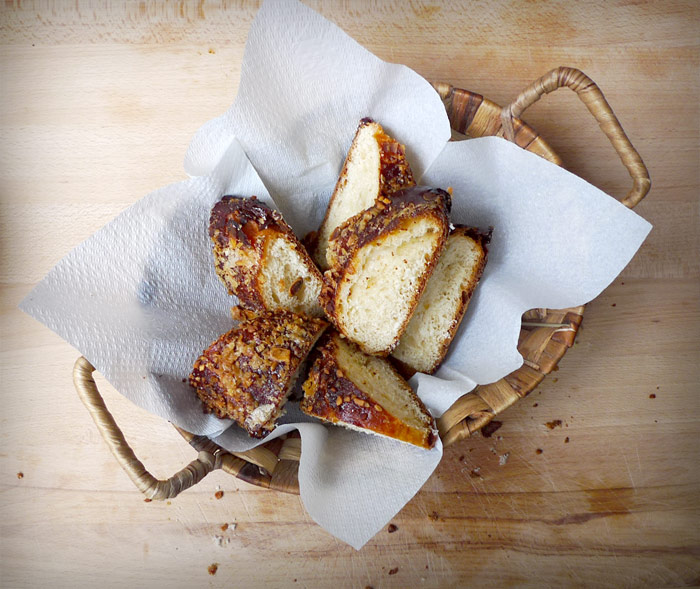
[tp lang=”es” only=”y”] Antes de que se me pasen las fechas en las que aun tendría sentido este post vamos con el roscón de reyes. El año pasado hice mi primer roscón y como salió bastante bien este año repetí. La receta es la misma, la de Madrid tiene miga sólo que yo le añado 7 grs. de levadura y alguna variación más he hecho este año. Me ha parecido menos trabajoso que el año pasado y después de la tortura fracasada de intentar hacer un Panettone de masa madre incluso se me ha hecho fácil! Aunque tiene su aquel. He de reconocer que este bollo navideño tardó mucho en conquistarme. De hecho no fue hasta que probé un roscón casero que mi pobre opinión sobre el roscón cambió. A partir de ese momento nos hicimos amigo, aunque con condiciones… no me gustan las frutas confitadas (para queja de mi chico) y no se las pongo, no me gusta que sepa demasiado a azahar y no me gustan rellenos. Aunque entiendo que para mucha gente sea un roscón demasiado “minimalista” como me dicen, para mi así está perfecto aunque bueno, algún día le pondremos frutas por darle gusto al novio.[/tp]

[tp lang=”es” only=”y”]La receta original de masa madre sin levadura esta aquí.

Os copio la que yo hice.

Ingredientes

  • 300 grs. de harina de fuerza
  • 7 grs. de levadura fresca
  • 140 grs. de masa madre de trigo blanco
  • 120 grs. de leche
  • 120 grs. de agua
  • 100 grs. de azúcar
  • 40 grs. de mantequilla
  • 2 huevos
  • 30-40 grs. de ron
  • 4 cucharaditas de agua de azahar
  • cáscara de limón
  • cáscara de naranja
  • canela en rama
  • almendras laminadas
  • almendras tostadas en trocitos

[/tp]

[tp not_in=”es”]Before we pass the dates in which it makes sense to upload this post let´s go with the Roscón de reyes. For those out of Spain this is a traditional bread made in Christmas time, specifically for “Reyes” which is celebrated in Spain on the 6th of January. Last year I made my first roscón and it went pretty well so I repeated this year. The recipe is the same I used last year from the blog Madrid tiene miga (in spanish).

I  added 7 grs. yeast and some  variations to the one  i’ve done this year. It felt less work than it did  last year and after the failed attempt at a sourdough Panettone it even felt easy! Although it has it´s complications. I must admit that this Christmas bread has taken some time to conquer my heart. In fact, it was not until I tried a homemade roscón that my low opinion of it changed. From that moment on we´ve become friends, but with some conditions… I do not like candied fruit (it´s traditional to put some) so I don´t put it, I also do not like too much orange blossom water and I do not like fillers ( it´s also custom to put whipped cream in it) . Although I understand that for many people here my roscón is too “Minimalist”  so they say,  for me it’s just perfect like this.

Ingredients

  • 300 grs. strong bread flour
  • 7 grs. yeast
  • 140 grs. sourdough white wheat
  • 120 grs. milk
  • 120 grs. water
  • 100 grs. sugar
  • 40 grs. butter
  • 2 eggs
  • 30-40 grs. de rum
  • 4 teaspoons orange blossom water
  • lemon peel
  • orange peel
  • cinnamon
  • sliced ​​almonds
  • chopped toasted almonds

[/tp]

P1070585

[tp lang=”es” only=”y”]La masa madre
Estuve refrescando mi masa con harina de trigo blanco, usualmente la tengo de centeno integral así que la tuve un par de días a punta de trigo y en el último refresco la alimenté con agua y leche como pone en la receta.

Con la masa madre lista empezamos con el primer turno. En una cacerola mezclar el agua con la leche y hacer una infusión con la piel de naranja, la del limón y la canela. Yo la naranja y el limón los rallé bastante. Dejar que la leche hierva y bajar el fuego. Dejar que se enfríe y cuando esté tibio añadir al azahar y el ron.

Sacamos la canela y parte de la ralladura de limón y naranja. Separamos 90 grs. de la infusión y los mezclamos con la levadura, la masa madre y la harina. Mezclamos muy bien deshaciendo bien la levadura. La masa es bastante pegajosa… amasamos bien hasta que esté suave, la dejamos reposar un rato y le vamos añadiendo la mantequilla de a pocos. Seguimos amasando (un buen rato) hasta que tengamos una masa lisa, suave y que no se nos pegue demasiado a la encimera.

Aquí unté un bowl grande con un poco de mantequilla y la puse a fermentar media hora fuera y luego toda la noche en la nevera. Al día siguiente por la mañana había casi duplicado su volumen.

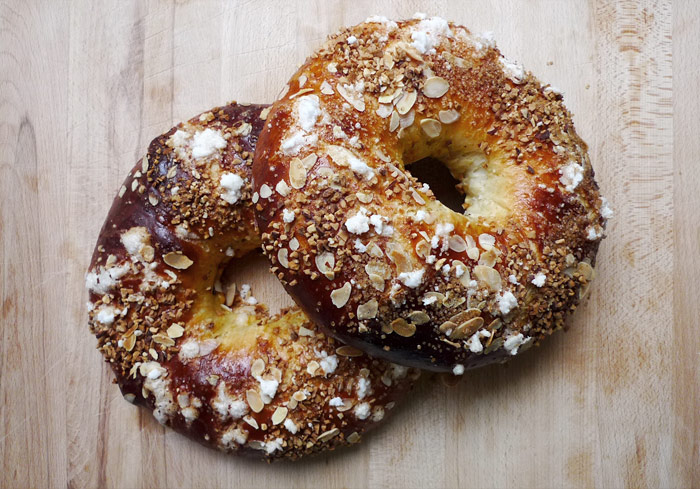
Dejarla fuera un rato para que se atempere. Luego dividirla en dos formar dos bolas y dejarla reposar otro rato. Formar las roscas rompiendo el centro con los dedos enharinados y estirando la masa hasta darle la forma de anillo. Ponerlas sobre un papel de hornear y poner un vaso untado con un poco de mantequilla en el centro para que no se cierre el agujero.

Lo pintamos con los huevos batidos y lo dejamos fermentando hasta que vuelva a doblar el volumen. Como hace frío los dejé fermentando dentro de mi horno con una jarra de agua caliente para mantenerlos a una temperatura de unos 24-26 grados. Cuando hayan crecido los pintamos otra vez con huevo y le ponemos las almendras y el azúcar mojada (mezclar azúcar blanca con un poquito de agua para hacer esas bolitas que tiene por encima) y listo, al horno 200-220ºC unos 25min.

Tiene su complicación pero se puede hacer y sale bastante bien! Id revisando el horno para que no se queme por arriba y si veis que se tuesta demasiado ponerle un papel aluminio por encima el ultimo rato de horno.[/tp]

[tp not_in=”es”]With our sourdough started and ready to go let´s begin. In a saucepan mix milk with water and make a tea with the orange peel, the lemon and cinnamon. I grated thinly the orange and the lemon. Allow the milk boil and reduce heat. Allow to cool and when warm add the orange blossom water and the rum.
take out the cinnamon and some of the lemon and orange zest. Separate 90 grs. from your infusion and mix with the yeast, the sourdough and the flour. Mix very well for undoing the yeast. The dough is quite sticky… knead well until smooth, let rest for a while and start adding the butter little by little. Continue kneading (quite a while) until you have a smooth dough, smooth and that we is not sticking too much to the counter top.[/tp]

[tp not_in=”es”]Get a large bowl and smear with a little butter. Put the dough inside to begin fermentation after half an hour outside set overnight in the fridge. The next morning it should have doubled its volume.

Leave it outside for a while to warm up. Then divide it into two and form two balls, let it rest for another 10min. Form the rings breaking the center with floured fingers and stretching the dough into the shape of a ring. Put them on a baking paper and place a glass smeared with a little butter in the center so that the hole does not close.

Paint it with the beaten eggs and let it ferment until it doubles the volume again. As it is cold I had it fermenting inside my oven with a jug of hot water to keep them at a temperature of about 24-26 degrees. When they have grown again, paint them with egg for the second time and put the almonds and sugar on top (mix white sugar with a little water to make those sugar balls) Ready, get it to the oven at 200-220ºC about 25min.

It has its complications, but it does pretty well! Check the oven to prevent the top from burning and if you see that it´s getting too toasted put a foil over for the last minutes of cooking.[/tp]

P1070591

Categories
Dulces Easy essentials Fácil Imprescindibles Peruvian Recipes Sweets

Pie de limón, el postre que conquista.

P1060658P1070594
[tp lang=”es” only=”y”]Ésta fue la primera entrada de me kitchen. El primer post y el postre que me hizo pensar en que tenía que compartir esta receta con  los demás. El pie de limón es un postre clásico de la cultura anglosajona dónde se le conoce como Lemon meringue pie y lleva dando vueltas desde mediados del siglo XIX. Los Peruanos, no me pregunten cómo ni cuando nos lo hemos robado olímpicamente  y ahora es un postre clásico de la repostería peruana casera. Claro que en Perú no lo hacemos con limones (los amarillos) sino con limas (nuestros limones) con lo que realmente hacemos Key lime pie… pero terminologías aparte, no conozco a nadie a quién este postre no le deje enamorado. Es fácil, es rápido y es absolutamente delicioso. Eso sí tiene doscientasmil calorías… pero no es para comer a diario  y con lo bueno que está, se las perdonamos.  He decidido reeditar la receta básicamente por que se merecía un post más bonito.[/tp]

[tp lang=”es” only=”y”]Los ingleses tienen otra forma de hacerlo, la clásica, que lleva otro proceso de masa y de relleno. Esta no es la receta original  es la receta peruana en concreto la de mi casa y  aviso, esto es adictivo!

Hay algunas variaciones con la primera receta, vamos a ello.[/tp]

[tp not_in=”es”]This was the first entry in me kitchen. The first post and the dessert that made me think that I had to share this recipe with others. The lemon meringue pie is a classic dessert of Anglo-Saxon culture and carries around since the mid-nineteenth century. Peruvians (don´t ask me how or when) have stolen it and now it´s a classic homemade dessert in peruvian homes. Of course, in Peru we don´t do it with lemons (the yellow ones) but with limes (our lemons) so what we actually do would be Key lime pie… but apart from all those details, I don´t know anyone who does n´t love this pie. It´s easy, it´s fast and it´s absolutely delicious. It does have (I guess) too many calories… but we don´t eat this every day and besides it´s so good, that they are forgiven. I’ve decided to republish the recipe basically because it deserved a nicer post than the first one.[/tp]

[tp not_in=”es”]The English have another way to it, the classical, it involves another process in the dough and the filling since it´s custard. So this is not the original recipe, this is the Peruvian recipe and particularly my family´s recipe and take notice, this is addictive!

There are a few variations from the first recipe I published, so let’s do this.[/tp]

P1070595

[tp lang=”es” only=”y”] Ingredientes

  • Zumo de 4 limones 
  • 4 yemas
  • 6 claras
  • 1 lata leche condensada
  • 3/4 taza de azúcar blanca
  • 2 tazas de galletas maria trituradas
  • 1/2 taza de mantequilla

Masa
Triturar las galletas ( yo las meto en una bolsa  ziploc y les doy un poco con el martillo, así de rudimentario, pero podéis meterlas en una picadora por ejemplo o con la mano) colocar la galleta  triturada en un bowl y mezclar con la mantequilla hasta  formar una masa, he puesto 2 tazas de galleta por media de mantequilla pero las proporciones dependerán  del molde de pie que tengáis. Tiene que haber suficiente masa para cubrir el molde entero y la pared del mismo, pueden hacer un poco y si falta hacer más. Cubrir el molde y las paredes con una capa no muy gruesa pero que tape todo. Aplastando bien con los dedos para que se pegue.

Meter en el horno unos 10 minutos a 170ºC para que se seque. Lo sacamos y dejamos enfriar.

Relleno
Separar las claras de las yemas de 6 huevos. Echar en otro bowl 4 de las yemas, el zumo de 4 limones y la lata de leche condensada. Mezclar bien. tiene que quedar una crema uniforme. El huevo se cocerá con el zumo de limón.Es importante mezclarlo bien.

Merengue
Cogemos las claras de los 6 huevos y batimos a punto de nieve añadiendo  de a pocos el azúcar. Tienen que quedar bien batidas, para comprobar  sacar la batidora y deberían quedarse en la espátula de la misma sin caerse. Nunca he sido fan de las torres de merengue… prefiero el justo y necesario. Pero si queréis hacer esos merengues de catedral, usad más claras, unas 8 deberían bastar.

Montaje
Colocar el relleno en la masa estirarlo bien para que cubra todo y por encima poner el merengue. Esto se puede hacer de muchas maneras, podemos ponernos creativos y con una manga pastelera hacerle formas o (como aquí) con una espátula de silicona haciendo una montañita, también podemos darle textura con un tenedor y dejarlo con formas y texturas distintas. Eso ya depende de vosotros, yo suelo terminar en la versión más simplificada de montaña rústica.

Cuando esté todo montado, le espolvoreamos un poquito de azúcar por encima (mínima) y lo metemos al horno unos minutos para dorar el merengue. Con eso hemos acabado, lo único malo de este postre es que no os durará ni un día![/tp]

[tp not_in=”es”]
Ingredients

  • Juice of 4 lemons
  • 4 egg yolks
  • 6 egg whites
  • 1 can condensed milk
  • 3/4 cup white sugar
  • 2 cups of crushed vanilla cookies
  • 1/2 cup butter

Dough
Crush the biscuits (I stuff them in a ziploc bag and give them a little with the hammer, so rudimentary I know but you can put them in a blender or do it by hand). Place the crushed biscuits in a bowl and mix with butter to form a dough, I have put 2 cups of cookies for half a cup of butter but the proportions will depend on the pie shell that you may have. There must be enough dough to cover the entire cast and the wall. Thereof, you can do this measures and make some more if necessary. Cover the pan and the walls with the dough. Crushing with your fingers to make it stick.
Place it in the oven for 10 minutes at 338 º F to get it dry. Take it out and let cool.
Filling
Separate the whites from the yolks of 6 eggs. Pour into another bowl 4 yolks and the juice of 4 lemons, add the can of condensed milk. Mix well until you have a uniform cream. The egg will get cooked with the juice. It´s important to mix well though.
Meringue
Take the whites of the 6 eggs and beat until stiff adding the sugar little by little. They must be well beaten, to check remove the blender and the meringue should stay in the same spatula without falling. I’ve never been a fan of meringue towers… I prefer it in a smaller amount. But if you want to make these sort of cathedral meringue, Make sure you use at least 8 whites.
Mounting
Place the filling on the dough and stretch it to cover well. Above all put the merengue. This can be done in many ways. You can get creative and with a pastry bag make forms or (as here) with a silicone spatula making a mound, you can also give it texture with a fork and leave it with different shapes and textures. That depends on you, I usually end up in the most simplified version of a rustic mountain.
When everything is mounted, sprinkle a little sugar on top (Minimum) and put it in the oven a few minutes to brown the meringue. So we are finished, the only bad thing about this dessert is that it won´t last a day![/tp]
P1070600P1070593

Categories
Dulces Easy Fácil Sweets Vegetarian Vegetarianos

Galette de manzana

P1070493P1070523

[tp lang=”es” only=”y”] Después de unos días sin cocinar por razones ajenas a mi voluntad, tenía ganas de algo rico, casero y dulce. Una galette de manzana. Un postre fácil, rápido y delicioso. No dura ni 24 horas en casa. De postre, de merienda y de desayuno,sí de desayuno es espectacular! Muy poco trabajo para un resultado tan bueno, es de esas cosas que hacen feliz cualquier día.[/tp]

[tp not_in=”es”]After a few days out of the kitchen for reasons beyond my control, I wanted something rich, sweet and homemade. An apple galette. An easy dessert, fast and delicious. It won´t last 24 hours at home. As a dessert, snack and breakfast, yeah! for breakfast it´s amazing. Very little work for such a good result, is one of those things that makes any day happier.[/tp]

P1070498

[tp lang=”es” only=”y”]Ingredientes
Masa

  • 1 taza de harina de trigo
  • 1/2 taza de mantequilla
  • 2 cucharadas soperas de agua
  • azúcar moreno

Relleno

  • 1 kilo de manzana reineta
  • 1 taza de azúcar moreno
  • canela en polvo
  • 1 pizca de sal
  • 2 clavos de olor triturados
  • nuez moscada
  • agua
  • ron
  • 1 huevo separado yema de la clara.
  • [/tp]

[tp not_in=”es”]Ingredients
Dough

  • 1 cup of wheat flour
  • 1/2 cup butter
  • 2 tablespoons water
  • brown sugar
  • Filling

  • 1 Kg. of pippin apples
  • 1 cup brown sugar
  • cinnamon
  • 1 pinch of salt
  • 2 crushed cloves
  • nutmeg
  • water
  • rum
  • 1 egg separated (yolks from whites)
  • [/tp]

    [tp lang=”es” only=”y”] La masa
    Mezclamos la taza de harina con la mantequilla cortada en cubitos y deshacemos la mantequilla con las manos hasta que tengamos algo parecido a unas migas, añadimos el agua y amasamos hasta tener una pasta elástica y homogénea. La hacemos una bola y la metemos a la nevera a esperar.[/tp]

    [tp not_in=”es”]
    Dough
    Mix the flour with the butter previously cut into cubes and mix with your hands until you have something like crumbs, add the water spoons and knead until smooth and elastic. Turn it into a ball and put into the fridge to rest.[/tp]

    P1070480P1070478

    [tp lang=”es” only=”y”] El relleno
    Picamos las manzanas en cubitos. Las ponemos en una olla con un poco de agua aprox.1 taza. Añadimos el azúcar, una pizca de canela, el clavo, la nuez moscada, la sal y un chorrito de ron. Dejamos a fuego lento hasta que la manzana esté deshecha y tengamos una compota pero con algunos trocitos. Dejamos que se enfríe.

    Montaje
    Sacamos la masa de la nevera y la extendemos sobre un papel de horno con el rodillo en forma circular. No dejarla demasiado fina ya que tiene que aguantar el relleno. La pintamos con un pincel con la yema del huevo. Colocamos el relleno en el centro de nuestra masa dejando un borde ancho alrededor (no llevarla hasta el final, no es una pizza!) Cuando lo tengamos hecho simplemente doblamos los bordes de la masa por encima del borde del relleno. Hará como un contenedor como una “cuna” para el relleno. Pintamos la parte de fuera con la clara del huevo y espolvoreamos un poco de azúcar morena sobre la masa para decorar.

    Llevamos al horno a 180ºc unos 35 minutos en cuanto veamos que la masa está doradita y crujiente, fuera. Esta tarta se come tibia y si podemos con una bolita de helado de vainilla!

    *Un tip! Como os sobrara relleno, a mi me sobró. Licuadlo y así tendréis un puré de manzana que se puede almacenar en tarros de cristal durante unas semanas![/tp]

    [tp not_in=”es”]The filling
    Chop the apples into cubes. Put them in a pot with a little water aprox. 1 cup. Add the sugar, a pinch of cinnamon, cloves well crushed, nutmeg, salt and a dash of rum. Leave to simmer until the apples are soft and it looks like a compote but with some chunks. Let it cool.

    Mounting
    Take the dough from the refrigerator and roll it out on a baking paper in a circular shape. Do not let it go too thin since it has to put up with the filling. Then using a brush paint the dough with egg yolk. Place the filling in the center of our dough, leaving a wide border around (don not go all the way, it is not a pizza!) When it done simply bend the edges of the dough over the edge of the filling. It will act as a container or a “cradle” for filling. Paint the outside with the egg white and sprinkle some brown sugar over the dough to decorate.

    Bake at about 356 ° F 35 minutes and watch that the dough is golden brown and crispy and take out. This pie is best eaten warm and with some vanilla ice cream!

    *A tip! since you will have exceeding filling you can liquify it and store it in some glass jars for a homey apple sauce![/tp]

    P1070517