Categories
Carnívoros Imprescindibles Intermedio, un poco más de trabajo

Estofado de ternera

P1070784P1070790
[tp lang=”es” only=”y”] Estos días ha hecho mucho frío, a mi me va más el verano la verdad, pero tratando de buscarle el lado bueno a las cosas, un buen estofado es de esas cosas que en verano son casi imposibles de digerir y que hacen que el invierno parezca menos largo ¿no?[/tp]

[tp lang=”es” only=”y”]Ingredientes

  • 300 gr de carne de ternera para guisar (de pecho)
  • 1 pimiento verde
  • 1 cebolla
  • 2 dientes de ajo
  • 3 zanahorias grandes
  • vino tinto
  • aceite de oliva
  • sal
  • pimienta

[/tp]

[tp not_in=”es”]For cold winter days a simple stew, classic and warm. These past days have been very cold. I am more of a summer girl, but trying to look for the bright side of things, in summer these dishes are impossible and a good stew is really one of those things that makes winter seem less long right?[/tp]

[tp not_in=”es”]Ingredients

  • 300 grs of calf meat for stew (Breast)
  • 1 green pepper
  • 1 onion
  • 2 cloves of garlic
  • 3 large carrots
  • red wine
  • olive oil
  • salt
  • pepper

[/tp]
P1070786

[tp lang=”es” only=”y”]Primero vamos a picarlo todo. La carne ya nos la trocea el carnicero. La cebolla en trocitos, el pimiento también, las zanahorias las pelamos y las cortamos en rodajas. Los ajos pelados y picados muy pequeñitos.

Calentamos un poco de aceite en la cacerola. Cuando empiece a humear añadimos la carne y la doramos. Echamos los ajos, la cebolla y el pimiento y doramos un poquito, revolviendo para que no se nos queme. Añadimos 2 vasos de vino tinto, ponemos la tapa y bajamos el fuego al mínimo. Echamos las zanahorias, sal y pimienta y dejamos cocer a fuego lento.

Es un plato lento, dejarlo el tiempo que necesite. Yo lo tuve unas dos horas y algo más, hasta que la carne esté blandita y casi se separe con un tenedor. Revolvemos de rato en rato para asegurarnos que no se pega. Destapamos un rato para que reduzca el caldo. Si vemos que se nos seca mucho, añadir un poco más de vino.[/tp]

[tp not_in=”es”]First let’s chop it all. The meat we can get it chopped by the butcher. So chop the onion in small squares, also the pepper, peel the carrots and cut them into slices. Peel the garlic and chop very tiny.

Heat a little oil in the pan. When it starts to smoke add the meat and brown it a little. Take the garlic, onion and pepper toss them in and brown a bit, revolving from time to time so that it does n´t stick. Add 2 glasses of red wine, put the lid on and lower the heat to low. Put in the carrots, salt and pepper and let it simmer.

It´s a slow plate, let it be the time it needs. I had it on the stove for about two hours and a bit more, until the meat is soft and almost separates with a fork. Revolve from time to time, to ensure that the bottom does not burn. Uncover for a while to reduce the broth. If you see that it dries too much, add a little more wine!.[/tp]

P1070787

Categories
Desayunos Dulces Fácil Imprescindibles

Galletas de avena con chips

P1070750P1070760

[tp lang=”es” only=”y”]El Domingo me levante temprano con mucha hambre y muy enérgica. Así que mientas mi chico dormía decidí hacer unas galletas para desayunar porque un desayuno de Domingo en mi casa, es un desayuno de Domingo. Estas galletas son muy fáciles y en serio no se tarda nada en hacerlas. Están buenísimas, aunque salen pocas y claro al día siguiente ya no quedaba ni una!

Vamos a ello…

Ingredientes

  • 1/2 taza de mantequilla a temperatura ambiente
  • 1/2 taza azúcar integral
  • 1 huevo batido
  • 1/2 taza de harina de trigo
  • 1/2 cucharadita de polvo de hornear
  • 1/2 taza de copos de avena
  • 1/2 taza de chips de chocolate

Pre calentar el horno a 180ºC y colocar un papel de horno en la bandeja. Mezclar en un bowl el azúcar con la mantequilla y batir hasta que este suave. Añadir el huevo batido. Añadir la harina, el polvo de hornear y la avena, añadir los chips de chocolate y mezclar todo bien.

Colocar una cucharada sopera por galleta en la bandeja, dejar bastante espacio de separación entre una y otra por que se expanden y mucho. Hornear unos 15 minutos hasta que empiecen a dorar. Sacar la bandeja del horno y dejar en la bandeja caliente 2 minutos. Pasar a una rejilla a enfriar. Listo en 35 minutos tenemos las galletas calentitas y listas para desayunar![/tp]

[tp not_in=”es”]On Sunday I woke up very early, very hungry and very energetic. So while my guy was still sleeping I decided to make some cookies for breakfast because Sunday´s breakfast at home is a whole deal! These cookies are very easy and very quick to make. They are delicious, although the recipe is for a few so the next day there were none left!

Let’s do this…

Ingredients

  • 1/2 cup of butter at room temperature
  • 1/2 cup brown sugar
  • 1 egg, beaten
  • 1/2 cup of wheat flour
  • 1/2 teaspoon baking powder
  • 1/2 cup of oatmeal
  • 1/2 cup of chocolate chips

Preheat oven to 180 º C and place a baking paper on the tray. Mix in a bowl the sugar with the butter and beat until smooth. Add the beaten egg. Add flour, baking powder and oats. Add the chocolate chips and mix well.

Place one tablespoon per cookie on the tray, leave enough gap between them because they will expand a lot. Bake about 15 minutes until starting to brown. Remove the pan from the oven and leave them in the hot pan 2 minutes. Transfer to a rack to cool. There you go, in 35 minutes you have warm cookies ready for breakfast![/tp]

P1070755P1070765

Categories
Carnívoros Fácil Imprescindibles Oriental

Arroz chaufa

[tp lang=”es” only=”y”] No es la primera vez que pongo una receta de chaufa, pero es que me encanta! El anterior fue de pollo. Esta vez lo hacemos de cerdo. En la entrada anterior contaba un poco sobre la relación de amor culinario entre Perú y China. Poco por añadir aparte de que el arroz Chaufa que en chino significa arroz frito es uno de los platos estrellas del Chifa (la cocina china-peruana) con más de 5,000 chifas sólo en Lima, se nota que nos gusta y mucho!

Como el sábado pude ir al mercado de Maravillas conseguí hacerme de mis ingredientes chinos favoritos, así que con ellos va este chaufa. Por suerte en Madrid ya es fácil encontrar estos ingredientes en algunos mercados como el de Mostenses o el de Maravillas y en supermercados chinos como el de la calle Leganitos o los de la calle General Margallo dónde hay de todo.

Vamos a ello. El arroz chaufa es muy fácil, simplemente es cuestión de tener los ingredientes adecuados. Una profesora de cocina China hace muchos, pero muchos años nos contó que este arroz es un plato típico de final de la semana para aprovechas las sobras. Es un plato barato, rápido  y que admite muchas versiones. Aquí va.

Ingredientes

  • 1 cebolleta o cebolla china
  • 1 manojo de tallos de cebolleta (la parte verde) o cebollino
  • 2 dientes de ajo
  • 4 Cintas de lomo de cerdo picadas en cubitos
  • Aceite de oliva suave (no virgen) o aceite de girasol
  • Salsa de soja
  • 1 trocito de kion o jengibre
  • Un puñado de colantao o tirabeques
  • 1 pak choi
  • arroz de grano largo
  • 1 huevo

[/tp]

[tp lang=”es” only=”y”] Lo primero es cocer el arroz. Preparar aprox. 2 tazas de arroz blanco sin sal. Cuando esté listo lo dejamos a un lado para que se enfríe. Picamos las cebolletas, las cintas de lomo en cubitos, pelamos un trocito de jengibre y lo picamos muy finito. Quitamos las hebras de los tirabeques y partimos el tallo del pak choi. Reservamos todo.

En una sartén grande o wok calentamos un poco de aceite, cogemos el huevo lo batimos bien y hacemos una tortilla. la sacamos, la escurrimos un poco, la picamos en trocitos y la reservamos. Volvemos a calentar aceite, sofreímos un poco los ajos con piel y enteros y los retiramos. Cuando el aceite este bien caliente y humeando echamos la cinta de lomo y la doramos bien. Añadimos la cebolleta picada ( la parte blanca y el jengibre) añadimos el arroz y salteamos. Añadimos un buen chorro de salsa de soja y por ultimo las verduras junto con las partes verdes de las cebolletas. Le damos a todo un par de vueltas y listo, a servir.

Unos cuantos consejos…
El aceite muy caliente, fuego al máximo y salteando mucho y rápido para que nada se queme. Las verduras al final y que queden crujientes, las partes verdes de las cebolletas casi crudas, no añadir sal, la salsa de soja es suficiente.[/tp]

[tp not_in=”es”]This is not the first time I upload a recipe of chaufa rice, but I love it! The previous one was with chicken, this time we do it with pork. In the previous post I talked a bit about the culinary love relationship between Peru and China. Little to add other than that Chaufa rice in Chinese means fried rice and that is one of the stars of Chifa cuisine (Chinese-Peruvian cuisine) with over 5,000 chifas only in Lima, you can tell that we like a lot!

On Saturday I went to Maravillas market in Madrid and I got myself some of my favorite Chinese ingredients, so they are going on in this chaufa. Luckily in Madrid now is easy to find these ingredients in some markets like the Maravillas or Mostenses and on Chinese supermarkets such as the ones in Leganitos street or General Margallo street where there is everything.

Let’s do this. The rice is very easy, it’s just a matter of having the right ingredients. A chinese cooking teacher many years ago told us that this rice is a typical dish for the end of the week to take advantage of leftovers. It is a cheap dish, fast and it supports many versions.Here it is.

Ingredients

  • 1 scallion (the white part)
  • 1 cluster of stems of chive
  • 2 cloves of garlic
  • 4 slices of pork loin cut into cubes
  • Mild olive oil (low flavored olive oil) or sunflower oil
  • Soy sauce
  • 1 small piece of ginger
  • A handful of sugar peas
  • 1 pak choi
  • long grain rice
  • 1 egg

[/tp]

[tp not_in=”es”]First let´s cook the rice. Prepare approx. 2 cups of white rice without salt. When it´s ready leave it aside to cool. Chop the chives and scallion, chop the loin diced, peel a slice of ginger and chop very finite. Remove the strands of the sugar peas and set off the stem of the pak choi. Put everything on the side.

In a large skillet or wok heat a little oil, Take the egg and beat well do what an omelette. take it off, drain it a bit and chop it into small pieces, reserve it. Again heat some oil, fry the garlic with the skin for a couple of minutes and take out. When the oil is smoking hot toss the meat dice and brown them well. Add the chopped chives (the whites) and the ginger, add the rice and sauté. Added a splash of soy sauce and finally the vegetables along with the green parts of scallions or chives. Give it a few turns around and serve.

A few tips…
The oil has to be very hot, set heat to high and saute hard and fast to avoid burning anything. The vegetables are meant to be crispy and the green parts of the chives almost raw, do not add salt, soy sauce is enough![/tp]
P1070769

Categories
Imprescindibles Muy fácil Sandwiches Sandwiches

Apuntes: Cena en 5

P1070720P1070725
Esto va de no tener demasiado tiempo o tener mucha pereza, una de dos. Una tosta para cenas súper rápidas y súper ricas. Está claro que una buena rebanada de un pan rico es indispensable.

P1070717

A partir de allí es picar un par de tomates, unas aceitunas negras, unas hojitas de albahaca fresca, un pelin de aceite de oliva, ajo, sal, pimienta y revolverlo todo. Esto sobre unas lonchitas de pavo ahumado o de jamón y una rebanada del pan de sésamo tostado que hice el otro día y a disfrutar con esfuerzo menos mil, ¿así da gusto eh?

P1070730
P1070732

Categories
Dibujos Dulces Fácil Imprescindibles

Dibureceta: Pie de manzana

applepieHoy vamos con una dibureceta de pie de manzana. La receta no es mia, la he sacado de bakemania pero me gusta mucho como la explican y me apetecía ilustrar un pie de manzana así que en el link tenéis los pasos y las instrucciones! Espero tener un hueco y hacerla yo también.

Ingredientes
Para la masa:

  • 225grs. de mantequilla muy fría cortada en cubitos de 1cm
  • 60ml. de agua heada
  • 1 cucharadita de sal

Para el relleno

  • 1.3 kg de manzanas variadas
  • 1 cucharada sopera de nata
  • 1 yema
  • 1 cucharada de zumo de limón
  • 1/4 taza de azúcar
  • 15 grs. de mantequilla
  • 1 pizca de sal
Categories
Complicado aunque vale la pena Imprescindibles Masas y Pan

Exploraciones panaderas: El pan de tartine

P1070707
P1070696
[tp lang=”es” only=”y”] Ya toca una de pan. He de reconocerlo, estoy obsesionada con el pan de Tartine… y como no. Nunca lo he visto en vivo, pero esas migas y esas cortezas me tienen enamorada. Así que como soy un poco cabezota he decidido que quiero hacer ese pan hasta que salga perfecto o lo mejor posible (dentro de mis posibilidades). Así que llevo luchando con él unas cuantas veces y creo que nos empezamos a hacer amigos. Este finde ha salido uno que me tiene más que contenta! No suelo poner recetas de panes porque es un tema más complicado y este blog es de cosas sencillas y fáciles pero, esta vez os copio la receta del libro y os cuento un poco como lo hice yo.[/tp]

[tp lang=”es” only=”y”]Esta es la receta del country loaf de trigo blanco. Es un pan sólo de masa madre por lo que que necesitaréis estar familiarizados con la masa madre y tenerla activa. La mía está alimentada con centeno integral.[/tp]

[tp not_in=”es”]It´s bread time. I have to admit, I’m obsessed with Tartine´s Bread. I haven´t tried it or seen it (besides the book I mean) but those crumbs and crusts keep me in love. So, since I am a bit stubborn I’ve decided I want to make this bread until it is perfect or at least the best I can. So I’ve been struggling with it a few times and I think we have started to become friends. This weekend I made one which has left me more than happy! I usually don´t put bread recipes here because it is a complicated issue and this blog is for simple and easy things, but… this time I copied the recipe from the book and I’ll tell you a little of how I did it.[/tp]

[tp not_in=”es”]This is the recipe for the white country loaf. It’s a sourdough bread just so you will need to be familiar with sourdough and have it active. Mine is fed with whole rye.[/tp]

P1070709

[tp lang=”es” only=”y”]Ingredientes

  • agua 26ºc  700grs + 50 grs.
  • masa madre  activa (que flote) 200 grs.
  • Harina panadera trigo 900grs.
  • Harina integral trigo 100grs.
  • sal 20grs.

Bueno más que una receta, os cuento lo que hice. Primero en un bowl muy grande mezclar la masa madre (primero que pase la prueba de la flotabilidad) con 700 grs. de agua a 26ºc La batí un poco para deshacerla y luego añadir las harinas que son en total 1k. Mezclamos bien y dejamos reposar unos 45 minutos. Pasado este tiempo añadir la sal y los 50grs. de agua restantes, mezclar muy bien y amasar un poco en el bowl. La tapamos con un trapo húmedo y la dejamos 30 minutos. He seguido el sistema del libro de ir plegando varias veces dentro del mismo bowl. Así que a los 30 minutos la plegamos sobre si misma, lo que suelo hacer es plegarla por uno de sus lados e irla rotando y plegando hasta hacer cuatro pliegues.

Así las primeras 2 horas:
pliegue- 30 min. descanso

Después de las 4 veces de pliegue-descanso de 30 minutos (en total 2 horas) pasamos a dejarla reposar una hora y luego otro pliegue y descanso de otra hora. En total el tiempo de plegados más o menos es de 4 horas. Aquí le puse un plástico por encima al bowl y la metí a la nevera a fermentar toda la noche,ya que la quería hornear al día siguiente.

Al día siguiente la saqué, la dejé un rato para que se atemperará y la dividí en dos. Las dos masas las plegue sobre si mismas y las dejé reposar unos 30 min. Formarlas en bola y cada una a su banetón a descansar, como a las dos horas las horneé. En la cocotte, como dice en el libro. Esta masa es muy húmeda y la he intentado hornear sin cocotte alguna vez y ha sido un desastre total así que me quedo con la cocotte para este pan, 25 minutos con tapa y unos 25 sin tapa hasta que tenga el color que queremos! Esta vez ha salido bastante bien (aunque no perfecto, esas greñas como que no) con lo cual de momento seguiremos practicando![/tp]

[tp not_in=”es”]Ingredients

  • water 80ºF 700grs + 50 grs.
  • leaven (floating) 200 grs.
  • White flour 900grs.
  • wholemeal wheat flour 100grs.
  • salt 20grs.

Well more than a recipe, I´ll tell you what I did. First in a large bowl mix the sourdough (first pass the floating test) with 700 grs. of water at 80°F beat slightly to undo it and then add the flours which are a total of 1k. Mix well and let it stand about 45 minutes. After this time, add salt and 50g. of remaining water. Mix well and knead a little in the bowl. Then cover with a damp cloth and let stand for 30 minutes. I followed the book system of folding several times within the same bowl. So after 30 minutes, fold it over itself, what I do is fold by one side and then rotate it and fold again until you make four folds.

Thus the first 2 hours:
fold- 30 min. rest

After 4 series of “fold and 30 rest minutes” which sum 2 hours, let it sit an hour and then give it another fold and rest for another hour. In total the folding time is roughly 4 hours. Here I put a plastic cover on the bowl and stuck it into the fridge to ferment overnight since I wanted to bake the next day.

The next day I took it out, I left it for a while outside so it would temper and then divided it into two. I folded the two doughs on themselves and let them stand for 30 min. Then I formed them in a boule and put them in their baskets to rest for sort of two hours. Then I baked them in the Dutch oven as it says in the book. This dough is very wet and I´ve tried baking it without the dutch oven and it has been a total disaster. So for this bread I prefer to use it, 25 minutes with a lid and 25 without lid until you have the color you want! This time it turned out pretty well (although not perfect, the scorings are not so good) So I´ll just have to continue practicing![/tp]

P1070716
P1070700

Categories
Fácil Imprescindibles

Very pop: sopa de tomate

P1070652P1070655
[tp lang=”es” only=”y”]Al más puro estilo Warholiano, pero nada de latas, hecha en casa. Una sopita de tomate perfecta para las cenas invernales que tanta pereza dan, a mi es que me gusta cocinar por el día con luz y solecito de ser posible. Así que esta sopa resuelve bien y rápido. Lleva un poco de bacon para los no vegetarianos que le da un toquecito muy rico, pero se lo podemos quitar.[/tp]

[tp not_in=”es”]In a true Warholian style but with no cans, homemade. A tomato soup perfect for winter dinners. Don´t know about you but I like to cook in daylight and with little sunlight if possible. So this works out well and quite fast for those evenings when I´d rather be on the couch! It has a bit of bacon but for vegetarians it can be removed.[/tp]

[tp lang=”es” only=”y”]Ingredientes

  • 8 tomates maduros (bien maduros)
  • 2 patatas
  • 1 diente de ajo
  • 1 cebolla morada
  • vino tinto
  • sal
  • pimienta
  • aceite de oliva
  • albahaca
  • bacon
  • agua
  • leche fresca

Primero hay que pelar los tomates. Truco viejo por si no lo sabéis, meterlos en agua hirviendo unos segundos y luego en agua helada (con hielos) otros segundos. La piel sale sólo tirando. Una vez pelados, picarlos en trozos. Pelar las patatas ( no muy grandes) y cortarlas en 4. Pelar y picar el ajo y la cebolla.

En una cacerola calentar un chorrito de aceite y sofreír el ajo y la cebolla. Añadir el tomate y freír un poco. Añadir las patatas y agua sólo para cubrir. Echamos un chorrito de vino y dejamos a fuego medio hasta que las patatas estén cocidas.

Una vez que estén licuamos todo. Añadimos un poco de leche hasta tener el punto de cremosidad que nos guste, añadimos la sal y la pimienta y colamos la crema en otro recipiente.

El bacon es lo más fácil. Cuatro lonchas en un plato, papel de cocina debajo y papel de cocina por encima, microondas 3 minutos, secamos bien con otro papel para que no quede grasoso. Nos quedara tostado y sin grasa. Cortamos unas hojitas de albahaca y con una tijera las troceamos sobre la crema, ponemos el bacon, añadimos un para de rebanadas de pan y listo![/tp]

[tp not_in=”es”]

Ingredients

  • 8 ripe tomatoes (ripe)
  • 2 potatoes
  • 1 clove of garlic
  • 1 onion
  • red wine
  • salt
  • pepper
  • olive oil
  • basil
  • bacon
  • water
  • fresh milk

First you have to peel the tomatoes. An old trick if you don´t know it, put them in boiling water a few seconds, then in iced water another second. The skin goes out just by pulling. Once peeled, chop them into pieces. Peel the potatoes (not too large) and cut them into 4. Peel and chop the garlic and onion.

In a pan heat a little oil and saute the garlic and onion. Add the tomato and fry a little. Add the potatoes and water just to cover. We take a splash of wine and leave it on medium heat until the potatoes are cooked.

Once they are, liquefy it all. Add a little milk till you reach the point of creaminess you like, add salt and pepper and strain it into another container.

The bacon is the easiest. Put four slices on a plate, a paper towel underneath and above, microwave oven for 3 minutes, and pat them dry with paper so they are not greasy. I like them roast and lean. Cut a sprig of basil and chop with a scissor on top of the cream, put the bacon, add a slice of bread and you are ready![/tp]

P1070646

Categories
Easy essentials Fácil Imprescindibles

Por mis huevos, oeuf mollets

P1070638P1070641
[tp lang=”es” only=”y”]El huevo, los huevos, soy una fanática perdida y enamorada de los huevos. Me da igual lo que digan al respecto que si comer huevos es malo, que si una vez por semana como mucho… no estoy de acuerdo. Soy de las que creo que vale la pena gastarse el dinero en unos buenos huevos, de gallinas sanas y de preferencia que corran libres por los verdes prados. Los huevos de gallinas presas y enfermas son malos, los otros no. Así que como me encantan, también me encanta prepararlos y creo que son de las cosas más complicadas de aprender a hacer bien. Por simples que parezcan unos huevos bien hechos tienen mucha complicación. Y la diferencia se nota. Una simple tortilla, una vez que estudiamos como se hace realmente una omelette, cambia por completo! La vida no es la misma una vez que una se come una omelette bien hecha, lo prometo. Sigo peleando con el huevo poché y el frito perfecto tiene su aquel.[/tp]

[tp lang=”es” only=”y”]Los Franceses, esos seres que se dedicaron a crear muchas de las técnicas de cocina que usamos en el mundo mundial y a estudiarlas y registrarlas por supuesto, tienen mucho que decir acerca de los huevos y muchísimas técnicas especificas de como prepararlos (en el libro de técnicas culinarias de Escoffier hay más de 90 sí… 90 recetas de huevos y eso sin llegar a los omelettes!) Y técnica es la palabra por que son reglas inamovibles de como preparar un tipo de huevo u otro. Estrictos, sí pero los resultados lo valen.

Me he propuesto aprenderlas todas (esa es la idea a menos) de momento vamos con una de las sencillitas. Oeuf mollet, esto que significaría huevo mullido es un tipo de huevo cocido. Se diferencia de el huevo cocido por el tiempo de cocción y el estado líquido de la yema. Se cuecen con cáscara por lo que tampoco son huevos poché.

Simple. Un par de buenos huevos, mientras más frescos mejor, pero esto es difícil de saber con exactitud. Un cazo con agua, que rompa a hervir y sólo cuando este hirviendo meter los huevos enteros. 5 minutos por reloj! sacar, pasar por agua fría y pelar con mucho cuidado ya que son muy delicados y si se nos rompen fuera del plato la yema se saldrá entera y será un pequeño desastre.

Un pan y unas espinacas y para mi al menos, poco hay más rico que esto![/tp]

[tp not_in=”es”]The egg, eggs, I’m a fan of eggs. I don´t care what they say about them, that eating eggs is bad for you, that you should only have them once a week… I don´t agree. I am think it´s worth spending your money on good eggs from healthy chickens that run free preferably by green meadows. Eggs from hens that are stuck and sick are bad for you, I believe eggs from healthy hens aren´t. So as I love them, I also love to prepare them. I think are the hardest things to learn to do well. As simple as they seem, well made eggs have some complications. And the difference is noticeable. A simple omelette, once you learn how an omelette is actually made, it changes it completely! Life is not the same once you have an omelet well done, I promise. I keep fighting the perfect poached egg and the fried is still tricky.

The French, those beings who were devoted to create many of the cooking techniques we use in the global world and of course to study and record them, have a lot to say about eggs and many specific techniques to prepare them (in the book of culinary techniques of Escoffier there are more than 90 yes… 90 egg recipes and that´s without reaching the omelettes!) And it´s quite technical, there are immovable rules on how to prepare a type of egg or other. Strict, yes but the results are worth it.[/tp]

[tp not_in=”es”]I intend to learn them all (that’s the idea at least) for now we go with one of the easy ones. An oeuf mollet (this would mean fluffy egg) is a type of cooked egg. It differs from the cooked egg in the cooking time and the texture of it´s liquid yolk. You boil them in the shell so they are not poached eggs.

It´s simple if you follow the rules. A couple of good eggs, freshest is best (I know this is difficult to know exactly). Take a pot with water to a boil and only when it´s actually boiling put the whole eggs in. 5 minutes per clock! time it. Take them out through some cold water and peel them carefully as they are very delicate and if you break them off the plate the yolk will pour all over and you will have a small disaster.

A good bread and some spinach and at least for me, there is little richer than this![/tp]

Categories
Easy essentials Fácil Imprescindibles Italia Italy

Carbonara real deal: sin nata


P1070664P1070668Vamos con una receta clásica aunque usualmente mal entendida. La carbonara nace en Roma, es un plato de pasta, spaghetti usualmente pero podría hacerse con fettuccine o rigattoni. Se basa en una manera rápida de preparar la pasta al huevo y panceta y contrariamente a lo que se suele hacer, no, no lleva nata.

Lo de la nata en todos los platos italianos es un misterio que no pretendo resolver… pero efectivamente éste y muchos otros no la llevan. Vamos a ello, es muy fácil de hacer y muy rápida, en este caso yo he optado por bacon en lugar de panceta. Es perfecta para un día con poco tiempo, yo casi me he decidido por instaurarla como plato oficial de los viernes.


P1070667Ingredientes

  • 250grs. de spaghetti
  • 4 lonchas de bacon (o panceta)
  • 1 diente de ajo
  • 2 huevos
  • queso parmesano
  • sal
  • pimienta
  • aceite de oliva

Poner una olla grande con agua a fuego alto, en cuanto rompa a hervir añadir la pasta y preparar 1 minuto menos de lo que pone en la caja. En este caso la mía ponía 11min. Pues 10. Sacar a un colador, echar un chorro de agua fría y dejar a un lado. Ni sal, ni aceite ni nada.

En una sartén calentamos un chorrito de aceite de oliva (poquito) y sofreímos el ajo. Picamos el bacon o panceta en trozos pequeños. Retiramos el ajo de la olla y freímos el bacon hasta que se dore un poco. Lo reservamos.

En un bowl echamos los dos huevos, añadimos la sal, pimienta y queso parmesano y los batimos bien.

Ahora, en la cacerola grande con un poco de calor (fuego medio) volvemos a meter la pasta, dejamos que se caliente un poco ya que se nos habrá enfriado un pelin. Apagamos el fuego y añadimos la mezcla de los huevos y el bacon y revolvemos todo bien. El calor de la pasta cocerá el huevo. Pasamos a un plato y ponemos queso parmesano al gusto por encima. Listo, en 15 minutos lo tenemos hecho!


P1070675

Categories
Bread and Bakery Complicado aunque vale la pena Dulces essentials Imprescindibles Masas y Pan Sweets

Roscón de reyes

P1070566P1070569
[tp lang=”es” only=”y”] Antes de que se me pasen las fechas en las que aun tendría sentido este post vamos con el roscón de reyes. El año pasado hice mi primer roscón y como salió bastante bien este año repetí. La receta es la misma, la de Madrid tiene miga sólo que yo le añado 7 grs. de levadura y alguna variación más he hecho este año. Me ha parecido menos trabajoso que el año pasado y después de la tortura fracasada de intentar hacer un Panettone de masa madre incluso se me ha hecho fácil! Aunque tiene su aquel. He de reconocer que este bollo navideño tardó mucho en conquistarme. De hecho no fue hasta que probé un roscón casero que mi pobre opinión sobre el roscón cambió. A partir de ese momento nos hicimos amigo, aunque con condiciones… no me gustan las frutas confitadas (para queja de mi chico) y no se las pongo, no me gusta que sepa demasiado a azahar y no me gustan rellenos. Aunque entiendo que para mucha gente sea un roscón demasiado “minimalista” como me dicen, para mi así está perfecto aunque bueno, algún día le pondremos frutas por darle gusto al novio.[/tp]

[tp lang=”es” only=”y”]La receta original de masa madre sin levadura esta aquí.

Os copio la que yo hice.

Ingredientes

  • 300 grs. de harina de fuerza
  • 7 grs. de levadura fresca
  • 140 grs. de masa madre de trigo blanco
  • 120 grs. de leche
  • 120 grs. de agua
  • 100 grs. de azúcar
  • 40 grs. de mantequilla
  • 2 huevos
  • 30-40 grs. de ron
  • 4 cucharaditas de agua de azahar
  • cáscara de limón
  • cáscara de naranja
  • canela en rama
  • almendras laminadas
  • almendras tostadas en trocitos

[/tp]

[tp not_in=”es”]Before we pass the dates in which it makes sense to upload this post let´s go with the Roscón de reyes. For those out of Spain this is a traditional bread made in Christmas time, specifically for “Reyes” which is celebrated in Spain on the 6th of January. Last year I made my first roscón and it went pretty well so I repeated this year. The recipe is the same I used last year from the blog Madrid tiene miga (in spanish).

I  added 7 grs. yeast and some  variations to the one  i’ve done this year. It felt less work than it did  last year and after the failed attempt at a sourdough Panettone it even felt easy! Although it has it´s complications. I must admit that this Christmas bread has taken some time to conquer my heart. In fact, it was not until I tried a homemade roscón that my low opinion of it changed. From that moment on we´ve become friends, but with some conditions… I do not like candied fruit (it´s traditional to put some) so I don´t put it, I also do not like too much orange blossom water and I do not like fillers ( it´s also custom to put whipped cream in it) . Although I understand that for many people here my roscón is too “Minimalist”  so they say,  for me it’s just perfect like this.

Ingredients

  • 300 grs. strong bread flour
  • 7 grs. yeast
  • 140 grs. sourdough white wheat
  • 120 grs. milk
  • 120 grs. water
  • 100 grs. sugar
  • 40 grs. butter
  • 2 eggs
  • 30-40 grs. de rum
  • 4 teaspoons orange blossom water
  • lemon peel
  • orange peel
  • cinnamon
  • sliced ​​almonds
  • chopped toasted almonds

[/tp]

P1070585

[tp lang=”es” only=”y”]La masa madre
Estuve refrescando mi masa con harina de trigo blanco, usualmente la tengo de centeno integral así que la tuve un par de días a punta de trigo y en el último refresco la alimenté con agua y leche como pone en la receta.

Con la masa madre lista empezamos con el primer turno. En una cacerola mezclar el agua con la leche y hacer una infusión con la piel de naranja, la del limón y la canela. Yo la naranja y el limón los rallé bastante. Dejar que la leche hierva y bajar el fuego. Dejar que se enfríe y cuando esté tibio añadir al azahar y el ron.

Sacamos la canela y parte de la ralladura de limón y naranja. Separamos 90 grs. de la infusión y los mezclamos con la levadura, la masa madre y la harina. Mezclamos muy bien deshaciendo bien la levadura. La masa es bastante pegajosa… amasamos bien hasta que esté suave, la dejamos reposar un rato y le vamos añadiendo la mantequilla de a pocos. Seguimos amasando (un buen rato) hasta que tengamos una masa lisa, suave y que no se nos pegue demasiado a la encimera.

Aquí unté un bowl grande con un poco de mantequilla y la puse a fermentar media hora fuera y luego toda la noche en la nevera. Al día siguiente por la mañana había casi duplicado su volumen.

Dejarla fuera un rato para que se atempere. Luego dividirla en dos formar dos bolas y dejarla reposar otro rato. Formar las roscas rompiendo el centro con los dedos enharinados y estirando la masa hasta darle la forma de anillo. Ponerlas sobre un papel de hornear y poner un vaso untado con un poco de mantequilla en el centro para que no se cierre el agujero.

Lo pintamos con los huevos batidos y lo dejamos fermentando hasta que vuelva a doblar el volumen. Como hace frío los dejé fermentando dentro de mi horno con una jarra de agua caliente para mantenerlos a una temperatura de unos 24-26 grados. Cuando hayan crecido los pintamos otra vez con huevo y le ponemos las almendras y el azúcar mojada (mezclar azúcar blanca con un poquito de agua para hacer esas bolitas que tiene por encima) y listo, al horno 200-220ºC unos 25min.

Tiene su complicación pero se puede hacer y sale bastante bien! Id revisando el horno para que no se queme por arriba y si veis que se tuesta demasiado ponerle un papel aluminio por encima el ultimo rato de horno.[/tp]

[tp not_in=”es”]With our sourdough started and ready to go let´s begin. In a saucepan mix milk with water and make a tea with the orange peel, the lemon and cinnamon. I grated thinly the orange and the lemon. Allow the milk boil and reduce heat. Allow to cool and when warm add the orange blossom water and the rum.
take out the cinnamon and some of the lemon and orange zest. Separate 90 grs. from your infusion and mix with the yeast, the sourdough and the flour. Mix very well for undoing the yeast. The dough is quite sticky… knead well until smooth, let rest for a while and start adding the butter little by little. Continue kneading (quite a while) until you have a smooth dough, smooth and that we is not sticking too much to the counter top.[/tp]

[tp not_in=”es”]Get a large bowl and smear with a little butter. Put the dough inside to begin fermentation after half an hour outside set overnight in the fridge. The next morning it should have doubled its volume.

Leave it outside for a while to warm up. Then divide it into two and form two balls, let it rest for another 10min. Form the rings breaking the center with floured fingers and stretching the dough into the shape of a ring. Put them on a baking paper and place a glass smeared with a little butter in the center so that the hole does not close.

Paint it with the beaten eggs and let it ferment until it doubles the volume again. As it is cold I had it fermenting inside my oven with a jug of hot water to keep them at a temperature of about 24-26 degrees. When they have grown again, paint them with egg for the second time and put the almonds and sugar on top (mix white sugar with a little water to make those sugar balls) Ready, get it to the oven at 200-220ºC about 25min.

It has its complications, but it does pretty well! Check the oven to prevent the top from burning and if you see that it´s getting too toasted put a foil over for the last minutes of cooking.[/tp]

P1070591

Categories
Dulces Easy essentials Fácil Imprescindibles Peruvian Recipes Sweets

Pie de limón, el postre que conquista.

P1060658P1070594
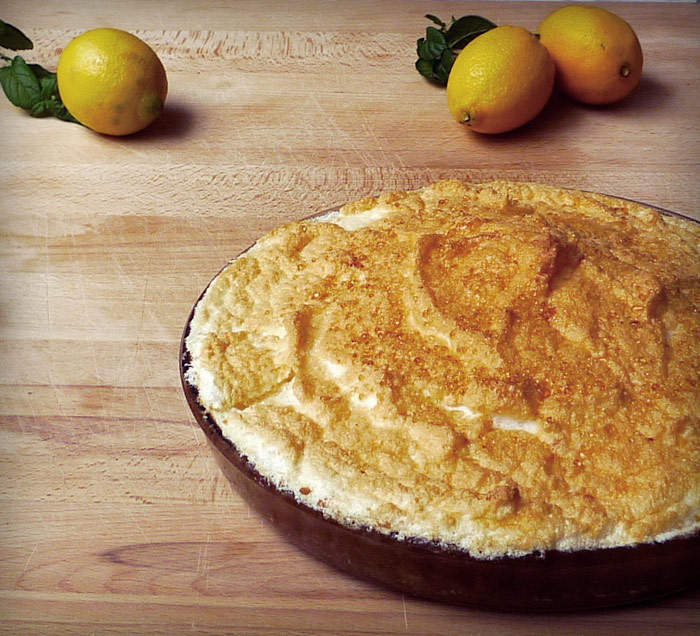
[tp lang=”es” only=”y”]Ésta fue la primera entrada de me kitchen. El primer post y el postre que me hizo pensar en que tenía que compartir esta receta con  los demás. El pie de limón es un postre clásico de la cultura anglosajona dónde se le conoce como Lemon meringue pie y lleva dando vueltas desde mediados del siglo XIX. Los Peruanos, no me pregunten cómo ni cuando nos lo hemos robado olímpicamente  y ahora es un postre clásico de la repostería peruana casera. Claro que en Perú no lo hacemos con limones (los amarillos) sino con limas (nuestros limones) con lo que realmente hacemos Key lime pie… pero terminologías aparte, no conozco a nadie a quién este postre no le deje enamorado. Es fácil, es rápido y es absolutamente delicioso. Eso sí tiene doscientasmil calorías… pero no es para comer a diario  y con lo bueno que está, se las perdonamos.  He decidido reeditar la receta básicamente por que se merecía un post más bonito.[/tp]

[tp lang=”es” only=”y”]Los ingleses tienen otra forma de hacerlo, la clásica, que lleva otro proceso de masa y de relleno. Esta no es la receta original  es la receta peruana en concreto la de mi casa y  aviso, esto es adictivo!

Hay algunas variaciones con la primera receta, vamos a ello.[/tp]

[tp not_in=”es”]This was the first entry in me kitchen. The first post and the dessert that made me think that I had to share this recipe with others. The lemon meringue pie is a classic dessert of Anglo-Saxon culture and carries around since the mid-nineteenth century. Peruvians (don´t ask me how or when) have stolen it and now it´s a classic homemade dessert in peruvian homes. Of course, in Peru we don´t do it with lemons (the yellow ones) but with limes (our lemons) so what we actually do would be Key lime pie… but apart from all those details, I don´t know anyone who does n´t love this pie. It´s easy, it´s fast and it´s absolutely delicious. It does have (I guess) too many calories… but we don´t eat this every day and besides it´s so good, that they are forgiven. I’ve decided to republish the recipe basically because it deserved a nicer post than the first one.[/tp]

[tp not_in=”es”]The English have another way to it, the classical, it involves another process in the dough and the filling since it´s custard. So this is not the original recipe, this is the Peruvian recipe and particularly my family´s recipe and take notice, this is addictive!

There are a few variations from the first recipe I published, so let’s do this.[/tp]

P1070595

[tp lang=”es” only=”y”] Ingredientes

  • Zumo de 4 limones 
  • 4 yemas
  • 6 claras
  • 1 lata leche condensada
  • 3/4 taza de azúcar blanca
  • 2 tazas de galletas maria trituradas
  • 1/2 taza de mantequilla

Masa
Triturar las galletas ( yo las meto en una bolsa  ziploc y les doy un poco con el martillo, así de rudimentario, pero podéis meterlas en una picadora por ejemplo o con la mano) colocar la galleta  triturada en un bowl y mezclar con la mantequilla hasta  formar una masa, he puesto 2 tazas de galleta por media de mantequilla pero las proporciones dependerán  del molde de pie que tengáis. Tiene que haber suficiente masa para cubrir el molde entero y la pared del mismo, pueden hacer un poco y si falta hacer más. Cubrir el molde y las paredes con una capa no muy gruesa pero que tape todo. Aplastando bien con los dedos para que se pegue.

Meter en el horno unos 10 minutos a 170ºC para que se seque. Lo sacamos y dejamos enfriar.

Relleno
Separar las claras de las yemas de 6 huevos. Echar en otro bowl 4 de las yemas, el zumo de 4 limones y la lata de leche condensada. Mezclar bien. tiene que quedar una crema uniforme. El huevo se cocerá con el zumo de limón.Es importante mezclarlo bien.

Merengue
Cogemos las claras de los 6 huevos y batimos a punto de nieve añadiendo  de a pocos el azúcar. Tienen que quedar bien batidas, para comprobar  sacar la batidora y deberían quedarse en la espátula de la misma sin caerse. Nunca he sido fan de las torres de merengue… prefiero el justo y necesario. Pero si queréis hacer esos merengues de catedral, usad más claras, unas 8 deberían bastar.

Montaje
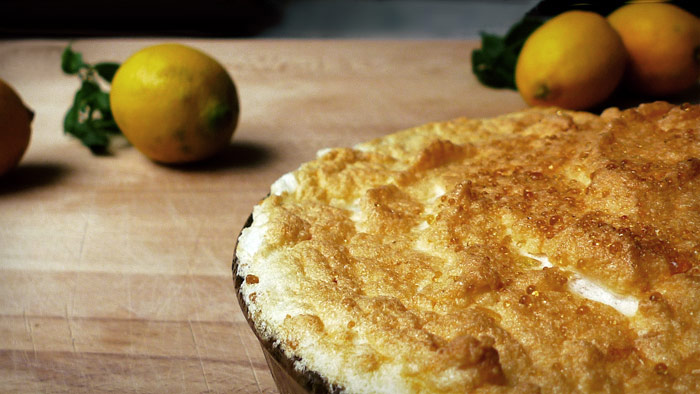
Colocar el relleno en la masa estirarlo bien para que cubra todo y por encima poner el merengue. Esto se puede hacer de muchas maneras, podemos ponernos creativos y con una manga pastelera hacerle formas o (como aquí) con una espátula de silicona haciendo una montañita, también podemos darle textura con un tenedor y dejarlo con formas y texturas distintas. Eso ya depende de vosotros, yo suelo terminar en la versión más simplificada de montaña rústica.

Cuando esté todo montado, le espolvoreamos un poquito de azúcar por encima (mínima) y lo metemos al horno unos minutos para dorar el merengue. Con eso hemos acabado, lo único malo de este postre es que no os durará ni un día![/tp]

[tp not_in=”es”]
Ingredients

  • Juice of 4 lemons
  • 4 egg yolks
  • 6 egg whites
  • 1 can condensed milk
  • 3/4 cup white sugar
  • 2 cups of crushed vanilla cookies
  • 1/2 cup butter

Dough
Crush the biscuits (I stuff them in a ziploc bag and give them a little with the hammer, so rudimentary I know but you can put them in a blender or do it by hand). Place the crushed biscuits in a bowl and mix with butter to form a dough, I have put 2 cups of cookies for half a cup of butter but the proportions will depend on the pie shell that you may have. There must be enough dough to cover the entire cast and the wall. Thereof, you can do this measures and make some more if necessary. Cover the pan and the walls with the dough. Crushing with your fingers to make it stick.
Place it in the oven for 10 minutes at 338 º F to get it dry. Take it out and let cool.
Filling
Separate the whites from the yolks of 6 eggs. Pour into another bowl 4 yolks and the juice of 4 lemons, add the can of condensed milk. Mix well until you have a uniform cream. The egg will get cooked with the juice. It´s important to mix well though.
Meringue
Take the whites of the 6 eggs and beat until stiff adding the sugar little by little. They must be well beaten, to check remove the blender and the meringue should stay in the same spatula without falling. I’ve never been a fan of meringue towers… I prefer it in a smaller amount. But if you want to make these sort of cathedral meringue, Make sure you use at least 8 whites.
Mounting
Place the filling on the dough and stretch it to cover well. Above all put the merengue. This can be done in many ways. You can get creative and with a pastry bag make forms or (as here) with a silicone spatula making a mound, you can also give it texture with a fork and leave it with different shapes and textures. That depends on you, I usually end up in the most simplified version of a rustic mountain.
When everything is mounted, sprinkle a little sugar on top (Minimum) and put it in the oven a few minutes to brown the meringue. So we are finished, the only bad thing about this dessert is that it won´t last a day![/tp]
P1070600P1070593

Categories
A bit more complicated Carnívoros essentials Imprescindibles Intermedio, un poco más de trabajo Italia Italy Meat

Ossobuco

P1070548P1070554

[tp lang=”es” only=”y”] Después de las (interminables) fiestas vuelve la calma, se acaban los días de descanso y hay que seguir con el ritmo habitual, así que estamos de vuelta. Lo bueno es que en estos pocos días libres he tenido tiempo de hacer varías cosas, por que hay que comer entre fiesta y fiesta. Así que una de las cosas que hubo en me kitchen fue este ossobuco. Ossobuco que significa literalmente hueso con hueco es un corte de carne típico de la cocina Italiana, Milanesa para ser exactos. No es un corte demasiado común en España pero se encuentra fácilmente y si no, tu carnicero te lo consigue. La pieza de carne en España se llama Jarrete y debe ser cortado grueso y con el hueso incluido. Dicho esto vamos con la receta. Esto es un plato muy casero, lentito y muy de invierno, aquí va.

Ingredientes

  • 4 cortes de ossobuco
  • 1 cebolla
  • 4 dientes de ajo
  • 4 zanahorias
  • 1 pimiento rojo
  • 8 champiñones grandes
  • 1 taza de vino tinto
  • 1 taza de caldo de ternera
  • sal
  • pimienta
  • aceite de oliva
  • vinagre balsámico

[/tp]

[tp not_in=”es”]After (these endless) holidays calm returns, I´ve run out of days off and have to keep pace with my routine, so we’re back. The good thing is I had time these days to do a lot of stuff! we need to eat between party and party. So one of the things that I did in my kitchen was this ossobuco. Ossobuco literally means bone with a hole. It is a cut of meat typical of Italian cuisine, Milanese to be exact. The piece of meat used is shank and must be cut including the bone, it should be thick about 3cm. That said let´s go with the recipe. This is a very homey dish, slow to cook and very winterly, here it goes.

Ingredients

  • 4 cuts ossobuco
  • 1 onion
  • 4 cloves of garlic
  • 4 carrots
  • 1 red pepper
  • 8 large mushrooms
  • 1 cup red wine
  • 1 cup of veal broth
  • salt
  • pepper
  • olive oil
  • balsamic vinegar[/tp]

P1070547

[tp lang=”es” only=”y”]Primero vamos a marinar la carne. Cogemos el ossobuco y lo pintamos con un poquito de vinagre balsámico y aceite de oliva virgen, les echamos sal y pimienta por ambos lados y los reservamos.

Picamos los ajos muy finitos, picamos la cebolla en rodajas finas y el pimiento en cubitos. Pelamos y picamos las zanahorias en rodajas. Los champiñones los limpiamos pero los dejamos enteros.

En una cacerola grande (yo lo hice en la cocotte) calentamos un chorrito de aceite a fuego alto. Cuando humeé sellamos las rodajas de carne por todos sus lados para que se doren bien. Las sacamos a un plato y las reservamos. Sólo sellar por fuera que ya se cocerán luego. Bajamos el fuego a medio y añadimos otro chorrito de aceite en la cacerola, sofreímos el ajo, el pimiento y la cebolla, cuando estén dorados añadimos el caldo y las zanahorias.

Volvemos a colocar la carne en la cacerola y añadimos el vaso de vino, la sal y la pimienta. Añadimos los champiñones encima de todo, tapamos y dejamos cocer a fuego lento. Tardará según la carne que tengamos más o menos 1 hora. Cada tanto ir revisando que no se queme el fondo y que no se evapore el liquido. Si vemos que se seca añadimos 1/2 taza más de caldo y 1/2 taza más de vino. Lo tenemos así hasta que veamos que la carne está bien cocida y blandita (debe separarse del hueso fácilmente) y las zanahorias están hechas.

Cuando esté listo retiramos la carne. Cogemos aprox. la mitad del caldo y las verduras y lo licuamos para hacer una salsa espesa.Se suele comer con risotto, yo hice arroz blanco. Colocamos la carne junto al arroz, algunas verduritas enteras con su jugo y la salsa por encima… está de muerte, el guiso con el hueso y el sabor que le da es todo un acontecimiento![/tp]

[tp not_in=”es”]First lets marinate the meat. We take the ossobuco and paint it with a little balsamic vinegar and virgin olive oil, we toss salt and pepper on both sides and reserve it.

Chop the garlic very small, chop the onion into thin slices and the bell pepper diced. Peel and chop the carrots into slices. Clean the mushrooms but leave them whole.

In a large saucepan (I did it in the cast iron) heat a little olive oil at high temperature. When it steams seal the slices of meat on all it´s sides until golden brown. Then get them to a plate and reserve. Lower the heat to medium heat and add another drizzle of oil into the pan, fry garlic, pepper and onion. When they are golden, add the broth and carrots.

Put the meat into the pan and add the wine glass, the salt and the pepper. Add the mushrooms above all, cover and let it simmer at low heat. It takes more or less 1 hour. From time to time review the fund does not burn and the liquid does not evaporate. If you see that it dries add 1/2 more cup of broth and 1/2 more cup of wine. We have it like this until we see that the meat is well cooked and squishy (easily separated from the bone) and carrots are made.
When ready retire the meat. Take approx. half of the broth and vegetables and liquefy to make a sauce. It is usually eaten with risotto, I made white rice. Put the meat next to rice, some of the vegetables with their juice and the sauce on top… It´s really good, the stew with the bone and flavor that it gives is a whole event![/tp]

P1070556
P1070557

Categories
Easy essentials Fácil Imprescindibles Vegetarian Vegetarianos

Primera receta del año! Crema de coliflor y patata

P1070502coliflor2

[tp lang=”es” only=”y”]Ante todo, feliz año nuevo! Vamos con la primera receta del año.Es una facilita y sobre todo de descanso. Descanso de comer y específicamente de comer tanta carne. No sé vosotros pero yo estoy ya un poco hartita de las comidas navideñas y con la cantidad de carne en todas sus formas que llevo ingiriendo en estos días,una necesita un día de vacaciones al menos. Así que hoy vegetarianos totales. Una crema de coliflor y patatas. Muy fácil, muy rápida y muy sanota.[/tp]

[tp not_in=”es”]Happy new year! Here is the first recipe of the year.Quite easy and perfect to take a break from all these holiday meat eating days. I don´t know about you but I’m a little tired of Christmas meals and the amount of meat in all of them is quite large. I need a meat vacation day so today we go completely vegetarian. A cream of cauliflower and potatoes. Very easy, very quick and very healthy.[/tp]

P1070506

[tp lang=”es” only=”y”]Ingredientes

  • 4 patatas
  • 1 coliflor
  • 1 vaso de vino blanco
  • 1 vaso de leche
  • sal
  • pimienta
  • romero fresco
  • aceite de oliva
  • 4 dientes de ajo
  • 1 cebolla blanca
  • leche fresca

Primero vamos a poner a cocer por un lado la coliflor y por otro las patatas. Las patatas al agua con piel y todo y hasta que estén hechas. La coliflor, la cortamos sacando las flores y separandolas lo más posible y al agua también a cocer hasta que esté blandita. Cuando ambas cosas estén cocidas las sacamos del agua, las escurrimos bien y las reservamos.[/tp]

[tp lang=”es” only=”y”]En una cacerola grande sofreímos los ajos pelados pero enteros y la cebolla picada en trozos (grandes) luego añadimos la coliflor, las patatas peladas partidas en trozos, el vaso de vino y la leche, dejamos a fuego medio bajo un rato. Cuando la cebolla ya esté cocida y blanda (con la batidora de mano) licuamos hasta tener una crema. Si queda demasiado espesa añadir un poco de agua. Añadimos la sal y la pimienta y un chorrito de aceite de oliva virgen por encima. Ponemos un poco de romero fresco y lista![/tp]

[tp not_in=”es”]Ingredients

  • 4 potatoes
  • 1 cauliflower
  • 1 glass of white wine
  • 1 glass of milk
  • salt
  • pepper
  • fresh rosemary
  • olive oil
  • 4 cloves of garlic
  • 1 white onion
  • fresh milk

Let’s begin to cook the potatoes and the cauliflower. Potatoes go into a lot of water (skin and all), until they made. For the cauliflower remove the flowers and separate them as much as possible. Then toss them to boil in water until soft. When both are cooked drain well and reserve.[/tp]

[tp not_in=”es”]In a large saucepan with a bit of olive oil fry the whole peeled garlic and the onion coarsely chopped then add the cauliflower, the peeled potatoes cut into pieces, the glass of wine and the milk, leave over medium low heat for a while. When the onion is cooked and tender (with your hand mixer) liquefy until you have a cream. If it´s too thick add a little water! Add salt and pepper and a drizzle of olive oil over it. Put some fresh rosemary leaves and you´re ready![/tp]

P1070508

Categories
Carnívoros Imprescindibles Intermedio, un poco más de trabajo

Chuletas de cerdo marinadas

P1070408P1070414

Hoy tocan chuletas de cerdo. Baratas, ricas y facilitas… cómo nos gustan. Ayer las cenamos con puré de batata he aquí la receta pero vamos con las chuletas.

Ingredientes

  • 4 chuletas de cerdo
  • 2 dientes de ajo
  • 1 cebolla morada
  • una ramita de romero
  • 1 taza de salsa de soja
  • 1 limón
  • 2 cucharadas soperas de miel
  • sal
  • pimienta
  • comino
  • 2 clavos de olor
  • aceite de oliva

P1070414

Preparamos en un bowl el marinado. La salsa de soja, el zumo de limón, la miel, una pizca de comino, sal, los clavos y la pimienta. En una fuente tipo de horno colocamos las chuletas y les echamos el menjunje, añadimos las hojitas de romero y le damos bien con un pincel por todos lados, es importante esparcir bien el menjunje en las chuletas para que caramelicen correctamente. Las dejamos así una hora. Mientras picamos el ajo en trocitos y la cebolla en rodajas. Cuando estemos listos, calentamos el aceite a fuego alto. Sofreímos el ajo y la cebolla y colocamos las chuletas en la sartén, escurriendo lo mejor posible el liquido que lo dejamos en la fuente. En este punto, retiramos los clavos del menjunje.

Marcamos bien las chuletas para que estén doradas por ambas caras. Luego bajamos el fuego y añadimos el liquido de la fuente, dejamos que se terminen de cocer a fuego bajito hasta que estén bien hechas pero fijaos que no se sequen, ni se os queme la salsa… un poco de puré al lado o lo que queráis y listo!


P1070407