Categories
Desayunos Dulces Fácil Imprescindibles

Galletas de batata (camote) y naranja

_DSC9592
_DSC9576
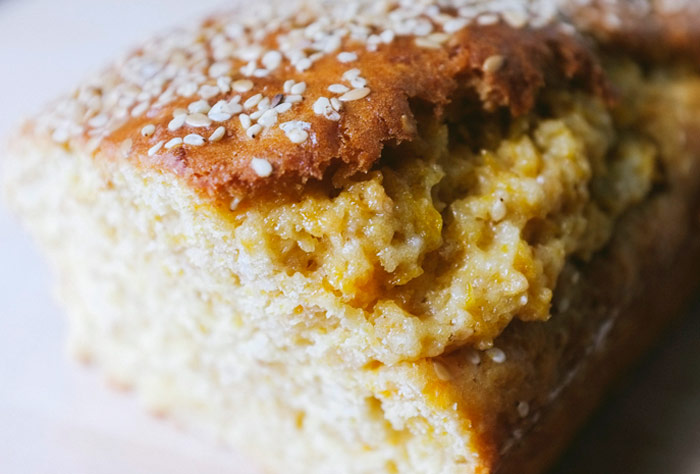
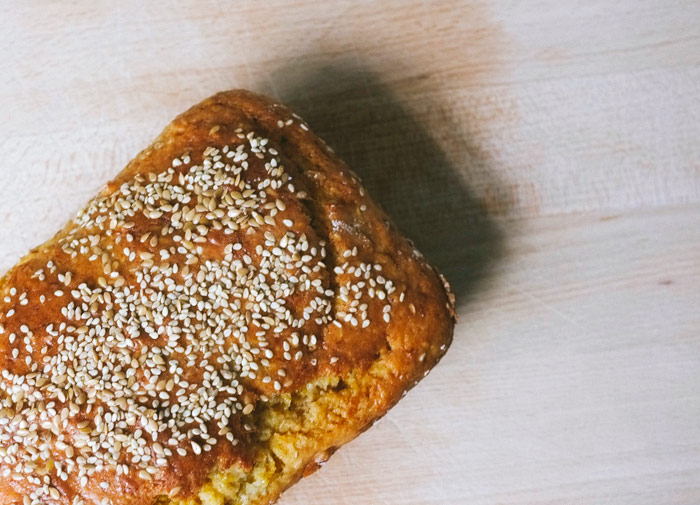
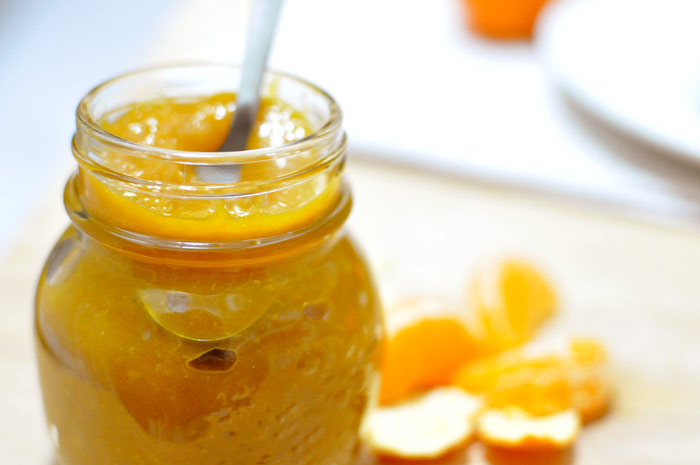
[tp lang=”es” only=”y”]De vez en cuando se me da por hacer algún invento y este tiene que ver con el antojo de unas galletas de naranja. Así que buscando recetas, encontré una de galletas sanas y sin mantequilla. La receta era con puré de manzana y algunas otras cosas. Pero como no tenía manzana (ni las otras cosas) y sí tenía batatas, pues con puré de batatas salió.[/tp]

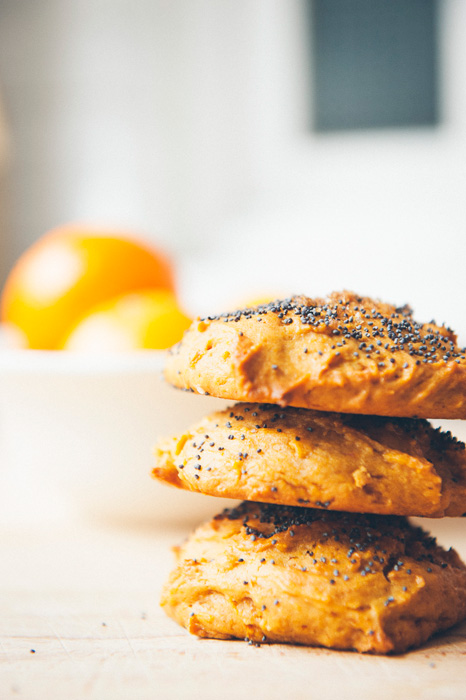
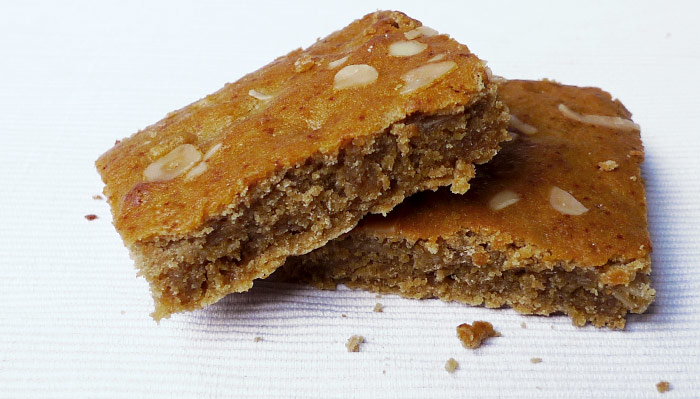
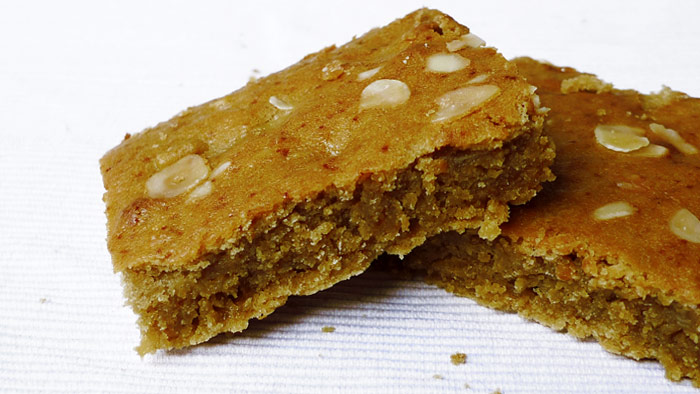
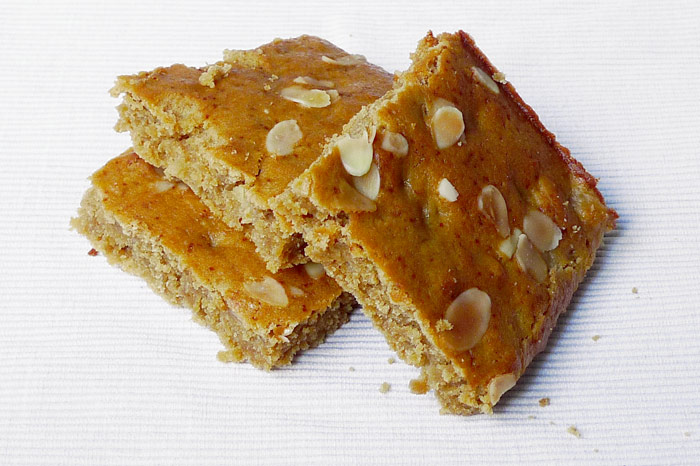
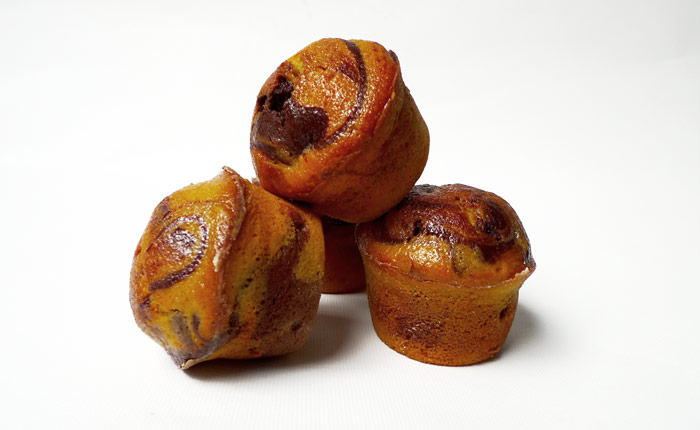
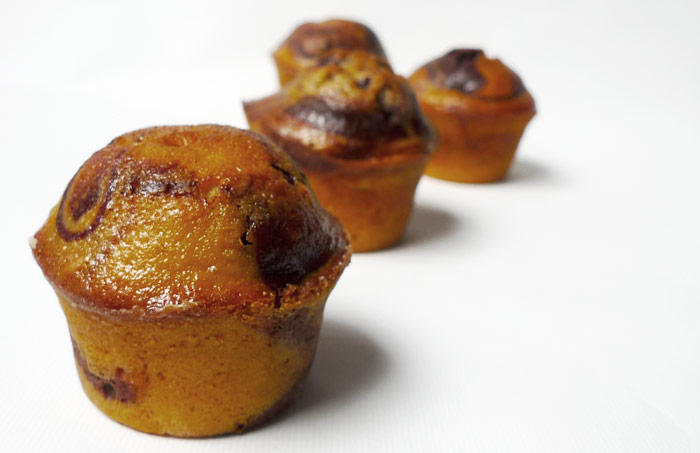
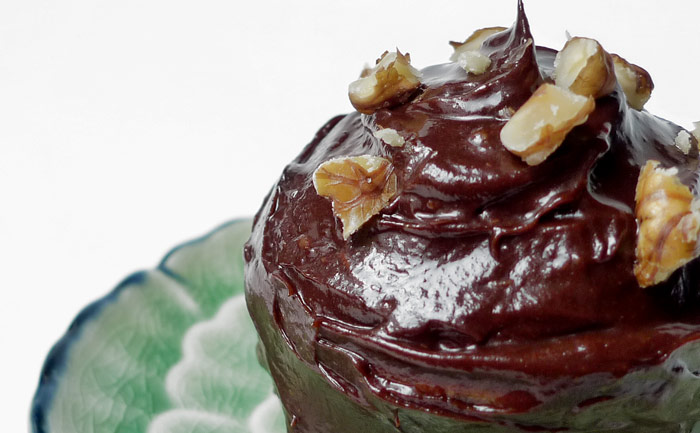
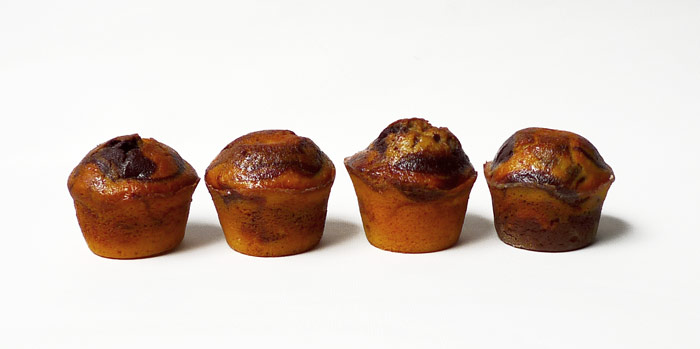
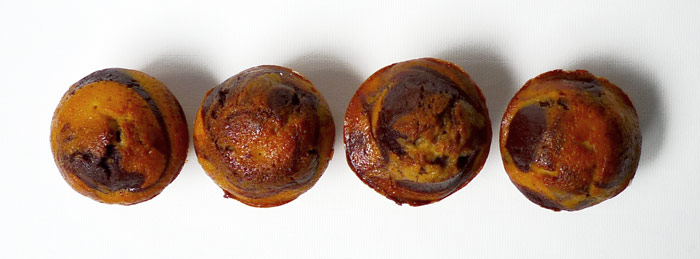
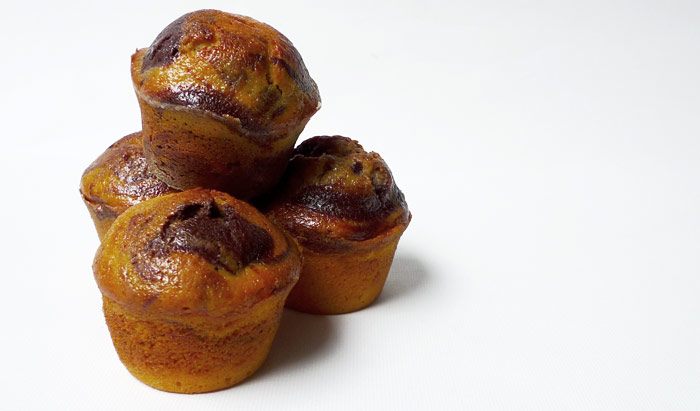
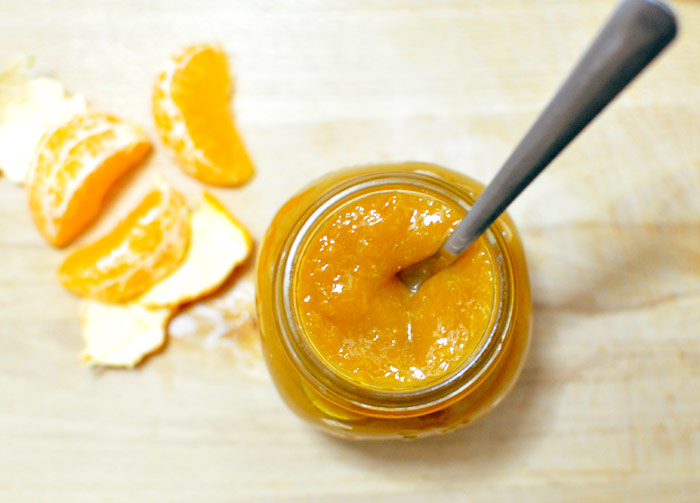
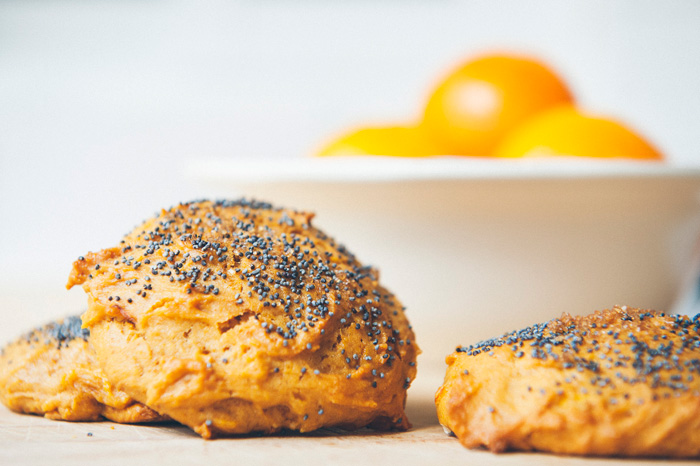
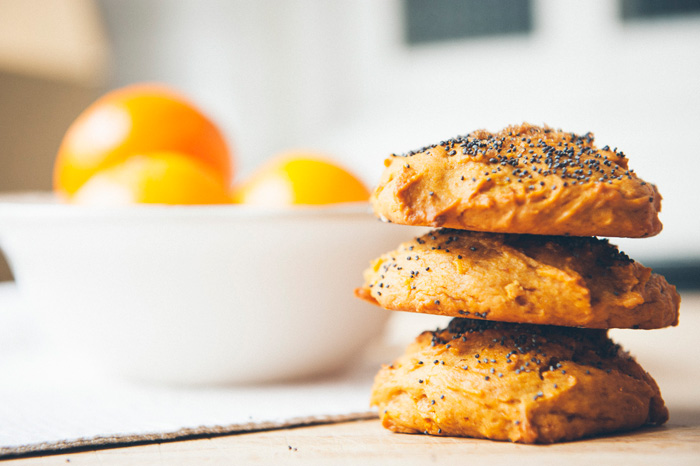
[tp lang=”es” only=”y”]Aparte el puré de batata con naranja es una de las cosas que más me gusta con lo que eso hecho galleta tenía que salir bien… y salió. Son unas galletas a medio camino entre galleta y bizcocho, blanditas, no demasiado dulces y con sabor a naranja. Perfectas para desayunar y muy fáciles. Encima son veganas así que valen para todos. Muy contenta las comparto. (Las fotos tan bonitas son de NSE fotografía que como no me dio tiempo a mi, me ha hecho el favor de hacerlas en compensación al desayuno que se tomado).[/tp]

[tp not_in=”es”]From time to time I like to make some inventions and this one has to do with a craving for orange biscuits. So looking for recipes I found one for healthy cookies without butter. The recipe called for applesauce and some other things. But since I did n´t have any apples (or the other things) and I did have some sweet potatoes, i made them with these.[/tp]

[tp not_in=”es”]Besides, mashed sweet potatoes with orange juice is one of my favorite things so it had to turn out well. They are cookies halfway between a cookie and cake, soft, not too sweet and with orange flavor. Perfect for breakfast and really easy. On top they are vegan so they work for all. Heres the recipe (The pretty pictures are from NSE photography).[/tp]

[tp lang=”es” only=”y”]Ingredientes

  • 1 1/2 taza harina repostera
  • 1 cucharadita de polvo de hornear
  • 1/2 cucharadita de sal
  • 1 taza de panela
  • 1/2 taza de puré de batata (batata cocida machacada)
  • 1/4 taza de aceite de girasol
  • 1 cucharada de ralladura de naranja
  • zumo de 1 naranja
  • un puñado de semillas de amapola

[/tp]

[tp not_in=”es”]Ingredients

  • 1 1/2 cup of pastry flour
  • 1 teaspoon baking powder
  • 1/2 teaspoon salt
  • 1 cup of brown cane sugar
  • 1/2 cup of sweet potato purée (mashed sweet potato)
  • 1/4 cup of sunflower oil
  • 1 tablespoon orange zest
  • juice 1 orange
  • a handful of poppy seeds

[/tp]

[tp lang=”es” only=”y”]Lo primero vamos a hacer nuestro puré de batata que consiste en cocer una batata grande (camote) y una vez cocido machacarlo con una cuchara hasta llenar 1/2 taza.[/tp]

[tp lang=”es” only=”y”]Una vez hecho esto ponemos la harina y el polvo de hornear en un bowl, le añadimos la sal. En otro mezclamos la panela con la batata, el aceite y el zumo y la ralladura de naranja. Mezclamos esto con la harina bien. Tendremos una masa pegajosa y uniforme. Fijarse bien de que no queden trocitos de batata sin aplastar.[/tp]


[tp lang=”es” only=”y”]Calentamos el horno a 170ºC y ponemos en la bandeja un papel de hornear. Colocamos una cucharada sopera de masa por galleta. Entran unas 8 en la bandeja, no se expanden nada hacia los lados. Les damos un poco de forma con el dedo para que queden más redonditas y un poco más aplastadas. Ponemos sobre cada galleta una pizca de panela y de semillas de amapola. Al horno unos 20 minutos. Las dejamos en la bandeja caliente unos 2 o 3 minutos más (fuera del horno) y luego las pasamos a una rejilla enfriar y a dejar que se endurezcan y listo. Esperad a que se enfríen que calientes están demasiado blandas! Ricas, sanas y desayunables, como nos gusta en mekitchen.[/tp]

[tp not_in=”es”]The first thing we will do is our mashed sweet potato. So cook a large sweet potato in water. Once cooked crush with a spoon and fill 1/2 cup. Once done put the flour and baking powder in a bowl, add salt. In another bowl mix the sweet potatoes with the sugar, oil and juice and orange zest. Mix this well with the flour. We’ll have a sticky and uniform dough. Carefully check that there are no sweet potatoes pieces and mash them if there are.

Heat the oven to 170 º C and put baking paper on the tray. Place a tablespoon of dough per cookie. You can fit up to 8 cookies in the tray, they don´t expand much to the sides. Finnish shaping them with your finger to make them more plump and slightly crushed. Add to each cracker a pinch of brown sugar and poppy seeds. Bake for 20 minutes or so. Left them on the hot pan about 2 or 3 minutes more (outside the furnace) and then pass them to a wire rack to cool to harden. EWait for them to cool completely. They are rich, healthy and breakfastable, as we like to do them in mekitchen.[/tp]

_DSC9578

Categories
Imprescindibles Masas y Pan

Una de pan de molde

P1070976

P1070979

P1070980

P1070984

Hoy dejo unas fotos de los panes de molde de la semana. Del libro Handmade Loaf de Dan Lepard con algunas variaciones(más harina integral y algunas semillas en el pequeño) han dado unas buenas tostadas con dulce de leche esta semana!

Categories
Carnívoros Imprescindibles Intermedio, un poco más de trabajo

Variación del estofado de carne

P1070987P1070990
[tp lang=”es” only=”y”]Ya estamos en primavera! (aunque hace frío) así que aprovecho con una variación del estofado de ternera que aún se puede. Es un plato de tiempo y cariño y para entrar en calor. Ya lo puse en el blog en Enero, pero como está tan rico os pongo una variante.[/tp]

[tp not_in=”es”]We are already in spring! (though it´s still cold) so I´ve made a variation on my Veal stew. It is a dish that takes time and love to warm us up. I made this post on the blog on January, but since it´s really good I´ve decided to post this variation.[/tp]

[tp lang=”es” only=”y”]Ingredientes

  • 300 gr de carne de ternera para guisar (de pecho)
  • 1 pimiento rojo grande
  • 1 cebolla morada
  • 2 dientes de ajo
  • 3 zanahorias grandes
  • 1 tomate
  • 1 vaso vino tinto
  • 1/2 vaso de agua
  • aceite de oliva
  • sal
  • pimienta
  • champiñones

[/tp]


[tp not_in=”es”]Ingredients

  • 300 g of calf meat for stew
  • 1 large red bell pepper
  • 1 onion
  • 2 cloves of garlic
  • 3 large carrots
  • 1 tomato
  • 1 glass of red wine
  • 1/2 glass of water
  • olive oil
  • salt
  • pepper
  • mushrooms

[/tp]

P1070988

[tp lang=”es” only=”y”] Lo primero, picar la cebolla en rodajas, el ajo en trocitos muy finitos, el pimiento y el tomate en cubos.Limpiar los champiñones y partirlos en 4 y pelar la zanahoria y cortarla en rodajas. Con todo listo y separado, poner a calentar un poco de aceite y cuando esté caliente sofreír el ajo y la cebolla. Añadir la carne para que dore un poco. Añadir el pimiento y el tomate. Freír sin que se nos queme revolviendo constantemente y bajar el fuego al mínimo. Añadir los champiñones, el vaso de vino y el agua. Tapar y dejar a fuego mínimo.

Pasada una media hora añadir la sal y la pimienta. Dejar cocer a fuego bajito y tapado hasta que la carne se deshaga fácilmente con una cuchara. Ir removiendo de rato en rato para evitar que se pegue. La ultima media hora quitar la tapa para reducir el caldo y que nos quede una salsa. Aquí todo es cuestión de tiempo y de revisar de rato en rato para ver que la cosa vaya bien. Si se nos seca mucho añadimos un poco más de vino, si nos queda demasiado liquido dejamos reducir un poco más… eso es todo. Tiempo y cariño.[/tp]

[tp not_in=”es”]The first thing to do is chop the onion into slices, the garlic chopped very finite, the pepper and the tomato in cubes. Clean the mushrooms and split them into 4 and peel the carrots and cut into slices. With everything ready and separated, put to heat some oil and when hot, fry the garlic and onion. Add the meat to brown slightly. Add the pepper and tomato. Fry stirring constantly to avoid that it burns and lower the heat to lowest. Add mushrooms, the glass of wine and the water. Cover and leave on low heat.

After about half hour add the salt and pepper. Cook very softly and covered until the meat flakes easily with a spoon. Stir from time to time to prevent sticking. The last half hour remove the lid to reduce the broth and allow it to become a sauce. Everything here is a matter of time and to check from time to time to see that things are going well. If it dries too much add a little more wine, if there is too much liquid boil down a little more… that’s all. Time and love.[/tp]

P1070997

Categories
Del Mar Fácil Imprescindibles

Dos amigos para el pescadito frito

P1070952P1070964P1070972
[tp lang=”es” only=”y”] Después de un par de fines de semana sin mucho tiempo para cocinar y hacer entradas, éste por fin he tenido tiempo de ir al mercado, cocinar para la semana y organizarme la vida. Así que del día de mercado del sábado salió este menú. Unos boquerones fritos, camotes y una ensalada de zanahoria. Todo muy fácil de hacer. Así que empezamos, que ya tocaba algo salado para variar un poco…[/tp]

[tp lang=”es” only=”y”]Ingredientes

  • 2 Camotes grandes (batatas)
  • 3 Zanahorias grandes
  • 1/2 Kg de boquerones
  • Sal
  • Aceite de oliva para freír
  • mayonesa
  • pasas
  • romero fresco

[/tp]

[tp not_in=”es”]After a couple of weekends without time to cook or make entries, this one I finally had some time to go to the market, cook for the whole week and organizing my life. So on Saturday I made this menu. Some fried anchovies, sweet potatoes and a carrot salad. All quite easy. So let´s get started,it was already time for something savory for a change…[/tp]


[tp not_in=”es”]Ingredients

  • 2 Large sweet potatoes
  • 3 Large carrots
  • 1/2 Kg of anchovies
  • Salt
  • Olive oil for frying
  • mayonnaise
  • raisins
  • fresh rosemary

[/tp]

P1070958
[tp lang=”es” only=”y”] Camotes dorados (batata)
Estos camotes son la receta de “Piru” que hace los mejores camotes que me he comido. Así que siguiendo esa receta llevo años intentando que me queden iguales. No es fácil, pero me acerco. Es importante que el camote (batata) sea bueno y no siempre lo es. Estos son de la cesta ecológica y se acercan más al sabor del camote de Perú (que es más dulce) que los que venden en el súper. La manera de hacerlos es simple. Primero ponerlos a cocer en agua con piel y todo. Una vez cocidos quitarles la piel y cortarlos en rodajas. Freír las rodajas en aceite de oliva a fuego medio sin que se quemen, hasta que estén doraditos por fuera, escurrirlos en papel de cocina. Deben quedar crujientes y dorados por fuera y blanditos y dulces por dentro. Añadirles una pizca de sal y ya. Una delicia, lo prometo.[/tp]

[tp not_in=”es”]Golden sweet potatoes
This sweet potatoes recipe is from “Piru” who makes the best sweet potatoes I have ever tried. So following her recipe I´ve spent years trying to make them the same way. It is not easy, but i am closer. It´s important that the sweet potatos are good and it´s not always the case. These are from my organic basket and they are closer to the taste of the sweet potato in Peru (which is sweeter) than those they sell in the supermarket. The way to do it is quite simple. First cook them in water with skin and all. Once cooked remove the skin and slice. Fry the slices in olive oil over medium heat without scorching, until they are golden brown on the outside, take them put and drain on paper towels. They should be crisp and golden on the outside, sweet and squishy inside. Add a pinch of salt. Delightful, I promise.[/tp]

P1070957
[tp lang=”es” only=”y”] Ensalada de zanahorias
La ensalada de zanahorias de la casa de mi abuela. Más fácil imposible. Pelar y rallar 3 zanahorias grandes. Mezclar la zanahoria rallada con mayonesa y unas cuantas pasas. Listo![/tp]

[tp not_in=”es”]Carrot salad
This is the carrot salad from my grandmother’s house. Really easy. Peel and grate 3 large carrots. Mix the grated carrots with mayonnaise and a few raisins. Done![/tp]

P1070969
[tp lang=”es” only=”y”]Pescadito frito
Bueno, de esto poco que decir a parte de que me los como como patatas fritas. 1/2 Kilo de boquerones limpios, los abro en mitad y les quito las raspas si son muy gordas. Pasarlos por harina y freír en aceite de oliva suave. Luego escurrir en papel de cocina. Añadir sal y unas hojitas de romero. Son un vicio.[/tp]

[tp not_in=”es”]Fried pescadito (fish)
Well, there is little to say about these except from that fact that I can eat them like chips. 1/2 Kilo clean anchovies, I open them in half and remove the cobs. TPass them through flour and fry in olive oil at mild temperature. Then drain on paper towels. Add salt and a sprig of rosemary. They are a vice![/tp]

Categories
Desayunos Dulces Fácil Imprescindibles

Blondies de pera y almendras

P1070945P1070940
[tp lang=”es” only=”y”]Volvemos! Estas ultimas semanas he estado con poco tiempo para cocinar y preparar posts pero conseguí hacer estos blondies el fin de semana y por fin tengo un hueco para subir la receta. Los blondies son como los brownies pero sin chocolate, la esencia es la misma. Tenía unas peras ecológicas en casa y decidí que había que hacer algo con ellas, así que salió esto. Hacen unos desayunos y meriendas bastante memorables! Vamos con la receta que es muy fácil…[/tp]

[tp not_in=”es”]We are back! These last few weeks I´ve been with little time to cook and prepare posts but I managed to make these blondies on the weekend and I finally have a bit of time to upload the recipe. The blondies are like brownies but without chocolate, the essence is the same. I had some great pears at home and decided I had to do something with them, so I did this. They make some pretty memorable breakfast! Let´s get on with the recipe, it´s very easy…[/tp]

[tp lang=”es” only=”y”] Ingredientes

  • 1/2 taza de mantequilla + un poco para el molde
  • 1 taza de azúcar morena
  • 2 huevos
  • 1 taza de harina
  • 1/2 cucharadita de polvo de hornear
  • 1 taza de pera pelada y picada muy finita
  • 1 taza de almendras laminadas
  • esencia de vainilla

[/tp]

[tp not_in=”es”]Ingredients

  • 1/2 cup butter + a bit more for the mold
  • 1 cup brown sugar
  • 2 eggs
  • 1 cup flour
  • 1/2 teaspoon baking powder
  • 1 cup peeled and chopped pear (very thin)
  • 1 cup sliced ​​almonds
  • vanilla scent[/tp]

[tp lang=”es” only=”y”]Calentar el horno a 180ºC. Preparar un molde de metal rectangular, no demasiado alto. Enmantequillar y enharinar.

Separar las claras de las yemas. Batir las claras a punto de nieve. En un bowl mezclar la mantequilla a temperatura ambiente con el azúcar y las yemas hasta que tengamos una mezcla homogénea. En otro bowl mezclar la harina con el polvo de hornear. Mezclar la pera pelada y picada en trocitos muy finitos con la mezcla de la mantequilla, el azúcar y las yemas. Añadir un chorrito de esencia de vainilla. Mezclar con la harina e ir incorporando las claras batidas poco a poco.

Añadir mitad de las almendras y mezclar bien. Colocar en la bandeja. esparcir por encima el resto de almendras. Hornear unos 25-30 minutos.Sacar, dejar en la bandeja unos dos minutos y luego pasar a una rejilla a enfriar.[/tp]

[tp not_in=”es”]Heat your oven to 180 º C. Prepare a rectangular metal baking tray. Grease and flour it.
Separate the whites from the yolks. Beat egg whites until stiff. In a bowl mix the softened butter with the sugar and yolks until you have a smooth mixture. In another bowl mix the flour with the baking powder. Mix the pear peeled and chopped into very small pieces with the butter mixture. Add a dash of vanilla essence.

Mix the flour and incorporate the egg whites gradually.Add half the almonds and mix well. Place on tray. Sprinkle with the remaining almonds. Bake about 25-30 minutes.Take out but leave it in the tray for about two minutes then move to a wire rack to cool.[/tp]

P1070951

Categories
Desayunos Dulces Fácil Imprescindibles

Bizcocho de calabaza y semillas

_DSF8195_DSF8203
[tp lang=”es” only=”y”] Ya llevaba varios días sin bizcocho y tuve petición. Así que como soy una blanda hice este bizcocho de calabaza y semillas, así animamos los desayunos madrugadores. Es muy sencillo. Realmente sólo lleva un poco de puré de calabaza sustituyendo algún ingrediente. Os cuento.[/tp]


[tp lang=”es” only=”y”]Ingredientes

  • 2 tazas de harina repostera
  • 2 cucharaditas de polvo de hornear
  • 3/4 taza de azúcar
  • 1 yogurt natural
  • 1 pizca de sal
  • 2 huevos
  • 1 taza de calabaza cocida machacada
  • 1 puñado de semillas de lino
  • 1 puñados de semillas de sésamo
  • mantequilla

[/tp]

[tp not_in=”es”]It´s been several days without a cake and I had a request. So (as I am a softy) I made this pumpkin and seeds cake, it´s also a great way to make better weekday breakfasts. It’s simple. It really just takes a little pumpkin puree and to replace some ingredients.[/tp]


[tp not_in=”es”]Ingredients

  • 2 cups pastry flour
  • 2 teaspoons baking powder
  • 3/4 cup sugar
  • 1 natural flavored yogurt
  • 1 pinch of salt
  • 2 eggs
  • 1 cup of smashed cooked pumpkin
  • 1 handful of flax seeds
  • 1 handfuls of sesame seeds
  • butter

[/tp]

_DSF8207

[tp lang=”es” only=”y”] Lo primero que hay que hacer es cocer la calabaza. Lo mejor es cocerla entera con piel y todo ya que la piel es dura y quitarla en crudo es difícil. Si la cocemos entera luego sale como mantequilla. La deshacemos bien con la mano, como haciendo un puré y llenamos una taza. Si os sobra hacer un puré de calabaza que está muy bueno.

Luego, separamos las claras de las yemas. Las claras las batimos a punto de nieve. Las yemas van a un bowl con el azúcar, el yogurt y mezclamos bien. Las claras a punto de nieve las reservamos.

En otro bowl ponemos la harina con el polvo de hornear. Le añadimos la mezcla del yogurt. Mezclamos bien, añadimos la calabaza, mezclamos. Añadimos las claras batidas y los puñados de semillas. Mezclamos todo hasta que este homogéneo.

Enmantequillamos nuestro molde y enharinamos. Al molde, al horno 170ºC una hora aprox. Ir revisando con vuestro palito! Es un bizcocho un poco húmedo así que cuando haya pasado la prueba del palito lo dejamos en el horno apagado y con la puerta semi abierta para que se seque un poco. Sacamos y dejamos que se enfríe bien en una rejilla.[/tp]

[tp not_in=”es”]The first thing to do is to cook the pumpkin. It´s best to cook it with the skin because it´s a hard one and to remove it raw is quite difficult. Boil it and then goes like butter. Smash it as making a puree and fill a cup. If you have any leftover pumpkin make a cream or soup!

Separate the whites from the yolks. Beat the whites until stiff. Yolks go into a bowl with sugar and yogurt, mix well. Reserve whites.

In another bowl put the flour with the baking powder. Add the yogurt mixture. Mix well, add the pumpkin and mix. Add the egg whites and the handfuls of seeds. Mix all until smooth.
Butter your your mold and flour. Take to oven 170 º C for approximately one hour. Check with stick at about 50 min. It´s a slightly damp dough so when you have passed the stick test leave it inside (the oven turned off) with the door half open to dry slightly. Then let it cool completely in a rack.[/tp]

_DSF8206

Categories
Desayunos Dulces Fácil Imprescindibles

Mega cookies de chocolate

P1070917P1070919

[tp lang=”es” only=”y”]Estoy muy dulcera últimamente y especialmente obsesionada con las galletas. El Domingo me entró una necesidad de esas de “hacer galletas” que me entran a veces y no tenía mantequilla! Así que como no me iba a quedar sin galletas, esto me llevo a tener que buscar opciones sin mantequilla, lo cual para unas galletas no es tarea fácil. Pero entre algunas ideas encontré una receta de galletas hechas con aceite en lugar de mantequilla así que decidí probar un camino exótico y usar aceite de oliva extra virgen y chocolate y añadir unas cuantas cosas más, por ver que pasaba.

El aceite que tenemos en casa es un aceite de una cooperativa de Almería dónde la familia de mi chico lleva sus olivas a prensar, un aceite fuerte, denso y con un sabor a estarte comiendo el árbol de olivas entero. Delicioso. Así que en lugar de usar el aceite “suave” me tiré a la piscina con el intenso. La mezcla de chocolate puro y aceite de oliva es genial, unas galletas con un sabor fuerte, unos añadidos más y el resultado son estás cookies, sanas, grandotas, deliciosas y nada empalagosas. Son unas galletas especiales a medio camino entre galleta y brownie, con harina integral y frutos secos, una sola te deja hasta arriba. Advierto, no apta para gustos galleteros clásicos![/tp]


[tp lang=”es” only=”y”]Ingredientes

  • 1 taza de harina integral de trigo
  • 1/2 taza de harina blanca repostera
  • 1/2 cucharadita de polvo de hornear
  • 3/4 taza de azúcar de caña (integral)
  • 1/4 taza de aceite de oliva extra virgen (si no nos atrevemos con el intenso, reemplazar por aceite de oliva suave)
  • 2 huevos
  • 1 cucharadita de esencia de vainilla
  • 5 cucharaditas de cocoa en polvo (chocolate puro, yo uso Valor)
  • Un puñados de arándanos secos
  • Un puñado de chips de chocolate
  • Un puñado de nueces
  • Agua
  • Papel de horno

[/tp]

[tp not_in=”es”]I’m very sweet driven lately and especially obsessed with cookies. On Sunday I had one of those needs to “bake cookies” I have some times and I had no butter! So since I was n´t going to be left without my cookies, I started looking for recipe options without butter, for cookies this is no easy task. But among some ideas I found a cookie recipe that used oil instead of butter so I decided to try an exotic path and use extra virgin olive oil and pure chocolate plus a few more things, to see what happened.

The olive oil we have at home is from a cooperative oil in Almería (Spain) where my boyfriend´s family carries their olives to be pressed, it´s a strong oil, dense and flavored, delicious. So instead of using “soft olive oil ” I took the plunge with the intense one. The mixture of pure chocolate and olive oil is great, it gives a strong flavor that with a few more additions results in these cookies which are, healthy, huge, delicious and not so sweet. These are special cookies halfway between a cookie and a brownie, whole wheat flour and nuts, They are quite filling. I warn you, these are not suitable for a classic cookie lover!

Ingredients

  • 1 cup whole wheat flour
  • 1/2 cup white pastry flour
  • 1/2 teaspoon baking powder
  • 3/4 cup sugar cane (brown sugar)
  • 1/4 cup extra virgin olive oil (if you do not dare with the intense, replace it with mild olive oil)
  • 2 eggs
  • 1 teaspoon vanilla extract
  • 5 teaspoons of cocoa powder (pure chocolate)
  • A handful of dried cranberries
  • A handful of chocolate chips
  • A handful of nuts
  • Water
  • Baking paper

[/tp]

[tp lang=”es” only=”y”] En un bowl batir los huevos, añadir el azúcar, añadir la esencia de vainilla y el cacao, batir todo bien. En otro mezclar las harinas con el polvo de hornear. Juntar ambas mezclas. Añadir los chips, los arándanos y las nueces. Mezclar todo bien para que se repartan bien los frutos secos y los chips. Si queda demasiado seca, añadir una cucharada de agua.

Poner un papel de horno en la bandeja. Calentar el horno a 170ºC. Colocar una cucharada sopera de masa en la bandeja, darle forma con la mano aplastando un poco. Dejar espacio entre galleta y galleta ya que crecen. Yo puse 6 en una horneada y 6 en la otra. Meter al horno 15 minutos. Sacar con una espátula con cuidado por que salen “blandas” y se endurecen cuando se enfrían. Dejar en la bandeja caliente 2 minutos más, pasar a una rejilla a enfriar.

Esperar a que la bandeja se enfríe para meter la segunda horneada (esto es importante ya que con la bandeja caliente se engrasaran) dejarlas enfriar bien y guardarlas en un tarro de galletas, si es de cierre hermético, mejor. Estas galletas están mejor al día siguiente y según pasan los días mejoran, recomiendo dejarlas enfriar muy bien antes de probarlas, vale la pena aguantarse, lo prometo.[/tp]

[tp not_in=”es”]In a bowl beat the eggs, add the sugar, vanilla essence and cocoa, beat all well. In another one mix the flour with the baking powder. Put together both mixtures. Add the chips, cranberries and walnuts. Mix well so that the nuts and chips get well distributed. If it´s too dry add a tablespoon of water.[/tp]

[tp not_in=”es”]Place a baking paper on the tray. Heat oven to 170 º C. Place a tablespoon of batter into the pan, shape by hand crushing a little. Leave space between them since they will grow. I got 6 in one batch and 6 in another one.Place in the oven for 15 minutes. Remove carefully with a spatula since they come out soft and harden when cooled. Leave them on the hot tray for 2 more minutes then move them to a wire rack to cool.

Wait for the pan to cool down for the second batch (This is important because with the hot tray they´ll get greasy). Let them cool well and store them in a cookie jar, better if it has sealing. These cookies are better the next day. I strongly recommend to let them cool well before tasting, it´s worth it I promise.[/tp]

P1070915

Categories
Desayunos Dulces Fácil Imprescindibles Masas y Pan

Tostadas francesas en pan de masa madre

P1070909
[tp lang=”es” only=”y”]La tostada francesa, pain perdu, prima de la torrija, ésa. Las recetas, que dan vueltas desde el siglo XV, han sido siempre una forma de reciclar el pan viejo, y yo, en este caso, utilicé el roca miche del curso de Hamelman. La miche u hogaza que hicimos de 1.5k, integral, maravillosa y de masa madre, se fue en parte al congelador (tenía exceso de pan en casa, si eso es posible) así que después de un par de días de descongelarla había que hacer algo con ella. Qué mejor para un pan francés que unas tostadas francesas ¿no?. Usar un pan como este, con ese carácter y ese sabor tan intenso, en una tostada francesa da un resultado diferente, no van a quedar igual que con un pan más suave y de trigo blanco ya que este pan es más duro, con más corteza y con una miga que se deshace menos. Pero el resultado ha sido glorioso, probadlo.[/tp]

[tp not_in=”es”]French toast, pain perdu, or torrijas. Recipes that have been spinning since the fifteenth century, they´ve always been a way to recycle old bread, in this case I used a miche from the Hamelman course. The miche or loaf we made was 1.5k, whole wheat, wonderful and all sourdough. It was partly in the freezer (I had too much bread at home, if that’s possible) so after a couple days of taking it out I had to do something with it. What could be a better end for a French bread than a French toast, right? Using this bread, with so much character and flavor in a French toast gives a bit of a different result. It´s not going to turn out the same than with a softer white wheat bread as this bread is harder, with more crust and a tough crumb. But I have to say the result was glorious, try it.[/tp]


[tp lang=”es” only=”y”]Ingredientes

  • 1 huevo
  • leche
  • mantequilla
  • canela
  • nuez moscada
  • sirope de arce (miel de maple)
  • Pan viejo en rodajas

En una bandeja de horno colocar el pan en rodajas. En un bowl batir el huevo y añadir la leche, la canela, y la nuez moscada. Mezclar bien. Echar esta mezcla en la bandeja sobre el pan. Tiene que haber suficiente líquido para que el pan quede bien mojado. Dejarlo reposar por un lado y pasados unos 10 minutos girarlo y que repose por el otro lado. Se tiene que empapar bien.

Calentar mantequilla en una sartén y freír las rodajas una a una para dorar bien ambos lados. Las sacamos y las reservamos. Las ponemos de nuevo en la bandeja de horno y las metemos al horno unos 10 minutos a 170ºC. Sacar y servir con un poco de mantequilla y sirope de arce (miel de maple). Listo, auguro un desayuno memorable.[/tp]

[tp not_in=”es”]Ingredients

  • 1 egg
  • milk
  • butter
  • cinnamon
  • nutmeg
  • maple syrup
  • Old sliced ​​bread

[/tp]

[tp not_in=”es”]In a baking pan place the sliced bread. In a bowl beat the egg and add milk, cinnamon, and nutmeg. Mix. Pour this mixture over the bread tray. There should be enough liquid so that the bread is well soaked. Let stand on one side and after about 10 minutes turn it and let it sit on the other side. It has to get soggy.

Heat butter in a pan and fry the slices one by one to brown well on both sides. Take them out, put them back on the baking pan and put them in the oven for about 10 minutes at 170 º C. Remove and serve with a little butter and maple syrup. Voilà! I predict a memorable breakfast.[/tp]

P1070908

Categories
Desayunos Dulces Imprescindibles Intermedio, un poco más de trabajo

Muffins marmoleados y un frosting de aguacate

P1070903P1070900
P1070885
[tp lang=”es” only=”y”] Este fin de semana he probado un par de recetas que tenía en mi cabeza (y en mi pinterest) hace tiempo. Una era estos muffins marmoleados y la otra era un frosting de chocolate vegetal. Así que opté por hacer un dos por uno y juntarlas. Vamos primero con los muffins. Yo soy muy de muffins. Me gustan más que los cupcakes. La diferencia es clara, el muffin es más una masa cercana a un bizcocho y el cupcake es una tarta en miniatura. El cupcake usualmente es menos interesante en el bizcocho y se apoya más en los frostings y decoraciones varias, y a mi eso no me termina de convencer. Algunos frostings están muy buenos pero la mayoría suelen ser una tonelada de grasa con azúcar sin más y como estén llenos de colorantes, ya me matan! No, no me gustan los bizcochos azules que le voy a hacer. Así que usualmente me resisto.[/tp]

[tp not_in=”es”]This weekend I tried a couple of recipes that were roaming in my head (and in my pinterest) for a while. One was these marbled muffins and the other one was an avocado chocolate frosting. So I decided to do both and bring them together. The muffins first. I like muffins more than cupcakes. The difference is clear, the muffin dough is closer to bread and a cupcake is a miniature cake. The cupcake´s cake is usually less interesting and relies more on the various frostings and decorations which does not convince me at all. Some frostings are very good, but most of them are usually a ton of fat and sugar without anything further and if they are full of dyes they kill me. No, I do not like blue cupcakes, sorry. So usually I resist myself.[/tp]

P1070893

[tp lang=”es” only=”y”]Sin embargo hace tiempo que veo esta receta de crema de chocolate de aguacate. Sí, de aguacate. Así que como mis muffins ya de por si son bastante “sanotes” pensé que sería una forma ideal de ponerles un poco de frosting y hacerles la gracia! Y funciona muy bien. Esto es algo que en las recetas de postres veganos se usa mucho y a mi lo de comerme un frosting que es un aguacate con todas su propiedades nutritivas y que encima que está bueno, me ha convencido. No os voy a mentir, no está más rico que un buen fudge hecho a mano con leche buena… pero está bastante mejor que esos fondants de plástico en los que ni sabes que comes y uno se lo come con mucha tranquilidad pensando que encima de comerme un dulce, le hago bien a mi cuerpo y a mi colesterol! Así que vamos a ello.[/tp]

[tp not_in=”es”]I´ve been seeing this recipe for chocolate avocado cream for a while. Yes, Avocado. So as my muffins already are quite “healthy” I thought it would be an ideal way to bring them a bit of frosting and do the trick! It worked very well. This is something quite used in vegan dessert recipes and I kind of love the idea of having a frosting that is an avocado with all its nutritional properties and besides it´s good! It has convinced me. I won´t lie, is not richer than a good handmade fudge made with good milk… but it´s much better than those plastic fondants you buy! Here you know what you eat and happily think about eating a sweet that´s good on your body and on your cholesterol! So let’s do this.[/tp]

P1070894

[tp lang=”es” only=”y”]Los muffins
Ingredientes

  • 2 tazas de harina repostera
  • 2 cucharaditas de polvo de hornear
  • 3 huevos
  • 1 taza de yogurt natural ecólogico
  • 1 taza de azúcar
  • 1 pizca de sal
  • 4 cucharadas soperas cacao en polvo ( yo uso valor puro)
  • 1 pizca de vainilla en polvo
  • 1/4 taza de aceite de oliva suave
  • mantequilla

[/tp]

[tp not_in=”es”]The muffins
Ingredients

  • 2 cups pastry flour
  • 2 teaspoons baking powder
  • 3 eggs
  • 1 eco cup plain yogurt
  • 1 cup sugar
  • 1 pinch of salt
  • 4 tablespoons cocoa powder
  • 1 pinch of vanilla powder
  • 1/4 cup mild olive oil
  • butter

[/tp]

[tp lang=”es” only=”y”]Lo primero que hacemos es poner la harina, la sal y el polvo de hornear en un bowl grande. En otro mezclamos el azúcar con el yogurt. Separamos las yemas de las claras de los 3 huevos. Las yemas las echamos al bowl del yogurt y mezclamos bien. Las claras las batimos a punto de nieve y las reservamos.

Incorporamos la mezcla del yogurt a la de la harina. Mezclamos bien e incorporamos las claras batidas poco a poco. Ahora tenemos una masa de bizcocho. Pasamos la mitad de nuestra masa a otro bowl. A una mitad le añadimos una pizca de vainilla en polvo. A la otra le añadimos el cacao. Mezclamos bien, sobre todo la del cacao. Añadimos mitad del aceite a cada una y mezclamos. Cuando esté todo bien mezclado, enmantequillamos y enharinamos nuestros moldes de muffin. Yo los hice en lata, pero pueden ser en silicona. Ponemos una cucharada grande de la masa de vainilla y encima una de la de cacao. Con una cucharilla movemos un poco para que se mezclen, pero sin mezclarlas demasiado como para que cambien de color! Queremos trozos blancos y trozos negros así que es sólo moverlas un poco en el molde para que hagan ese efecto marmoleado.

Al horno a 180ºC unos 35-40 minutos. Sacar y dejar enfriar en una rejilla.[/tp]

[tp not_in=”es”]The first thing we do is put the flour, salt and baking powder in a large bowl. In another one mix the sugar with the yogurt. Separate the yolks from the whites of the 3 eggs. Put the yolks go in the bowl with the yogurt and mix well. Beat the whites until stiff and reserve.

Incorporate the yogurt mixture into the flour. Mix well and incorporate the egg whites gradually. Now you have a cake batter. Split half the dough into another bowl. To one half add a pinch of vanilla powder. To the other one add the cocoa. Mix well, especially the cocoa. Add the oil (half and half) into each batter and mix. When it´s well blended,butter and flour your muffin molds. I made them in tins but it´s ok if you have silicone. Put a big scoop of vanilla dough on the mold and on top a spoonful of cocoa. With a teaspoon move a little to mix but without mixing too much for you don´t want to mix colors! We want black pieces and white pieces, so move just a bit in the mold to make that marbling effect.

Bake at 180 º C for 35-40 minutes. Remove and let it cool on a rack.[/tp]

P1070889
P1070880

[tp lang=”es” only=”y”] Ya tenemos eso así que vamos con el frosting. Esto puede sonar extraño.

El frosting
Ingredientes

  • 1 aguacate maduro
  • 5 cucharadas soperas de cacao en polvo
  • 5 cucharadas soperas de azúcar de caña

Licuar el aguacate con el cacao y el azúcar. Ir verificando, en principio yo le puse 3 de cada, pero me sabía demasiado a aguacate así que aumenté. Probad, lo mejor es ir ajustando a nuestro gusto. El aguacate hace de mantequilla y deja una crema perfecta para embadurnar cualquier tarta, cupcake o bizcocho!

Insito, no es igual que un fondant bien hecho pero está muy rico y bastante más sano y claro, apto para veganos![/tp]

[tp not_in=”es”]So we already have those made, let´s go with the frosting. This may sound strange.

The frosting
Ingredients

  • 1 ripe avocado
  • 5 tablespoons of cocoa powder
  • 5 tablespoons cane sugar

Blend the avocado with cocoa and sugar. I began with 3 tablespoons, but It felt too avocadish so I increased. Trying is the best way to adjust it to our liking. The avocado makes the “butter” and leaves a perfect cream to daub any cake, cupcake o muffin!

Even though it´s not like a well-made fondant it´s very rich, more healthy and suitable for vegans![/tp]

P1070888

Categories
Complicado aunque vale la pena Desayunos Imprescindibles Masas y Pan

¡Que coman brioche!

P1070833P1070838
[tp lang=”es” only=”y”]Por fin! Ya que es san Valentin y esas cosas, a mi como que el Brioche me pega con el amor ¿no? Un pan de yemas, dulce, con mantequilla a más no poder (estos franceses) y absolutamente delicioso. No dura nada, las tostadas de brioche son elevar el desayuno a una categoría superior, esto es así. Estos son de las famosas masas rescatadas. Después de pasar la receta de Hamelman por la calculadora panarra ya que la receta es para 6.600kg y como que se nos hace un poco demasiado por muy bueno que esté, os dejo la receta adaptada para 500grs. de harina.[/tp]

[tp not_in=”es”]It´s St.Valentine´s day and for me Brioche is synonym of love, huh? A yolky bread, sweet, with more butter than you could handle to eat (these Frenchies) and absolutely delicious. It won´t last long, brioche toasts raise breakfasts to a higher category. These are the famous rescued doughs from my course. After passing the Hamelman recipe by a baker´s calculator (since the recipe is for 6.600kg and that may be a bit too much) I give you the recipe adapted to 500grs. of flour.[/tp]

P1070840

[tp lang=”es” only=”y”]Ingredientes

  • Harina de fuerza ( la receta usa una panadera potenciada por lo visto) 500gr. (100%)
  • sal 12.5gr. (2.5%)
  • azúcar 60gr.(12%)
  • mantequilla (terminantemente prohibido usar margarina) 250gr.(50%)
  • Levadura 35gr.(7%)
  • Agua 45gr.(9%)
  • Huevos 250gr.(50%)

*Total porcentaje 230.5%

Mezclar todos los ingredientes menos el azúcar y la mantequilla, Amasar hasta tener una masa más o menos lisa e ir añadiendo de a poquitos el azúcar y la mantequilla. Hay que amasar hasta que la masa esté lisa, manejable, bonita y no se nos pegue a la encimera (esto puede tardar un poco). Hay que mantener la mantequilla fría y un tip de Hamelman es tener todos los ingredientes fríos (de la nevera). No queremos que la mantequilla se caliente por que nos quedaría un brioche grasoso.

En su receta pone que la dejemos toda la noche en la nevera, en un bowl cubierta con un film. A la mañana siguiente la formamos. El formado del brioche realmente puede variar mucho. En este caso yo me fui a hacer bolitas, 6 bien apretadas y colocar una junto a otra en el molde previamente enmantequillado y enharinado. Dejar levar una o dos horas aprox. Lo pintamos con 1 huevo batido (yo me olvidé en este caso) y lo metemos al horno.El horno a 200ºC, entre 40 y 45 minutos, ir verificando, si se tuesta mucho por encima, que se tostará… ponerle un papel Albal para que termine de hacerse y no se queme.

Lo dicho, desayunar esto es algo de otro planeta! así que cual Maria Antonieta ¡Que coman brioche![/tp]

[tp not_in=”es”]Ingredients

  • Strong bread flour 500gr. (100%)
  • salt 12.5gr. (2.5%)
  • Sugar 60gr.(12%)
  • butter (strictly forbidden to use margarine) 250gr.(50%)
  • yeast 35gr.(7%)
  • Water 45gr.(9%)
  • Eggs 250g.(50%)

[/tp]

[tp not_in=”es”]*Total percentage 230.5%

Mix every ingredient except the butter and the sugar, knead until you have a smooth nice dough and start adding the sugar and butter little by little. You have to work the dough until it´s nice, smooth and it won´t stick to your countertop (this may take a while). Try to keep the butter cold, Hamelman advises to try to keep all ingredients as cold as you can. You don´t want to get warm butter since you would get a greasy dough.

In his recipe here the dough goes to the fridge in a bowl covered with film and rests all night. Next morning take it out and shape it. You can shape brioche in a lot of ways here I did 6 tight balls and place them side by side in a previously buttered and floured mold. Let it rise for one or two hours. Take it out, paint it with some egg (beaten) and get it in the oven at about 200ºC between 40-45min. Check your oven. If it starts to toast too much on the top (and it will) place a foil paper on it and let it finish.

With that said having brioche for breakfast is an outer world experience, so as Marie Antoinette said, let them have brioche! [/tp]

P1070837P1070839

Categories
Dulces Fácil Imprescindibles Masas y Pan

Pastel de manzana con masa de brioche

P1070828P1070827

[tp lang=”es” only=”y”] Ya os había contado de la masa de Brioche del curso de Hamelman, ¿verdad? Pues eso, que rescaté un par de ellas que no hicimos por falta de tiempo para hornearlas e hice un par de Brioches deliciosos de los que hablaré más adelante. Hoy me centraré en la tarta. En el curso, Hamelman nos preparó una tarta de queso con masa de Brioche increíble. Así que como con dos Brioches había suficiente y quedaba masa, opté por hacer una tarta con ella, sólo que de manzana. Me ha encantado esto de usar la masa del Brioche para otras cosas y esta tarta (si tenemos la masa, claro) no puede ser más fácil. Técnicamente la podríamos hacer con cualquier tipo de masa de pie o pastel. Os cuento que fácil.[/tp]

[tp not_in=”es”]I already told you about the Brioche dough from the Hamelman course, did n´t I? So I rescued a couple of them that we did n´t do for lack of time to bake them and made a couple of delicious brioches which I will discuss later. Today I will focus on this tart. During the course, Hamelman cooked us a cheese tart with Brioche dough, it was amazing. So as two brioches were enough for me and I had come dough left, I decided to make a tart with it, only I used apples. I enjoyed using the Brioche dough for other things and this tart can not be easier. Technically we could do it with any kind of mass or cake stand.[/tp]

P1070807

[tp lang=”es” only=”y”]Ingredientes

  • Masa de brioche (o en su defecto otra masa, por ejemplo ésta o ésta.)
  • 1 kilo de manzana reineta
  • 1 taza de azúcar moreno
  • canela en polvo
  • 1 pizca de sal
  • 1 vaso de agua

[/tp]

[tp not_in=”es”]Ingredients

  • Brioche dough (or other dough, for example this or this.)
  • 1k of pippin apples
  • 1 cup brown sugar
  • 1pinch of cinnamon
  • 1 pinch of salt
  • 1 glass of water

[/tp]

[tp lang=”es” only=”y”] Realmente lo que vamos a hacer es una compota con trozos. Así que picamos las manzanas (las podéis pelar, a mi a veces me gusta dejar la piel y que sea más rústica) En éste caso, la dejé. Las picamos en cubos. A una cacerola, con el agua, el azúcar, la canela y la sal. A fuego bajito hasta que se deshaga todo bien. Pasamos la minipimer y licuamos un poco dejando algunos trozos y dejamos enfriar. Cogemos nuestra masa, la estiramos bien con un rodillo haciendo un circulo que sea más grande que el molde (unos 5cm por lo menos). Enmantequillamos con un pincel y enharinamos el molde (un poquito, que quede una capa muy finita) y colocamos la masa cuidando que llegue hasta el borde. La masa tiende a encogerse un poco, así que una vez colocada dejarla reposar un ratito y cuando se haya encogido, cortamos el sobrante de alrededor. Colocamos nuestra compota de manzana, ya fría, en el molde y al horno hasta que la masa esté dorada, unos 35 minutos a 180ºC. Hay que fijarse que esté bien cocida y que no se queme por encima. Si se empieza a tostar demasiado y aun no está hecha ponerle encima un papel albal (aluminio). Listo, dejarla enfriar e ir corriendo a comprar helado de vainilla![/tp]

[tp not_in=”es”]What we´ll do is a compote with chunks. So chop the apples (you can peel them, sometimes I like to leave the skin and make it more rustic) In this case I left them. So chop in cubes. In a saucepan, simmer with water, sugar, cinnamon and salt. At short heat until everything is well done. Give it a little blender and liquefy leaving some pieces chunky and let it cool. Take your dough, stretch it well with a roller making a circle that is larger than the mold (at least about 5cm). Butter it with a brush and add a bit of flour (a little in a very thin layer) place the dough until it reaches the edge. The dough tends to shrink a bit, so once placed allow it to stand for a while. When it has shrunk, cut the excess around. Put the applesauce in the mold and bake until the crust is golden, about 35 minutes at 180 º C. You have to look it’s well done and that it´s not burned above. If it starts to roast too much and it is not well cooked, put some foil over it and let it finish. Once ready let it cool and rush to buy some vanilla ice cream![/tp]

P1070826P1070809

Categories
Fácil Imprescindibles Italia

Alfredo y su fettuccine

P1070804

La salsa Alfredo es de las salsas de pasta más conocidas y a la vez desconocidas, su creador Alfredo di Lelio la inventó allá por 1914 como una variante de los fettuccine al burro (mantequilla) cambiando la receta por una doble ración de mantequilla en el plato. Es que la salsa Alfredo (al igual que la carbonara) que en muchos países lleva Bechamel, nata o roux realmente, no lleva nada de esto. Es sólo mantequilla y queso parmesano, mezclado en un plato caliente con la pasta. Al final hacemos más complicados los platos de pasta de lo que son en realidad, no sé bien porque. He leído por ahí que le añadieron nata en America para compensar la mala calidad de la mantequilla, lo cual tiene sentido. De todas formas con y sin nata, está buena. En Lima es muy común que lleve salsa blanca (bechamel) y jamón cocido o al menos en mi casa era así. No soy fan de la Bechamel, es muy pesada y una salsa con harina sobre pasta de harina, se me hace demasiado… así que está es mi versión, cogiendo un poquito de ambos lados.


Ingredientes

  • Fettuccine
  • Leche evaporada
  • Queso parmesano
  • Mantequilla ( la mejor que puedan encontrar y no margarina por favor)
  • 2 Dientes de ajo
  • Jamón cocido
  • Albahaca fresca
  • Sal
  • Pimienta

P1070806

Primero, para este plato hay que tener todo preparado por que el secreto está en el montaje y debe ser rápido. Así que el jamón picado en cuadraditos, los ajos muy finitos, la albahaca troceada, la mantequilla preparada y todo a la mano.

En una cacerola calentar un poquito de mantequilla y sofreír el ajo y el jamón. Sacar y reservar.

Poner a cocer los fettuccine, seguir las instrucciones de la cajita y esas cosas. Los hervimos, los sacamos al dente y los colamos. Calentamos un plato (en el micro) y en el plato caliente colocamos unos trocitos de mantequilla, colocamos la pasta caliente, le echamos el jamón con ajo, añadimos un chorrito de leche evaporada, sal y pimienta. Queso parmesano y revolvemos bien en el mismo plato. La albahaca fresca por encima y servimos, rápido, fácil y deliciosamente rico!

P1070800

Categories
Desayunos Dulces Fácil Imprescindibles

Bizcocho de mandarina con mermelada

_DSC4417_DSC4400[tp lang=”es” only=”y”]Bueno entre pan y pan, que llevo un par de semanas intensas, también hay otras cosas como este bizcocho de mandarina con mermelada (de mandarina, claro). Es una variación de mi bizcochito tradicional y aunque de entrada no sabía muy bien como iba a quedar y mi chico estaba un poco reticente al respecto, la verdad es que quedo muy bien. Esto se podría hacer con cualquier otra fruta supongo (seguiremos explorando) pero ya que es temporada de mandarinas vamos a aprovechar, vamos por partes.[/tp]

[tp lang=”es” only=”y”] Ingredientes[/tp]
[tp not_in=”es”]In between breads (It´s been a couple of intense weeks) there are other things, like this cake with tangerine jam. It´s a variation of my traditional cake and although I did n´t quite know how it would turn out, and my boy was a little reticent about it, truth is it turned out very well. This could be done with any fruit I guess (I will continue to explore) but since it’s tangerine season, let´s take advantage of them.[/tp]

[tp not_in=”es”]Ingredients[/tp]
_DSC4407
[tp lang=”es” only=”y”] Mermelada[/tp]
[tp lang=”es” only=”y”]

  • 1k de mandarinas
  • 1.5 taza de azúcar
  • 1/2 vaso de agua

Pelar y separar en gajos las mandarinas, guardar las cáscaras. En una cacerola poner a cocer las mandarinas con el agua y el azúcar. Dejar cocer a fuego lento. Cuando estén cocidas y se hayan deshecho la mayoría, pasar la minipimer y licuar. Ir probando para ver si está suficientemente dulce. La mermelada quedará un puntito amarga, pero que esté al punto de dulce que nos gusta. Añadir azúcar si vemos que nos falta y agua si se nos queda demasiado espesa. Pasar por un colador y dejar enfriar.[/tp]

[tp not_in=”es”]Jam[/tp]
[tp not_in=”es”]

  • 1k of tangerines
  • 1.5 cup sugar
  • 1/2 glass of water

Peel and separate tangerines into segments, save the shells. In a saucepan bring to boil water with the tangerines and sugar. Leave simmering. When they are fully cooked and have undone mostly, take the blender and blend them. Test to see if it´s sweet enough. The jam will be a bit bitter, but that is the point so just adjust how sweet you like it. Add sugar if you see it needs it and water if it´s too thick. Pass through a sieve and let it cool.[/tp]

_DSC4395
[tp lang=”es” only=”y”] Bizcocho[/tp]
[tp lang=”es” only=”y”]

  • 2 tazas de harina repostera
  • 1 taza de azúcar
  • 2 cucharaditas de polvo de hornear
  • 1/2 taza de semillas de amapola
  • 1/2 taza de leche
  • 1/4 taza de aceite de girasol o oliva suave (no virgen)
  • 1 yogurt natural
  • 2 huevos
  • mantequilla para el molde
  • la ralladura de 2 mandarinas

Mezclamos en un bowl la harina y el polvo de hornear. En otro, los huevos batidos, el yogurt y el azúcar y mezclamos bien. Juntamos ambos y añadimos la leche. Mezclar bien y añadir las semillas y la ralladura de mandarina, por último el aceite.

Enharinamos y enmantequillamos nuestro molde y metemos la masa, al horno 180ºc unos 45 min. Que esté bien hecho por dentro. Sacamos el bizcocho y lo dejamos enfriar en una rejilla. Cuando esté frío lo partimos por la mitad a lo ancho (como si fuéramos a hacer un bocadillo). Separamos las tapas y ponemos mermelada en el centro. Lo volvemos a juntar y lo dejamos reposar. La mermelada es un puntito amarga, pero queda genial con el dulce del bizcocho. Como os dije creo que se pueden hacer variaciones con otras frutas así que iré investigando. De momento está ha salido muy bien. El resto de la mermelada se puede guardar y en un pan de centeno está de muerte![/tp]

[tp not_in=”es”]Cake[/tp]
[tp not_in=”es”]

  • 2 cups pastry flour
  • 1 cup sugar
  • 2 teaspoons baking powder
  • 1/2 cup poppy seeds
  • 1/2 cup of milk
  • 1/4 cup sunflower or low flavored olive oil
  • 1 natural flavored yogurt
  • 2 eggs
  • butter for the mold
  • grating of 2 tangerines

Mix in a bowl flour and baking powder. In another one, beat eggs, yogurt and sugar and mix well. Blend both together and add the milk. Mix well and add the poppy seeds and the mandarin zest, finally the oil.
Butter and flour your mold and introduce the dough, bake about 180ºc for 45 min. Make sure it´s well done inside. Take the cake out and let it cool on a rack. When cooled split in half widthwise (as if we were to make a sandwich).Separate the lids and put jam in the middle. Get them back together and let it stand. The jam is a dot bitter, but it combines great with the sweetness in the cake. As I said, I think you can make variations with other fruits so I’ll keep on investigating. So far this one has gone well. The rest of the jam can be stored and on a rye bread it´s to die for![/tp]

_DSC4405
_DSC4373

Categories
Complicado aunque vale la pena Imprescindibles

Exploraciones panaderas: Jeffrey Hamelman

IMAG6179IMAG6186
Sigo con mis exploraciones panaderas, este mes cargadito de cursos. La semana pasada le tocó al curso de Baguettes de La escuela de Babette y este viernes tuve la suerte de poder irme a la Master Class de Jeffrey Hamelman! Los chicos de @LibrosconMiga hicieron la estupenda tarea de traducir su libro “El pan” al Español,con la traducción de Ibán Yarza y de traernos a España a este simpático señor que aparte de ser bastante majo, es un Mega Crack Panario. Así que estuvimos 8 horas de curso de aquí para allá entre masas y masas madre, lecciones, hornos, formados y todo a ritmo de polka por que el Sr. Hamelman no para, con las justas a comer un ratillo y venga a seguir. Una día genial, simplemente verle trabajar fue estupendo, ha sido un curso que vale por cinco!

IMAG6206

Hicimos pan de centeno con semillas de lino, pan de masa madre integral, baguettes, pan de cerveza, una tarta salada de queso con masa de brioche y unas tartaletas de champiñones con huevo para morir… creo que no me dejo nada.

IMAG6191

Salí de allí con más pan del que puedo humanamente ingerir, miles de conocimientos que poner en práctica (en cuanto se me acabe el pan que tengo en casa) y muy contenta de haberme metido en esta historia. Aquí dejo algunas fotos del curso y de los súper brioches que (por suerte) rescaté de un triste final. Aunque a estos les dedicaré luego un post especial, que se lo merecen de lo buenos que están!

P1070837
P1070833

Categories
Imprescindibles Masas y Pan

Exploraciones panaderas: Curso de baguettes

42 Este fin de semana no he cocinado. La razón es que me pasé todo en finde en La Escuela de Babette en un curso de baguettes. Fascinada con el mundo baguettino y gracias a Bea que es una profe genial pude sacar unas baguettes preciosas.
3
Hicimos baguettes de método directo, con poolish y de masa madre. Amasamos, formamos, greñamos, cortamos, esperamos y enharinamos todo.
5
Mi primera experiencia intentando hacer baguettes en casa había sido catastrófica, así que les tenía un poco de miedo, pero después de este curso allí que voy lanzada a intentarlo de nuevo. Un finde genial, 8 baguettes para casa y muchas ganas de probar a hacerlas sola… a ver que tal me salen!

1