Categories
Del Mar Fácil Imprescindibles

Dos amigos para el pescadito frito

P1070952P1070964P1070972
[tp lang=”es” only=”y”] Después de un par de fines de semana sin mucho tiempo para cocinar y hacer entradas, éste por fin he tenido tiempo de ir al mercado, cocinar para la semana y organizarme la vida. Así que del día de mercado del sábado salió este menú. Unos boquerones fritos, camotes y una ensalada de zanahoria. Todo muy fácil de hacer. Así que empezamos, que ya tocaba algo salado para variar un poco…[/tp]

[tp lang=”es” only=”y”]Ingredientes

  • 2 Camotes grandes (batatas)
  • 3 Zanahorias grandes
  • 1/2 Kg de boquerones
  • Sal
  • Aceite de oliva para freír
  • mayonesa
  • pasas
  • romero fresco

[/tp]

[tp not_in=”es”]After a couple of weekends without time to cook or make entries, this one I finally had some time to go to the market, cook for the whole week and organizing my life. So on Saturday I made this menu. Some fried anchovies, sweet potatoes and a carrot salad. All quite easy. So let´s get started,it was already time for something savory for a change…[/tp]


[tp not_in=”es”]Ingredients

  • 2 Large sweet potatoes
  • 3 Large carrots
  • 1/2 Kg of anchovies
  • Salt
  • Olive oil for frying
  • mayonnaise
  • raisins
  • fresh rosemary

[/tp]

P1070958
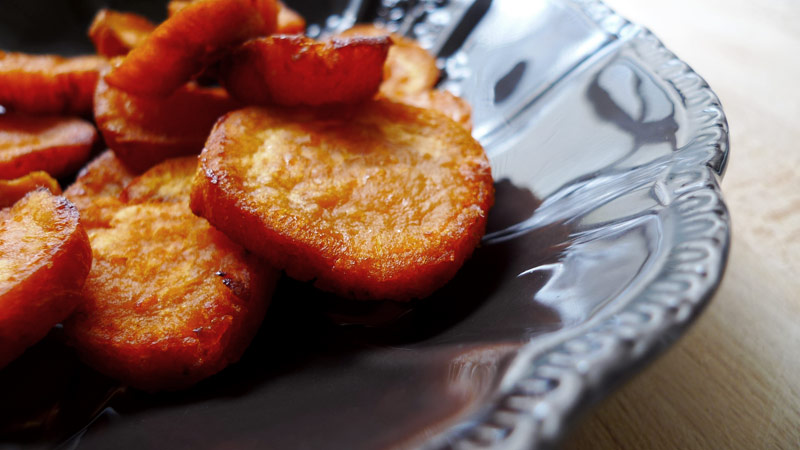
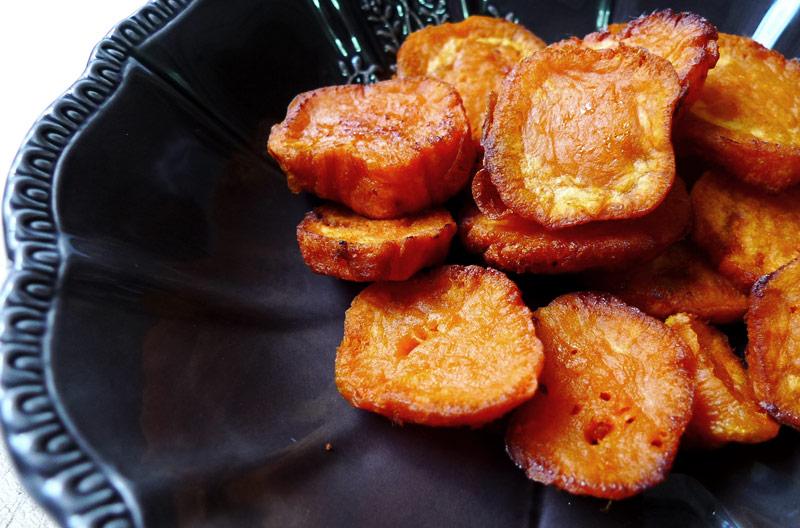
[tp lang=”es” only=”y”] Camotes dorados (batata)
Estos camotes son la receta de “Piru” que hace los mejores camotes que me he comido. Así que siguiendo esa receta llevo años intentando que me queden iguales. No es fácil, pero me acerco. Es importante que el camote (batata) sea bueno y no siempre lo es. Estos son de la cesta ecológica y se acercan más al sabor del camote de Perú (que es más dulce) que los que venden en el súper. La manera de hacerlos es simple. Primero ponerlos a cocer en agua con piel y todo. Una vez cocidos quitarles la piel y cortarlos en rodajas. Freír las rodajas en aceite de oliva a fuego medio sin que se quemen, hasta que estén doraditos por fuera, escurrirlos en papel de cocina. Deben quedar crujientes y dorados por fuera y blanditos y dulces por dentro. Añadirles una pizca de sal y ya. Una delicia, lo prometo.[/tp]

[tp not_in=”es”]Golden sweet potatoes
This sweet potatoes recipe is from “Piru” who makes the best sweet potatoes I have ever tried. So following her recipe I´ve spent years trying to make them the same way. It is not easy, but i am closer. It´s important that the sweet potatos are good and it´s not always the case. These are from my organic basket and they are closer to the taste of the sweet potato in Peru (which is sweeter) than those they sell in the supermarket. The way to do it is quite simple. First cook them in water with skin and all. Once cooked remove the skin and slice. Fry the slices in olive oil over medium heat without scorching, until they are golden brown on the outside, take them put and drain on paper towels. They should be crisp and golden on the outside, sweet and squishy inside. Add a pinch of salt. Delightful, I promise.[/tp]

P1070957
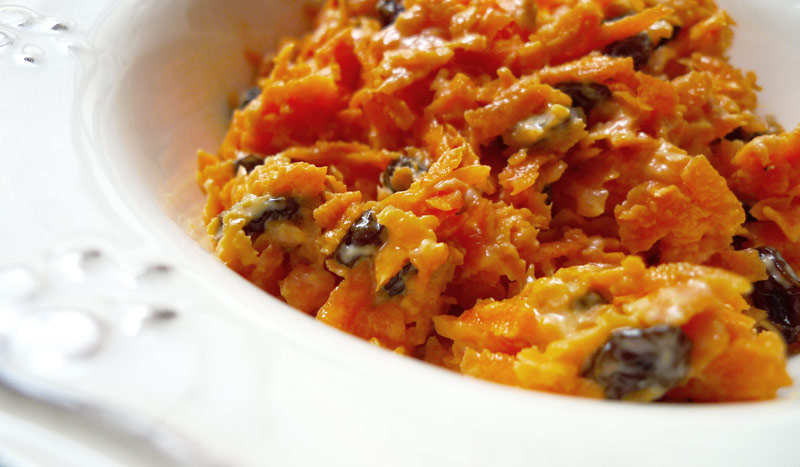
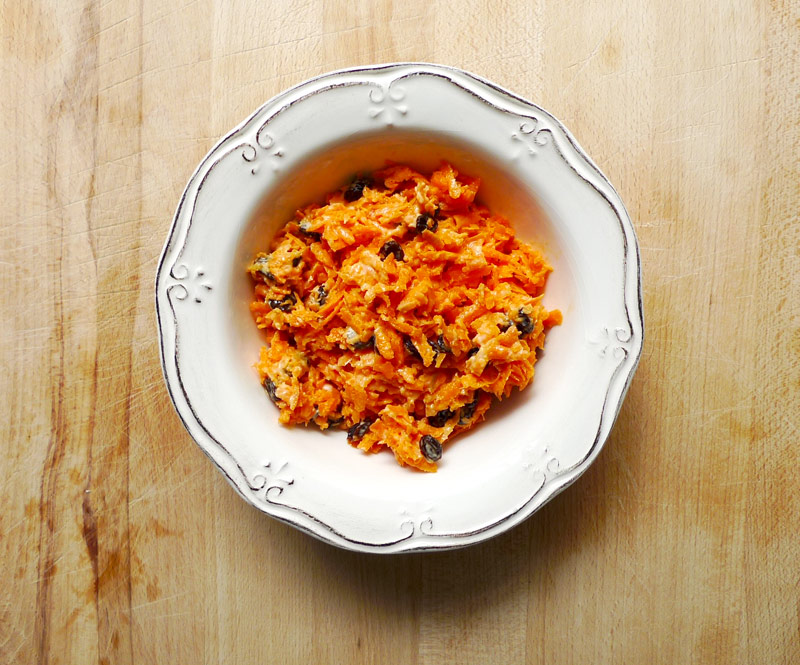
[tp lang=”es” only=”y”] Ensalada de zanahorias
La ensalada de zanahorias de la casa de mi abuela. Más fácil imposible. Pelar y rallar 3 zanahorias grandes. Mezclar la zanahoria rallada con mayonesa y unas cuantas pasas. Listo![/tp]

[tp not_in=”es”]Carrot salad
This is the carrot salad from my grandmother’s house. Really easy. Peel and grate 3 large carrots. Mix the grated carrots with mayonnaise and a few raisins. Done![/tp]

P1070969
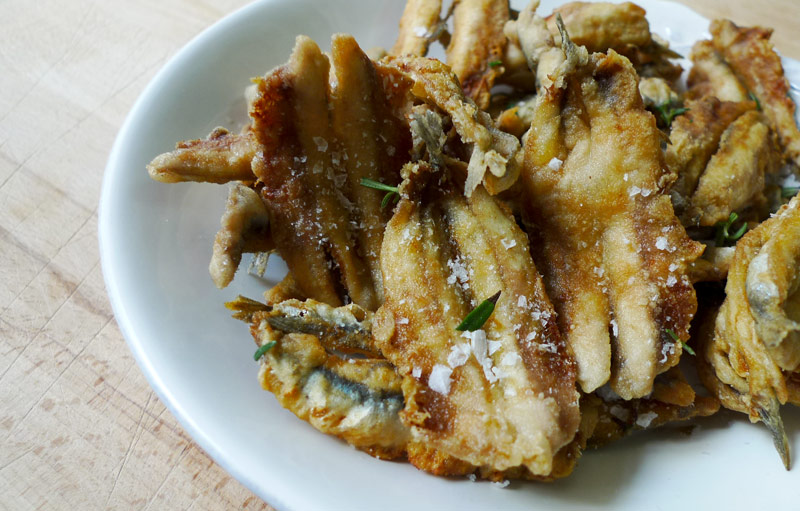
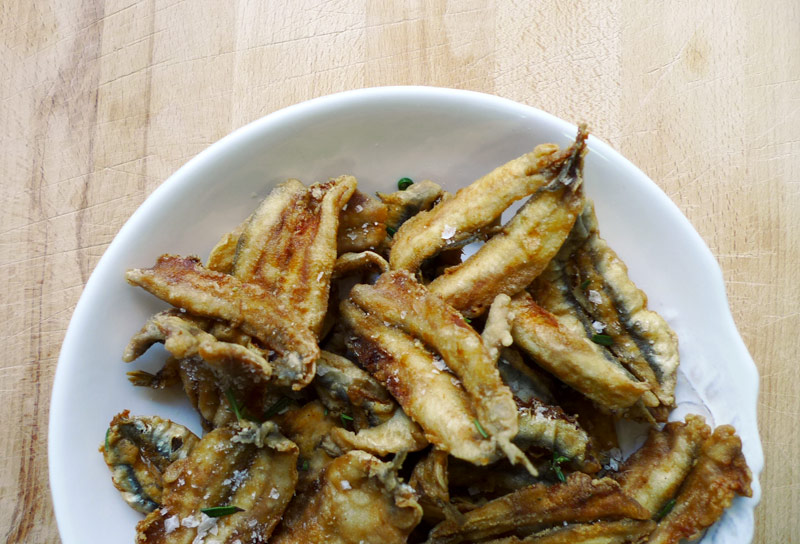
[tp lang=”es” only=”y”]Pescadito frito
Bueno, de esto poco que decir a parte de que me los como como patatas fritas. 1/2 Kilo de boquerones limpios, los abro en mitad y les quito las raspas si son muy gordas. Pasarlos por harina y freír en aceite de oliva suave. Luego escurrir en papel de cocina. Añadir sal y unas hojitas de romero. Son un vicio.[/tp]

[tp not_in=”es”]Fried pescadito (fish)
Well, there is little to say about these except from that fact that I can eat them like chips. 1/2 Kilo clean anchovies, I open them in half and remove the cobs. TPass them through flour and fry in olive oil at mild temperature. Then drain on paper towels. Add salt and a sprig of rosemary. They are a vice![/tp]

Categories
Desayunos Dulces Fácil Imprescindibles

Blondies de pera y almendras

P1070945P1070940
[tp lang=”es” only=”y”]Volvemos! Estas ultimas semanas he estado con poco tiempo para cocinar y preparar posts pero conseguí hacer estos blondies el fin de semana y por fin tengo un hueco para subir la receta. Los blondies son como los brownies pero sin chocolate, la esencia es la misma. Tenía unas peras ecológicas en casa y decidí que había que hacer algo con ellas, así que salió esto. Hacen unos desayunos y meriendas bastante memorables! Vamos con la receta que es muy fácil…[/tp]

[tp not_in=”es”]We are back! These last few weeks I´ve been with little time to cook and prepare posts but I managed to make these blondies on the weekend and I finally have a bit of time to upload the recipe. The blondies are like brownies but without chocolate, the essence is the same. I had some great pears at home and decided I had to do something with them, so I did this. They make some pretty memorable breakfast! Let´s get on with the recipe, it´s very easy…[/tp]

[tp lang=”es” only=”y”] Ingredientes

  • 1/2 taza de mantequilla + un poco para el molde
  • 1 taza de azúcar morena
  • 2 huevos
  • 1 taza de harina
  • 1/2 cucharadita de polvo de hornear
  • 1 taza de pera pelada y picada muy finita
  • 1 taza de almendras laminadas
  • esencia de vainilla

[/tp]

[tp not_in=”es”]Ingredients

  • 1/2 cup butter + a bit more for the mold
  • 1 cup brown sugar
  • 2 eggs
  • 1 cup flour
  • 1/2 teaspoon baking powder
  • 1 cup peeled and chopped pear (very thin)
  • 1 cup sliced ​​almonds
  • vanilla scent[/tp]

[tp lang=”es” only=”y”]Calentar el horno a 180ºC. Preparar un molde de metal rectangular, no demasiado alto. Enmantequillar y enharinar.

Separar las claras de las yemas. Batir las claras a punto de nieve. En un bowl mezclar la mantequilla a temperatura ambiente con el azúcar y las yemas hasta que tengamos una mezcla homogénea. En otro bowl mezclar la harina con el polvo de hornear. Mezclar la pera pelada y picada en trocitos muy finitos con la mezcla de la mantequilla, el azúcar y las yemas. Añadir un chorrito de esencia de vainilla. Mezclar con la harina e ir incorporando las claras batidas poco a poco.

Añadir mitad de las almendras y mezclar bien. Colocar en la bandeja. esparcir por encima el resto de almendras. Hornear unos 25-30 minutos.Sacar, dejar en la bandeja unos dos minutos y luego pasar a una rejilla a enfriar.[/tp]

[tp not_in=”es”]Heat your oven to 180 º C. Prepare a rectangular metal baking tray. Grease and flour it.
Separate the whites from the yolks. Beat egg whites until stiff. In a bowl mix the softened butter with the sugar and yolks until you have a smooth mixture. In another bowl mix the flour with the baking powder. Mix the pear peeled and chopped into very small pieces with the butter mixture. Add a dash of vanilla essence.

Mix the flour and incorporate the egg whites gradually.Add half the almonds and mix well. Place on tray. Sprinkle with the remaining almonds. Bake about 25-30 minutes.Take out but leave it in the tray for about two minutes then move to a wire rack to cool.[/tp]

P1070951

Categories
Desayunos Dulces Fácil Imprescindibles

Bizcocho de calabaza y semillas

_DSF8195_DSF8203
[tp lang=”es” only=”y”] Ya llevaba varios días sin bizcocho y tuve petición. Así que como soy una blanda hice este bizcocho de calabaza y semillas, así animamos los desayunos madrugadores. Es muy sencillo. Realmente sólo lleva un poco de puré de calabaza sustituyendo algún ingrediente. Os cuento.[/tp]


[tp lang=”es” only=”y”]Ingredientes

  • 2 tazas de harina repostera
  • 2 cucharaditas de polvo de hornear
  • 3/4 taza de azúcar
  • 1 yogurt natural
  • 1 pizca de sal
  • 2 huevos
  • 1 taza de calabaza cocida machacada
  • 1 puñado de semillas de lino
  • 1 puñados de semillas de sésamo
  • mantequilla

[/tp]

[tp not_in=”es”]It´s been several days without a cake and I had a request. So (as I am a softy) I made this pumpkin and seeds cake, it´s also a great way to make better weekday breakfasts. It’s simple. It really just takes a little pumpkin puree and to replace some ingredients.[/tp]


[tp not_in=”es”]Ingredients

  • 2 cups pastry flour
  • 2 teaspoons baking powder
  • 3/4 cup sugar
  • 1 natural flavored yogurt
  • 1 pinch of salt
  • 2 eggs
  • 1 cup of smashed cooked pumpkin
  • 1 handful of flax seeds
  • 1 handfuls of sesame seeds
  • butter

[/tp]

_DSF8207

[tp lang=”es” only=”y”] Lo primero que hay que hacer es cocer la calabaza. Lo mejor es cocerla entera con piel y todo ya que la piel es dura y quitarla en crudo es difícil. Si la cocemos entera luego sale como mantequilla. La deshacemos bien con la mano, como haciendo un puré y llenamos una taza. Si os sobra hacer un puré de calabaza que está muy bueno.

Luego, separamos las claras de las yemas. Las claras las batimos a punto de nieve. Las yemas van a un bowl con el azúcar, el yogurt y mezclamos bien. Las claras a punto de nieve las reservamos.

En otro bowl ponemos la harina con el polvo de hornear. Le añadimos la mezcla del yogurt. Mezclamos bien, añadimos la calabaza, mezclamos. Añadimos las claras batidas y los puñados de semillas. Mezclamos todo hasta que este homogéneo.

Enmantequillamos nuestro molde y enharinamos. Al molde, al horno 170ºC una hora aprox. Ir revisando con vuestro palito! Es un bizcocho un poco húmedo así que cuando haya pasado la prueba del palito lo dejamos en el horno apagado y con la puerta semi abierta para que se seque un poco. Sacamos y dejamos que se enfríe bien en una rejilla.[/tp]

[tp not_in=”es”]The first thing to do is to cook the pumpkin. It´s best to cook it with the skin because it´s a hard one and to remove it raw is quite difficult. Boil it and then goes like butter. Smash it as making a puree and fill a cup. If you have any leftover pumpkin make a cream or soup!

Separate the whites from the yolks. Beat the whites until stiff. Yolks go into a bowl with sugar and yogurt, mix well. Reserve whites.

In another bowl put the flour with the baking powder. Add the yogurt mixture. Mix well, add the pumpkin and mix. Add the egg whites and the handfuls of seeds. Mix all until smooth.
Butter your your mold and flour. Take to oven 170 º C for approximately one hour. Check with stick at about 50 min. It´s a slightly damp dough so when you have passed the stick test leave it inside (the oven turned off) with the door half open to dry slightly. Then let it cool completely in a rack.[/tp]

_DSF8206

Categories
Desayunos Dulces Fácil Imprescindibles

Mega cookies de chocolate

P1070917P1070919

[tp lang=”es” only=”y”]Estoy muy dulcera últimamente y especialmente obsesionada con las galletas. El Domingo me entró una necesidad de esas de “hacer galletas” que me entran a veces y no tenía mantequilla! Así que como no me iba a quedar sin galletas, esto me llevo a tener que buscar opciones sin mantequilla, lo cual para unas galletas no es tarea fácil. Pero entre algunas ideas encontré una receta de galletas hechas con aceite en lugar de mantequilla así que decidí probar un camino exótico y usar aceite de oliva extra virgen y chocolate y añadir unas cuantas cosas más, por ver que pasaba.

El aceite que tenemos en casa es un aceite de una cooperativa de Almería dónde la familia de mi chico lleva sus olivas a prensar, un aceite fuerte, denso y con un sabor a estarte comiendo el árbol de olivas entero. Delicioso. Así que en lugar de usar el aceite “suave” me tiré a la piscina con el intenso. La mezcla de chocolate puro y aceite de oliva es genial, unas galletas con un sabor fuerte, unos añadidos más y el resultado son estás cookies, sanas, grandotas, deliciosas y nada empalagosas. Son unas galletas especiales a medio camino entre galleta y brownie, con harina integral y frutos secos, una sola te deja hasta arriba. Advierto, no apta para gustos galleteros clásicos![/tp]


[tp lang=”es” only=”y”]Ingredientes

  • 1 taza de harina integral de trigo
  • 1/2 taza de harina blanca repostera
  • 1/2 cucharadita de polvo de hornear
  • 3/4 taza de azúcar de caña (integral)
  • 1/4 taza de aceite de oliva extra virgen (si no nos atrevemos con el intenso, reemplazar por aceite de oliva suave)
  • 2 huevos
  • 1 cucharadita de esencia de vainilla
  • 5 cucharaditas de cocoa en polvo (chocolate puro, yo uso Valor)
  • Un puñados de arándanos secos
  • Un puñado de chips de chocolate
  • Un puñado de nueces
  • Agua
  • Papel de horno

[/tp]

[tp not_in=”es”]I’m very sweet driven lately and especially obsessed with cookies. On Sunday I had one of those needs to “bake cookies” I have some times and I had no butter! So since I was n´t going to be left without my cookies, I started looking for recipe options without butter, for cookies this is no easy task. But among some ideas I found a cookie recipe that used oil instead of butter so I decided to try an exotic path and use extra virgin olive oil and pure chocolate plus a few more things, to see what happened.

The olive oil we have at home is from a cooperative oil in Almería (Spain) where my boyfriend´s family carries their olives to be pressed, it´s a strong oil, dense and flavored, delicious. So instead of using “soft olive oil ” I took the plunge with the intense one. The mixture of pure chocolate and olive oil is great, it gives a strong flavor that with a few more additions results in these cookies which are, healthy, huge, delicious and not so sweet. These are special cookies halfway between a cookie and a brownie, whole wheat flour and nuts, They are quite filling. I warn you, these are not suitable for a classic cookie lover!

Ingredients

  • 1 cup whole wheat flour
  • 1/2 cup white pastry flour
  • 1/2 teaspoon baking powder
  • 3/4 cup sugar cane (brown sugar)
  • 1/4 cup extra virgin olive oil (if you do not dare with the intense, replace it with mild olive oil)
  • 2 eggs
  • 1 teaspoon vanilla extract
  • 5 teaspoons of cocoa powder (pure chocolate)
  • A handful of dried cranberries
  • A handful of chocolate chips
  • A handful of nuts
  • Water
  • Baking paper

[/tp]

[tp lang=”es” only=”y”] En un bowl batir los huevos, añadir el azúcar, añadir la esencia de vainilla y el cacao, batir todo bien. En otro mezclar las harinas con el polvo de hornear. Juntar ambas mezclas. Añadir los chips, los arándanos y las nueces. Mezclar todo bien para que se repartan bien los frutos secos y los chips. Si queda demasiado seca, añadir una cucharada de agua.

Poner un papel de horno en la bandeja. Calentar el horno a 170ºC. Colocar una cucharada sopera de masa en la bandeja, darle forma con la mano aplastando un poco. Dejar espacio entre galleta y galleta ya que crecen. Yo puse 6 en una horneada y 6 en la otra. Meter al horno 15 minutos. Sacar con una espátula con cuidado por que salen “blandas” y se endurecen cuando se enfrían. Dejar en la bandeja caliente 2 minutos más, pasar a una rejilla a enfriar.

Esperar a que la bandeja se enfríe para meter la segunda horneada (esto es importante ya que con la bandeja caliente se engrasaran) dejarlas enfriar bien y guardarlas en un tarro de galletas, si es de cierre hermético, mejor. Estas galletas están mejor al día siguiente y según pasan los días mejoran, recomiendo dejarlas enfriar muy bien antes de probarlas, vale la pena aguantarse, lo prometo.[/tp]

[tp not_in=”es”]In a bowl beat the eggs, add the sugar, vanilla essence and cocoa, beat all well. In another one mix the flour with the baking powder. Put together both mixtures. Add the chips, cranberries and walnuts. Mix well so that the nuts and chips get well distributed. If it´s too dry add a tablespoon of water.[/tp]

[tp not_in=”es”]Place a baking paper on the tray. Heat oven to 170 º C. Place a tablespoon of batter into the pan, shape by hand crushing a little. Leave space between them since they will grow. I got 6 in one batch and 6 in another one.Place in the oven for 15 minutes. Remove carefully with a spatula since they come out soft and harden when cooled. Leave them on the hot tray for 2 more minutes then move them to a wire rack to cool.

Wait for the pan to cool down for the second batch (This is important because with the hot tray they´ll get greasy). Let them cool well and store them in a cookie jar, better if it has sealing. These cookies are better the next day. I strongly recommend to let them cool well before tasting, it´s worth it I promise.[/tp]

P1070915

Categories
Desayunos Dulces Fácil Imprescindibles Masas y Pan

Tostadas francesas en pan de masa madre

P1070909
[tp lang=”es” only=”y”]La tostada francesa, pain perdu, prima de la torrija, ésa. Las recetas, que dan vueltas desde el siglo XV, han sido siempre una forma de reciclar el pan viejo, y yo, en este caso, utilicé el roca miche del curso de Hamelman. La miche u hogaza que hicimos de 1.5k, integral, maravillosa y de masa madre, se fue en parte al congelador (tenía exceso de pan en casa, si eso es posible) así que después de un par de días de descongelarla había que hacer algo con ella. Qué mejor para un pan francés que unas tostadas francesas ¿no?. Usar un pan como este, con ese carácter y ese sabor tan intenso, en una tostada francesa da un resultado diferente, no van a quedar igual que con un pan más suave y de trigo blanco ya que este pan es más duro, con más corteza y con una miga que se deshace menos. Pero el resultado ha sido glorioso, probadlo.[/tp]

[tp not_in=”es”]French toast, pain perdu, or torrijas. Recipes that have been spinning since the fifteenth century, they´ve always been a way to recycle old bread, in this case I used a miche from the Hamelman course. The miche or loaf we made was 1.5k, whole wheat, wonderful and all sourdough. It was partly in the freezer (I had too much bread at home, if that’s possible) so after a couple days of taking it out I had to do something with it. What could be a better end for a French bread than a French toast, right? Using this bread, with so much character and flavor in a French toast gives a bit of a different result. It´s not going to turn out the same than with a softer white wheat bread as this bread is harder, with more crust and a tough crumb. But I have to say the result was glorious, try it.[/tp]


[tp lang=”es” only=”y”]Ingredientes

  • 1 huevo
  • leche
  • mantequilla
  • canela
  • nuez moscada
  • sirope de arce (miel de maple)
  • Pan viejo en rodajas

En una bandeja de horno colocar el pan en rodajas. En un bowl batir el huevo y añadir la leche, la canela, y la nuez moscada. Mezclar bien. Echar esta mezcla en la bandeja sobre el pan. Tiene que haber suficiente líquido para que el pan quede bien mojado. Dejarlo reposar por un lado y pasados unos 10 minutos girarlo y que repose por el otro lado. Se tiene que empapar bien.

Calentar mantequilla en una sartén y freír las rodajas una a una para dorar bien ambos lados. Las sacamos y las reservamos. Las ponemos de nuevo en la bandeja de horno y las metemos al horno unos 10 minutos a 170ºC. Sacar y servir con un poco de mantequilla y sirope de arce (miel de maple). Listo, auguro un desayuno memorable.[/tp]

[tp not_in=”es”]Ingredients

  • 1 egg
  • milk
  • butter
  • cinnamon
  • nutmeg
  • maple syrup
  • Old sliced ​​bread

[/tp]

[tp not_in=”es”]In a baking pan place the sliced bread. In a bowl beat the egg and add milk, cinnamon, and nutmeg. Mix. Pour this mixture over the bread tray. There should be enough liquid so that the bread is well soaked. Let stand on one side and after about 10 minutes turn it and let it sit on the other side. It has to get soggy.

Heat butter in a pan and fry the slices one by one to brown well on both sides. Take them out, put them back on the baking pan and put them in the oven for about 10 minutes at 170 º C. Remove and serve with a little butter and maple syrup. Voilà! I predict a memorable breakfast.[/tp]

P1070908

Categories
Dulces Fácil Imprescindibles Masas y Pan

Pastel de manzana con masa de brioche

P1070828P1070827

[tp lang=”es” only=”y”] Ya os había contado de la masa de Brioche del curso de Hamelman, ¿verdad? Pues eso, que rescaté un par de ellas que no hicimos por falta de tiempo para hornearlas e hice un par de Brioches deliciosos de los que hablaré más adelante. Hoy me centraré en la tarta. En el curso, Hamelman nos preparó una tarta de queso con masa de Brioche increíble. Así que como con dos Brioches había suficiente y quedaba masa, opté por hacer una tarta con ella, sólo que de manzana. Me ha encantado esto de usar la masa del Brioche para otras cosas y esta tarta (si tenemos la masa, claro) no puede ser más fácil. Técnicamente la podríamos hacer con cualquier tipo de masa de pie o pastel. Os cuento que fácil.[/tp]

[tp not_in=”es”]I already told you about the Brioche dough from the Hamelman course, did n´t I? So I rescued a couple of them that we did n´t do for lack of time to bake them and made a couple of delicious brioches which I will discuss later. Today I will focus on this tart. During the course, Hamelman cooked us a cheese tart with Brioche dough, it was amazing. So as two brioches were enough for me and I had come dough left, I decided to make a tart with it, only I used apples. I enjoyed using the Brioche dough for other things and this tart can not be easier. Technically we could do it with any kind of mass or cake stand.[/tp]

P1070807

[tp lang=”es” only=”y”]Ingredientes

  • Masa de brioche (o en su defecto otra masa, por ejemplo ésta o ésta.)
  • 1 kilo de manzana reineta
  • 1 taza de azúcar moreno
  • canela en polvo
  • 1 pizca de sal
  • 1 vaso de agua

[/tp]

[tp not_in=”es”]Ingredients

  • Brioche dough (or other dough, for example this or this.)
  • 1k of pippin apples
  • 1 cup brown sugar
  • 1pinch of cinnamon
  • 1 pinch of salt
  • 1 glass of water

[/tp]

[tp lang=”es” only=”y”] Realmente lo que vamos a hacer es una compota con trozos. Así que picamos las manzanas (las podéis pelar, a mi a veces me gusta dejar la piel y que sea más rústica) En éste caso, la dejé. Las picamos en cubos. A una cacerola, con el agua, el azúcar, la canela y la sal. A fuego bajito hasta que se deshaga todo bien. Pasamos la minipimer y licuamos un poco dejando algunos trozos y dejamos enfriar. Cogemos nuestra masa, la estiramos bien con un rodillo haciendo un circulo que sea más grande que el molde (unos 5cm por lo menos). Enmantequillamos con un pincel y enharinamos el molde (un poquito, que quede una capa muy finita) y colocamos la masa cuidando que llegue hasta el borde. La masa tiende a encogerse un poco, así que una vez colocada dejarla reposar un ratito y cuando se haya encogido, cortamos el sobrante de alrededor. Colocamos nuestra compota de manzana, ya fría, en el molde y al horno hasta que la masa esté dorada, unos 35 minutos a 180ºC. Hay que fijarse que esté bien cocida y que no se queme por encima. Si se empieza a tostar demasiado y aun no está hecha ponerle encima un papel albal (aluminio). Listo, dejarla enfriar e ir corriendo a comprar helado de vainilla![/tp]

[tp not_in=”es”]What we´ll do is a compote with chunks. So chop the apples (you can peel them, sometimes I like to leave the skin and make it more rustic) In this case I left them. So chop in cubes. In a saucepan, simmer with water, sugar, cinnamon and salt. At short heat until everything is well done. Give it a little blender and liquefy leaving some pieces chunky and let it cool. Take your dough, stretch it well with a roller making a circle that is larger than the mold (at least about 5cm). Butter it with a brush and add a bit of flour (a little in a very thin layer) place the dough until it reaches the edge. The dough tends to shrink a bit, so once placed allow it to stand for a while. When it has shrunk, cut the excess around. Put the applesauce in the mold and bake until the crust is golden, about 35 minutes at 180 º C. You have to look it’s well done and that it´s not burned above. If it starts to roast too much and it is not well cooked, put some foil over it and let it finish. Once ready let it cool and rush to buy some vanilla ice cream![/tp]

P1070826P1070809

Categories
Fácil Imprescindibles Italia

Alfredo y su fettuccine

P1070804

La salsa Alfredo es de las salsas de pasta más conocidas y a la vez desconocidas, su creador Alfredo di Lelio la inventó allá por 1914 como una variante de los fettuccine al burro (mantequilla) cambiando la receta por una doble ración de mantequilla en el plato. Es que la salsa Alfredo (al igual que la carbonara) que en muchos países lleva Bechamel, nata o roux realmente, no lleva nada de esto. Es sólo mantequilla y queso parmesano, mezclado en un plato caliente con la pasta. Al final hacemos más complicados los platos de pasta de lo que son en realidad, no sé bien porque. He leído por ahí que le añadieron nata en America para compensar la mala calidad de la mantequilla, lo cual tiene sentido. De todas formas con y sin nata, está buena. En Lima es muy común que lleve salsa blanca (bechamel) y jamón cocido o al menos en mi casa era así. No soy fan de la Bechamel, es muy pesada y una salsa con harina sobre pasta de harina, se me hace demasiado… así que está es mi versión, cogiendo un poquito de ambos lados.


Ingredientes

  • Fettuccine
  • Leche evaporada
  • Queso parmesano
  • Mantequilla ( la mejor que puedan encontrar y no margarina por favor)
  • 2 Dientes de ajo
  • Jamón cocido
  • Albahaca fresca
  • Sal
  • Pimienta

P1070806

Primero, para este plato hay que tener todo preparado por que el secreto está en el montaje y debe ser rápido. Así que el jamón picado en cuadraditos, los ajos muy finitos, la albahaca troceada, la mantequilla preparada y todo a la mano.

En una cacerola calentar un poquito de mantequilla y sofreír el ajo y el jamón. Sacar y reservar.

Poner a cocer los fettuccine, seguir las instrucciones de la cajita y esas cosas. Los hervimos, los sacamos al dente y los colamos. Calentamos un plato (en el micro) y en el plato caliente colocamos unos trocitos de mantequilla, colocamos la pasta caliente, le echamos el jamón con ajo, añadimos un chorrito de leche evaporada, sal y pimienta. Queso parmesano y revolvemos bien en el mismo plato. La albahaca fresca por encima y servimos, rápido, fácil y deliciosamente rico!

P1070800

Categories
Desayunos Dulces Fácil Imprescindibles

Bizcocho de mandarina con mermelada

_DSC4417_DSC4400[tp lang=”es” only=”y”]Bueno entre pan y pan, que llevo un par de semanas intensas, también hay otras cosas como este bizcocho de mandarina con mermelada (de mandarina, claro). Es una variación de mi bizcochito tradicional y aunque de entrada no sabía muy bien como iba a quedar y mi chico estaba un poco reticente al respecto, la verdad es que quedo muy bien. Esto se podría hacer con cualquier otra fruta supongo (seguiremos explorando) pero ya que es temporada de mandarinas vamos a aprovechar, vamos por partes.[/tp]

[tp lang=”es” only=”y”] Ingredientes[/tp]
[tp not_in=”es”]In between breads (It´s been a couple of intense weeks) there are other things, like this cake with tangerine jam. It´s a variation of my traditional cake and although I did n´t quite know how it would turn out, and my boy was a little reticent about it, truth is it turned out very well. This could be done with any fruit I guess (I will continue to explore) but since it’s tangerine season, let´s take advantage of them.[/tp]

[tp not_in=”es”]Ingredients[/tp]
_DSC4407
[tp lang=”es” only=”y”] Mermelada[/tp]
[tp lang=”es” only=”y”]

  • 1k de mandarinas
  • 1.5 taza de azúcar
  • 1/2 vaso de agua

Pelar y separar en gajos las mandarinas, guardar las cáscaras. En una cacerola poner a cocer las mandarinas con el agua y el azúcar. Dejar cocer a fuego lento. Cuando estén cocidas y se hayan deshecho la mayoría, pasar la minipimer y licuar. Ir probando para ver si está suficientemente dulce. La mermelada quedará un puntito amarga, pero que esté al punto de dulce que nos gusta. Añadir azúcar si vemos que nos falta y agua si se nos queda demasiado espesa. Pasar por un colador y dejar enfriar.[/tp]

[tp not_in=”es”]Jam[/tp]
[tp not_in=”es”]

  • 1k of tangerines
  • 1.5 cup sugar
  • 1/2 glass of water

Peel and separate tangerines into segments, save the shells. In a saucepan bring to boil water with the tangerines and sugar. Leave simmering. When they are fully cooked and have undone mostly, take the blender and blend them. Test to see if it´s sweet enough. The jam will be a bit bitter, but that is the point so just adjust how sweet you like it. Add sugar if you see it needs it and water if it´s too thick. Pass through a sieve and let it cool.[/tp]

_DSC4395
[tp lang=”es” only=”y”] Bizcocho[/tp]
[tp lang=”es” only=”y”]

  • 2 tazas de harina repostera
  • 1 taza de azúcar
  • 2 cucharaditas de polvo de hornear
  • 1/2 taza de semillas de amapola
  • 1/2 taza de leche
  • 1/4 taza de aceite de girasol o oliva suave (no virgen)
  • 1 yogurt natural
  • 2 huevos
  • mantequilla para el molde
  • la ralladura de 2 mandarinas

Mezclamos en un bowl la harina y el polvo de hornear. En otro, los huevos batidos, el yogurt y el azúcar y mezclamos bien. Juntamos ambos y añadimos la leche. Mezclar bien y añadir las semillas y la ralladura de mandarina, por último el aceite.

Enharinamos y enmantequillamos nuestro molde y metemos la masa, al horno 180ºc unos 45 min. Que esté bien hecho por dentro. Sacamos el bizcocho y lo dejamos enfriar en una rejilla. Cuando esté frío lo partimos por la mitad a lo ancho (como si fuéramos a hacer un bocadillo). Separamos las tapas y ponemos mermelada en el centro. Lo volvemos a juntar y lo dejamos reposar. La mermelada es un puntito amarga, pero queda genial con el dulce del bizcocho. Como os dije creo que se pueden hacer variaciones con otras frutas así que iré investigando. De momento está ha salido muy bien. El resto de la mermelada se puede guardar y en un pan de centeno está de muerte![/tp]

[tp not_in=”es”]Cake[/tp]
[tp not_in=”es”]

  • 2 cups pastry flour
  • 1 cup sugar
  • 2 teaspoons baking powder
  • 1/2 cup poppy seeds
  • 1/2 cup of milk
  • 1/4 cup sunflower or low flavored olive oil
  • 1 natural flavored yogurt
  • 2 eggs
  • butter for the mold
  • grating of 2 tangerines

Mix in a bowl flour and baking powder. In another one, beat eggs, yogurt and sugar and mix well. Blend both together and add the milk. Mix well and add the poppy seeds and the mandarin zest, finally the oil.
Butter and flour your mold and introduce the dough, bake about 180ºc for 45 min. Make sure it´s well done inside. Take the cake out and let it cool on a rack. When cooled split in half widthwise (as if we were to make a sandwich).Separate the lids and put jam in the middle. Get them back together and let it stand. The jam is a dot bitter, but it combines great with the sweetness in the cake. As I said, I think you can make variations with other fruits so I’ll keep on investigating. So far this one has gone well. The rest of the jam can be stored and on a rye bread it´s to die for![/tp]

_DSC4405
_DSC4373

Categories
Desayunos Dulces Fácil Imprescindibles

Galletas de avena con chips

P1070750P1070760

[tp lang=”es” only=”y”]El Domingo me levante temprano con mucha hambre y muy enérgica. Así que mientas mi chico dormía decidí hacer unas galletas para desayunar porque un desayuno de Domingo en mi casa, es un desayuno de Domingo. Estas galletas son muy fáciles y en serio no se tarda nada en hacerlas. Están buenísimas, aunque salen pocas y claro al día siguiente ya no quedaba ni una!

Vamos a ello…

Ingredientes

  • 1/2 taza de mantequilla a temperatura ambiente
  • 1/2 taza azúcar integral
  • 1 huevo batido
  • 1/2 taza de harina de trigo
  • 1/2 cucharadita de polvo de hornear
  • 1/2 taza de copos de avena
  • 1/2 taza de chips de chocolate

Pre calentar el horno a 180ºC y colocar un papel de horno en la bandeja. Mezclar en un bowl el azúcar con la mantequilla y batir hasta que este suave. Añadir el huevo batido. Añadir la harina, el polvo de hornear y la avena, añadir los chips de chocolate y mezclar todo bien.

Colocar una cucharada sopera por galleta en la bandeja, dejar bastante espacio de separación entre una y otra por que se expanden y mucho. Hornear unos 15 minutos hasta que empiecen a dorar. Sacar la bandeja del horno y dejar en la bandeja caliente 2 minutos. Pasar a una rejilla a enfriar. Listo en 35 minutos tenemos las galletas calentitas y listas para desayunar![/tp]

[tp not_in=”es”]On Sunday I woke up very early, very hungry and very energetic. So while my guy was still sleeping I decided to make some cookies for breakfast because Sunday´s breakfast at home is a whole deal! These cookies are very easy and very quick to make. They are delicious, although the recipe is for a few so the next day there were none left!

Let’s do this…

Ingredients

  • 1/2 cup of butter at room temperature
  • 1/2 cup brown sugar
  • 1 egg, beaten
  • 1/2 cup of wheat flour
  • 1/2 teaspoon baking powder
  • 1/2 cup of oatmeal
  • 1/2 cup of chocolate chips

Preheat oven to 180 º C and place a baking paper on the tray. Mix in a bowl the sugar with the butter and beat until smooth. Add the beaten egg. Add flour, baking powder and oats. Add the chocolate chips and mix well.

Place one tablespoon per cookie on the tray, leave enough gap between them because they will expand a lot. Bake about 15 minutes until starting to brown. Remove the pan from the oven and leave them in the hot pan 2 minutes. Transfer to a rack to cool. There you go, in 35 minutes you have warm cookies ready for breakfast![/tp]

P1070755P1070765

Categories
Carnívoros Fácil Imprescindibles Oriental

Arroz chaufa

[tp lang=”es” only=”y”] No es la primera vez que pongo una receta de chaufa, pero es que me encanta! El anterior fue de pollo. Esta vez lo hacemos de cerdo. En la entrada anterior contaba un poco sobre la relación de amor culinario entre Perú y China. Poco por añadir aparte de que el arroz Chaufa que en chino significa arroz frito es uno de los platos estrellas del Chifa (la cocina china-peruana) con más de 5,000 chifas sólo en Lima, se nota que nos gusta y mucho!

Como el sábado pude ir al mercado de Maravillas conseguí hacerme de mis ingredientes chinos favoritos, así que con ellos va este chaufa. Por suerte en Madrid ya es fácil encontrar estos ingredientes en algunos mercados como el de Mostenses o el de Maravillas y en supermercados chinos como el de la calle Leganitos o los de la calle General Margallo dónde hay de todo.

Vamos a ello. El arroz chaufa es muy fácil, simplemente es cuestión de tener los ingredientes adecuados. Una profesora de cocina China hace muchos, pero muchos años nos contó que este arroz es un plato típico de final de la semana para aprovechas las sobras. Es un plato barato, rápido  y que admite muchas versiones. Aquí va.

Ingredientes

  • 1 cebolleta o cebolla china
  • 1 manojo de tallos de cebolleta (la parte verde) o cebollino
  • 2 dientes de ajo
  • 4 Cintas de lomo de cerdo picadas en cubitos
  • Aceite de oliva suave (no virgen) o aceite de girasol
  • Salsa de soja
  • 1 trocito de kion o jengibre
  • Un puñado de colantao o tirabeques
  • 1 pak choi
  • arroz de grano largo
  • 1 huevo

[/tp]

[tp lang=”es” only=”y”] Lo primero es cocer el arroz. Preparar aprox. 2 tazas de arroz blanco sin sal. Cuando esté listo lo dejamos a un lado para que se enfríe. Picamos las cebolletas, las cintas de lomo en cubitos, pelamos un trocito de jengibre y lo picamos muy finito. Quitamos las hebras de los tirabeques y partimos el tallo del pak choi. Reservamos todo.

En una sartén grande o wok calentamos un poco de aceite, cogemos el huevo lo batimos bien y hacemos una tortilla. la sacamos, la escurrimos un poco, la picamos en trocitos y la reservamos. Volvemos a calentar aceite, sofreímos un poco los ajos con piel y enteros y los retiramos. Cuando el aceite este bien caliente y humeando echamos la cinta de lomo y la doramos bien. Añadimos la cebolleta picada ( la parte blanca y el jengibre) añadimos el arroz y salteamos. Añadimos un buen chorro de salsa de soja y por ultimo las verduras junto con las partes verdes de las cebolletas. Le damos a todo un par de vueltas y listo, a servir.

Unos cuantos consejos…
El aceite muy caliente, fuego al máximo y salteando mucho y rápido para que nada se queme. Las verduras al final y que queden crujientes, las partes verdes de las cebolletas casi crudas, no añadir sal, la salsa de soja es suficiente.[/tp]

[tp not_in=”es”]This is not the first time I upload a recipe of chaufa rice, but I love it! The previous one was with chicken, this time we do it with pork. In the previous post I talked a bit about the culinary love relationship between Peru and China. Little to add other than that Chaufa rice in Chinese means fried rice and that is one of the stars of Chifa cuisine (Chinese-Peruvian cuisine) with over 5,000 chifas only in Lima, you can tell that we like a lot!

On Saturday I went to Maravillas market in Madrid and I got myself some of my favorite Chinese ingredients, so they are going on in this chaufa. Luckily in Madrid now is easy to find these ingredients in some markets like the Maravillas or Mostenses and on Chinese supermarkets such as the ones in Leganitos street or General Margallo street where there is everything.

Let’s do this. The rice is very easy, it’s just a matter of having the right ingredients. A chinese cooking teacher many years ago told us that this rice is a typical dish for the end of the week to take advantage of leftovers. It is a cheap dish, fast and it supports many versions.Here it is.

Ingredients

  • 1 scallion (the white part)
  • 1 cluster of stems of chive
  • 2 cloves of garlic
  • 4 slices of pork loin cut into cubes
  • Mild olive oil (low flavored olive oil) or sunflower oil
  • Soy sauce
  • 1 small piece of ginger
  • A handful of sugar peas
  • 1 pak choi
  • long grain rice
  • 1 egg

[/tp]

[tp not_in=”es”]First let´s cook the rice. Prepare approx. 2 cups of white rice without salt. When it´s ready leave it aside to cool. Chop the chives and scallion, chop the loin diced, peel a slice of ginger and chop very finite. Remove the strands of the sugar peas and set off the stem of the pak choi. Put everything on the side.

In a large skillet or wok heat a little oil, Take the egg and beat well do what an omelette. take it off, drain it a bit and chop it into small pieces, reserve it. Again heat some oil, fry the garlic with the skin for a couple of minutes and take out. When the oil is smoking hot toss the meat dice and brown them well. Add the chopped chives (the whites) and the ginger, add the rice and sauté. Added a splash of soy sauce and finally the vegetables along with the green parts of scallions or chives. Give it a few turns around and serve.

A few tips…
The oil has to be very hot, set heat to high and saute hard and fast to avoid burning anything. The vegetables are meant to be crispy and the green parts of the chives almost raw, do not add salt, soy sauce is enough![/tp]
P1070769

Categories
Dibujos Dulces Fácil Imprescindibles

Dibureceta: Pie de manzana

applepieHoy vamos con una dibureceta de pie de manzana. La receta no es mia, la he sacado de bakemania pero me gusta mucho como la explican y me apetecía ilustrar un pie de manzana así que en el link tenéis los pasos y las instrucciones! Espero tener un hueco y hacerla yo también.

Ingredientes
Para la masa:

  • 225grs. de mantequilla muy fría cortada en cubitos de 1cm
  • 60ml. de agua heada
  • 1 cucharadita de sal

Para el relleno

  • 1.3 kg de manzanas variadas
  • 1 cucharada sopera de nata
  • 1 yema
  • 1 cucharada de zumo de limón
  • 1/4 taza de azúcar
  • 15 grs. de mantequilla
  • 1 pizca de sal
Categories
Fácil Imprescindibles

Very pop: sopa de tomate

P1070652P1070655
[tp lang=”es” only=”y”]Al más puro estilo Warholiano, pero nada de latas, hecha en casa. Una sopita de tomate perfecta para las cenas invernales que tanta pereza dan, a mi es que me gusta cocinar por el día con luz y solecito de ser posible. Así que esta sopa resuelve bien y rápido. Lleva un poco de bacon para los no vegetarianos que le da un toquecito muy rico, pero se lo podemos quitar.[/tp]

[tp not_in=”es”]In a true Warholian style but with no cans, homemade. A tomato soup perfect for winter dinners. Don´t know about you but I like to cook in daylight and with little sunlight if possible. So this works out well and quite fast for those evenings when I´d rather be on the couch! It has a bit of bacon but for vegetarians it can be removed.[/tp]

[tp lang=”es” only=”y”]Ingredientes

  • 8 tomates maduros (bien maduros)
  • 2 patatas
  • 1 diente de ajo
  • 1 cebolla morada
  • vino tinto
  • sal
  • pimienta
  • aceite de oliva
  • albahaca
  • bacon
  • agua
  • leche fresca

Primero hay que pelar los tomates. Truco viejo por si no lo sabéis, meterlos en agua hirviendo unos segundos y luego en agua helada (con hielos) otros segundos. La piel sale sólo tirando. Una vez pelados, picarlos en trozos. Pelar las patatas ( no muy grandes) y cortarlas en 4. Pelar y picar el ajo y la cebolla.

En una cacerola calentar un chorrito de aceite y sofreír el ajo y la cebolla. Añadir el tomate y freír un poco. Añadir las patatas y agua sólo para cubrir. Echamos un chorrito de vino y dejamos a fuego medio hasta que las patatas estén cocidas.

Una vez que estén licuamos todo. Añadimos un poco de leche hasta tener el punto de cremosidad que nos guste, añadimos la sal y la pimienta y colamos la crema en otro recipiente.

El bacon es lo más fácil. Cuatro lonchas en un plato, papel de cocina debajo y papel de cocina por encima, microondas 3 minutos, secamos bien con otro papel para que no quede grasoso. Nos quedara tostado y sin grasa. Cortamos unas hojitas de albahaca y con una tijera las troceamos sobre la crema, ponemos el bacon, añadimos un para de rebanadas de pan y listo![/tp]

[tp not_in=”es”]

Ingredients

  • 8 ripe tomatoes (ripe)
  • 2 potatoes
  • 1 clove of garlic
  • 1 onion
  • red wine
  • salt
  • pepper
  • olive oil
  • basil
  • bacon
  • water
  • fresh milk

First you have to peel the tomatoes. An old trick if you don´t know it, put them in boiling water a few seconds, then in iced water another second. The skin goes out just by pulling. Once peeled, chop them into pieces. Peel the potatoes (not too large) and cut them into 4. Peel and chop the garlic and onion.

In a pan heat a little oil and saute the garlic and onion. Add the tomato and fry a little. Add the potatoes and water just to cover. We take a splash of wine and leave it on medium heat until the potatoes are cooked.

Once they are, liquefy it all. Add a little milk till you reach the point of creaminess you like, add salt and pepper and strain it into another container.

The bacon is the easiest. Put four slices on a plate, a paper towel underneath and above, microwave oven for 3 minutes, and pat them dry with paper so they are not greasy. I like them roast and lean. Cut a sprig of basil and chop with a scissor on top of the cream, put the bacon, add a slice of bread and you are ready![/tp]

P1070646

Categories
Easy essentials Fácil Imprescindibles

Por mis huevos, oeuf mollets

P1070638P1070641
[tp lang=”es” only=”y”]El huevo, los huevos, soy una fanática perdida y enamorada de los huevos. Me da igual lo que digan al respecto que si comer huevos es malo, que si una vez por semana como mucho… no estoy de acuerdo. Soy de las que creo que vale la pena gastarse el dinero en unos buenos huevos, de gallinas sanas y de preferencia que corran libres por los verdes prados. Los huevos de gallinas presas y enfermas son malos, los otros no. Así que como me encantan, también me encanta prepararlos y creo que son de las cosas más complicadas de aprender a hacer bien. Por simples que parezcan unos huevos bien hechos tienen mucha complicación. Y la diferencia se nota. Una simple tortilla, una vez que estudiamos como se hace realmente una omelette, cambia por completo! La vida no es la misma una vez que una se come una omelette bien hecha, lo prometo. Sigo peleando con el huevo poché y el frito perfecto tiene su aquel.[/tp]

[tp lang=”es” only=”y”]Los Franceses, esos seres que se dedicaron a crear muchas de las técnicas de cocina que usamos en el mundo mundial y a estudiarlas y registrarlas por supuesto, tienen mucho que decir acerca de los huevos y muchísimas técnicas especificas de como prepararlos (en el libro de técnicas culinarias de Escoffier hay más de 90 sí… 90 recetas de huevos y eso sin llegar a los omelettes!) Y técnica es la palabra por que son reglas inamovibles de como preparar un tipo de huevo u otro. Estrictos, sí pero los resultados lo valen.

Me he propuesto aprenderlas todas (esa es la idea a menos) de momento vamos con una de las sencillitas. Oeuf mollet, esto que significaría huevo mullido es un tipo de huevo cocido. Se diferencia de el huevo cocido por el tiempo de cocción y el estado líquido de la yema. Se cuecen con cáscara por lo que tampoco son huevos poché.

Simple. Un par de buenos huevos, mientras más frescos mejor, pero esto es difícil de saber con exactitud. Un cazo con agua, que rompa a hervir y sólo cuando este hirviendo meter los huevos enteros. 5 minutos por reloj! sacar, pasar por agua fría y pelar con mucho cuidado ya que son muy delicados y si se nos rompen fuera del plato la yema se saldrá entera y será un pequeño desastre.

Un pan y unas espinacas y para mi al menos, poco hay más rico que esto![/tp]

[tp not_in=”es”]The egg, eggs, I’m a fan of eggs. I don´t care what they say about them, that eating eggs is bad for you, that you should only have them once a week… I don´t agree. I am think it´s worth spending your money on good eggs from healthy chickens that run free preferably by green meadows. Eggs from hens that are stuck and sick are bad for you, I believe eggs from healthy hens aren´t. So as I love them, I also love to prepare them. I think are the hardest things to learn to do well. As simple as they seem, well made eggs have some complications. And the difference is noticeable. A simple omelette, once you learn how an omelette is actually made, it changes it completely! Life is not the same once you have an omelet well done, I promise. I keep fighting the perfect poached egg and the fried is still tricky.

The French, those beings who were devoted to create many of the cooking techniques we use in the global world and of course to study and record them, have a lot to say about eggs and many specific techniques to prepare them (in the book of culinary techniques of Escoffier there are more than 90 yes… 90 egg recipes and that´s without reaching the omelettes!) And it´s quite technical, there are immovable rules on how to prepare a type of egg or other. Strict, yes but the results are worth it.[/tp]

[tp not_in=”es”]I intend to learn them all (that’s the idea at least) for now we go with one of the easy ones. An oeuf mollet (this would mean fluffy egg) is a type of cooked egg. It differs from the cooked egg in the cooking time and the texture of it´s liquid yolk. You boil them in the shell so they are not poached eggs.

It´s simple if you follow the rules. A couple of good eggs, freshest is best (I know this is difficult to know exactly). Take a pot with water to a boil and only when it´s actually boiling put the whole eggs in. 5 minutes per clock! time it. Take them out through some cold water and peel them carefully as they are very delicate and if you break them off the plate the yolk will pour all over and you will have a small disaster.

A good bread and some spinach and at least for me, there is little richer than this![/tp]

Categories
Easy essentials Fácil Imprescindibles Italia Italy

Carbonara real deal: sin nata


P1070664P1070668Vamos con una receta clásica aunque usualmente mal entendida. La carbonara nace en Roma, es un plato de pasta, spaghetti usualmente pero podría hacerse con fettuccine o rigattoni. Se basa en una manera rápida de preparar la pasta al huevo y panceta y contrariamente a lo que se suele hacer, no, no lleva nata.

Lo de la nata en todos los platos italianos es un misterio que no pretendo resolver… pero efectivamente éste y muchos otros no la llevan. Vamos a ello, es muy fácil de hacer y muy rápida, en este caso yo he optado por bacon en lugar de panceta. Es perfecta para un día con poco tiempo, yo casi me he decidido por instaurarla como plato oficial de los viernes.


P1070667Ingredientes

  • 250grs. de spaghetti
  • 4 lonchas de bacon (o panceta)
  • 1 diente de ajo
  • 2 huevos
  • queso parmesano
  • sal
  • pimienta
  • aceite de oliva

Poner una olla grande con agua a fuego alto, en cuanto rompa a hervir añadir la pasta y preparar 1 minuto menos de lo que pone en la caja. En este caso la mía ponía 11min. Pues 10. Sacar a un colador, echar un chorro de agua fría y dejar a un lado. Ni sal, ni aceite ni nada.

En una sartén calentamos un chorrito de aceite de oliva (poquito) y sofreímos el ajo. Picamos el bacon o panceta en trozos pequeños. Retiramos el ajo de la olla y freímos el bacon hasta que se dore un poco. Lo reservamos.

En un bowl echamos los dos huevos, añadimos la sal, pimienta y queso parmesano y los batimos bien.

Ahora, en la cacerola grande con un poco de calor (fuego medio) volvemos a meter la pasta, dejamos que se caliente un poco ya que se nos habrá enfriado un pelin. Apagamos el fuego y añadimos la mezcla de los huevos y el bacon y revolvemos todo bien. El calor de la pasta cocerá el huevo. Pasamos a un plato y ponemos queso parmesano al gusto por encima. Listo, en 15 minutos lo tenemos hecho!


P1070675

Categories
Dulces Easy essentials Fácil Imprescindibles Peruvian Recipes Sweets

Pie de limón, el postre que conquista.

P1060658P1070594
[tp lang=”es” only=”y”]Ésta fue la primera entrada de me kitchen. El primer post y el postre que me hizo pensar en que tenía que compartir esta receta con  los demás. El pie de limón es un postre clásico de la cultura anglosajona dónde se le conoce como Lemon meringue pie y lleva dando vueltas desde mediados del siglo XIX. Los Peruanos, no me pregunten cómo ni cuando nos lo hemos robado olímpicamente  y ahora es un postre clásico de la repostería peruana casera. Claro que en Perú no lo hacemos con limones (los amarillos) sino con limas (nuestros limones) con lo que realmente hacemos Key lime pie… pero terminologías aparte, no conozco a nadie a quién este postre no le deje enamorado. Es fácil, es rápido y es absolutamente delicioso. Eso sí tiene doscientasmil calorías… pero no es para comer a diario  y con lo bueno que está, se las perdonamos.  He decidido reeditar la receta básicamente por que se merecía un post más bonito.[/tp]

[tp lang=”es” only=”y”]Los ingleses tienen otra forma de hacerlo, la clásica, que lleva otro proceso de masa y de relleno. Esta no es la receta original  es la receta peruana en concreto la de mi casa y  aviso, esto es adictivo!

Hay algunas variaciones con la primera receta, vamos a ello.[/tp]

[tp not_in=”es”]This was the first entry in me kitchen. The first post and the dessert that made me think that I had to share this recipe with others. The lemon meringue pie is a classic dessert of Anglo-Saxon culture and carries around since the mid-nineteenth century. Peruvians (don´t ask me how or when) have stolen it and now it´s a classic homemade dessert in peruvian homes. Of course, in Peru we don´t do it with lemons (the yellow ones) but with limes (our lemons) so what we actually do would be Key lime pie… but apart from all those details, I don´t know anyone who does n´t love this pie. It´s easy, it´s fast and it´s absolutely delicious. It does have (I guess) too many calories… but we don´t eat this every day and besides it´s so good, that they are forgiven. I’ve decided to republish the recipe basically because it deserved a nicer post than the first one.[/tp]

[tp not_in=”es”]The English have another way to it, the classical, it involves another process in the dough and the filling since it´s custard. So this is not the original recipe, this is the Peruvian recipe and particularly my family´s recipe and take notice, this is addictive!

There are a few variations from the first recipe I published, so let’s do this.[/tp]

P1070595

[tp lang=”es” only=”y”] Ingredientes

  • Zumo de 4 limones 
  • 4 yemas
  • 6 claras
  • 1 lata leche condensada
  • 3/4 taza de azúcar blanca
  • 2 tazas de galletas maria trituradas
  • 1/2 taza de mantequilla

Masa
Triturar las galletas ( yo las meto en una bolsa  ziploc y les doy un poco con el martillo, así de rudimentario, pero podéis meterlas en una picadora por ejemplo o con la mano) colocar la galleta  triturada en un bowl y mezclar con la mantequilla hasta  formar una masa, he puesto 2 tazas de galleta por media de mantequilla pero las proporciones dependerán  del molde de pie que tengáis. Tiene que haber suficiente masa para cubrir el molde entero y la pared del mismo, pueden hacer un poco y si falta hacer más. Cubrir el molde y las paredes con una capa no muy gruesa pero que tape todo. Aplastando bien con los dedos para que se pegue.

Meter en el horno unos 10 minutos a 170ºC para que se seque. Lo sacamos y dejamos enfriar.

Relleno
Separar las claras de las yemas de 6 huevos. Echar en otro bowl 4 de las yemas, el zumo de 4 limones y la lata de leche condensada. Mezclar bien. tiene que quedar una crema uniforme. El huevo se cocerá con el zumo de limón.Es importante mezclarlo bien.

Merengue
Cogemos las claras de los 6 huevos y batimos a punto de nieve añadiendo  de a pocos el azúcar. Tienen que quedar bien batidas, para comprobar  sacar la batidora y deberían quedarse en la espátula de la misma sin caerse. Nunca he sido fan de las torres de merengue… prefiero el justo y necesario. Pero si queréis hacer esos merengues de catedral, usad más claras, unas 8 deberían bastar.

Montaje
Colocar el relleno en la masa estirarlo bien para que cubra todo y por encima poner el merengue. Esto se puede hacer de muchas maneras, podemos ponernos creativos y con una manga pastelera hacerle formas o (como aquí) con una espátula de silicona haciendo una montañita, también podemos darle textura con un tenedor y dejarlo con formas y texturas distintas. Eso ya depende de vosotros, yo suelo terminar en la versión más simplificada de montaña rústica.

Cuando esté todo montado, le espolvoreamos un poquito de azúcar por encima (mínima) y lo metemos al horno unos minutos para dorar el merengue. Con eso hemos acabado, lo único malo de este postre es que no os durará ni un día![/tp]

[tp not_in=”es”]
Ingredients

  • Juice of 4 lemons
  • 4 egg yolks
  • 6 egg whites
  • 1 can condensed milk
  • 3/4 cup white sugar
  • 2 cups of crushed vanilla cookies
  • 1/2 cup butter

Dough
Crush the biscuits (I stuff them in a ziploc bag and give them a little with the hammer, so rudimentary I know but you can put them in a blender or do it by hand). Place the crushed biscuits in a bowl and mix with butter to form a dough, I have put 2 cups of cookies for half a cup of butter but the proportions will depend on the pie shell that you may have. There must be enough dough to cover the entire cast and the wall. Thereof, you can do this measures and make some more if necessary. Cover the pan and the walls with the dough. Crushing with your fingers to make it stick.
Place it in the oven for 10 minutes at 338 º F to get it dry. Take it out and let cool.
Filling
Separate the whites from the yolks of 6 eggs. Pour into another bowl 4 yolks and the juice of 4 lemons, add the can of condensed milk. Mix well until you have a uniform cream. The egg will get cooked with the juice. It´s important to mix well though.
Meringue
Take the whites of the 6 eggs and beat until stiff adding the sugar little by little. They must be well beaten, to check remove the blender and the meringue should stay in the same spatula without falling. I’ve never been a fan of meringue towers… I prefer it in a smaller amount. But if you want to make these sort of cathedral meringue, Make sure you use at least 8 whites.
Mounting
Place the filling on the dough and stretch it to cover well. Above all put the merengue. This can be done in many ways. You can get creative and with a pastry bag make forms or (as here) with a silicone spatula making a mound, you can also give it texture with a fork and leave it with different shapes and textures. That depends on you, I usually end up in the most simplified version of a rustic mountain.
When everything is mounted, sprinkle a little sugar on top (Minimum) and put it in the oven a few minutes to brown the meringue. So we are finished, the only bad thing about this dessert is that it won´t last a day![/tp]
P1070600P1070593